
Introduction :
With this project, I wanted to work on a process that would be able to read, use, recompose and reassemble data. A process that is transcribing text into 3D shapes, in this case, vertical sculptures
An algorithm allowing to recompose abstract shapes from text and characters from the ASCII Table.
I would like to allow this algorithm to interpret data that make sense and to keep it while simplifying its reading path. The logo resulting from a text must keep the meaning conveyed by the initial text. It is thus a phenomenon of parametric encryption where the variables are data that we encounter every day, in the world around us.
I would like to create an automated approach which would allow, by giving the text, to obtain the result of the encryption. Able to go from a 2D pattern to a 3D structure, potentially printable, also multiplying the possibilities of shapes generated from the same data.
 Begin with ASCII Table :

There are 256 different characters in the official ASCII Table, leaving us a total of 512 characters in the extended ASCII Table.
On the other side we can list 511 possible combinations in a 3 per 3 Grid.

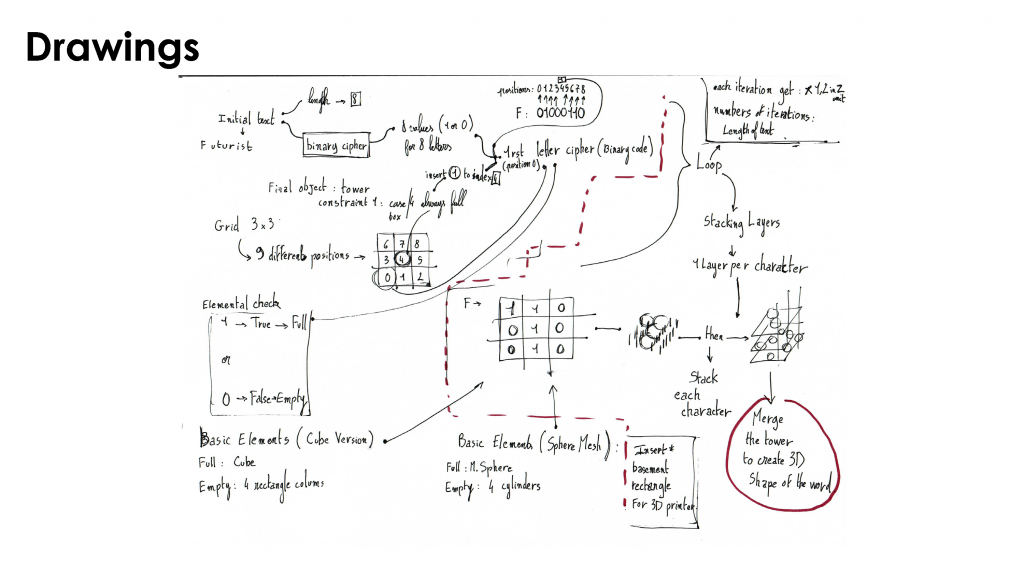
Step n°1 :
You can begin with creating a panel which display the text you want to transform.
The first step of the script is meant to encrypt these characters into their binary codes, listed in a data tree.
The binary converter is a stand alone component found in the following script.
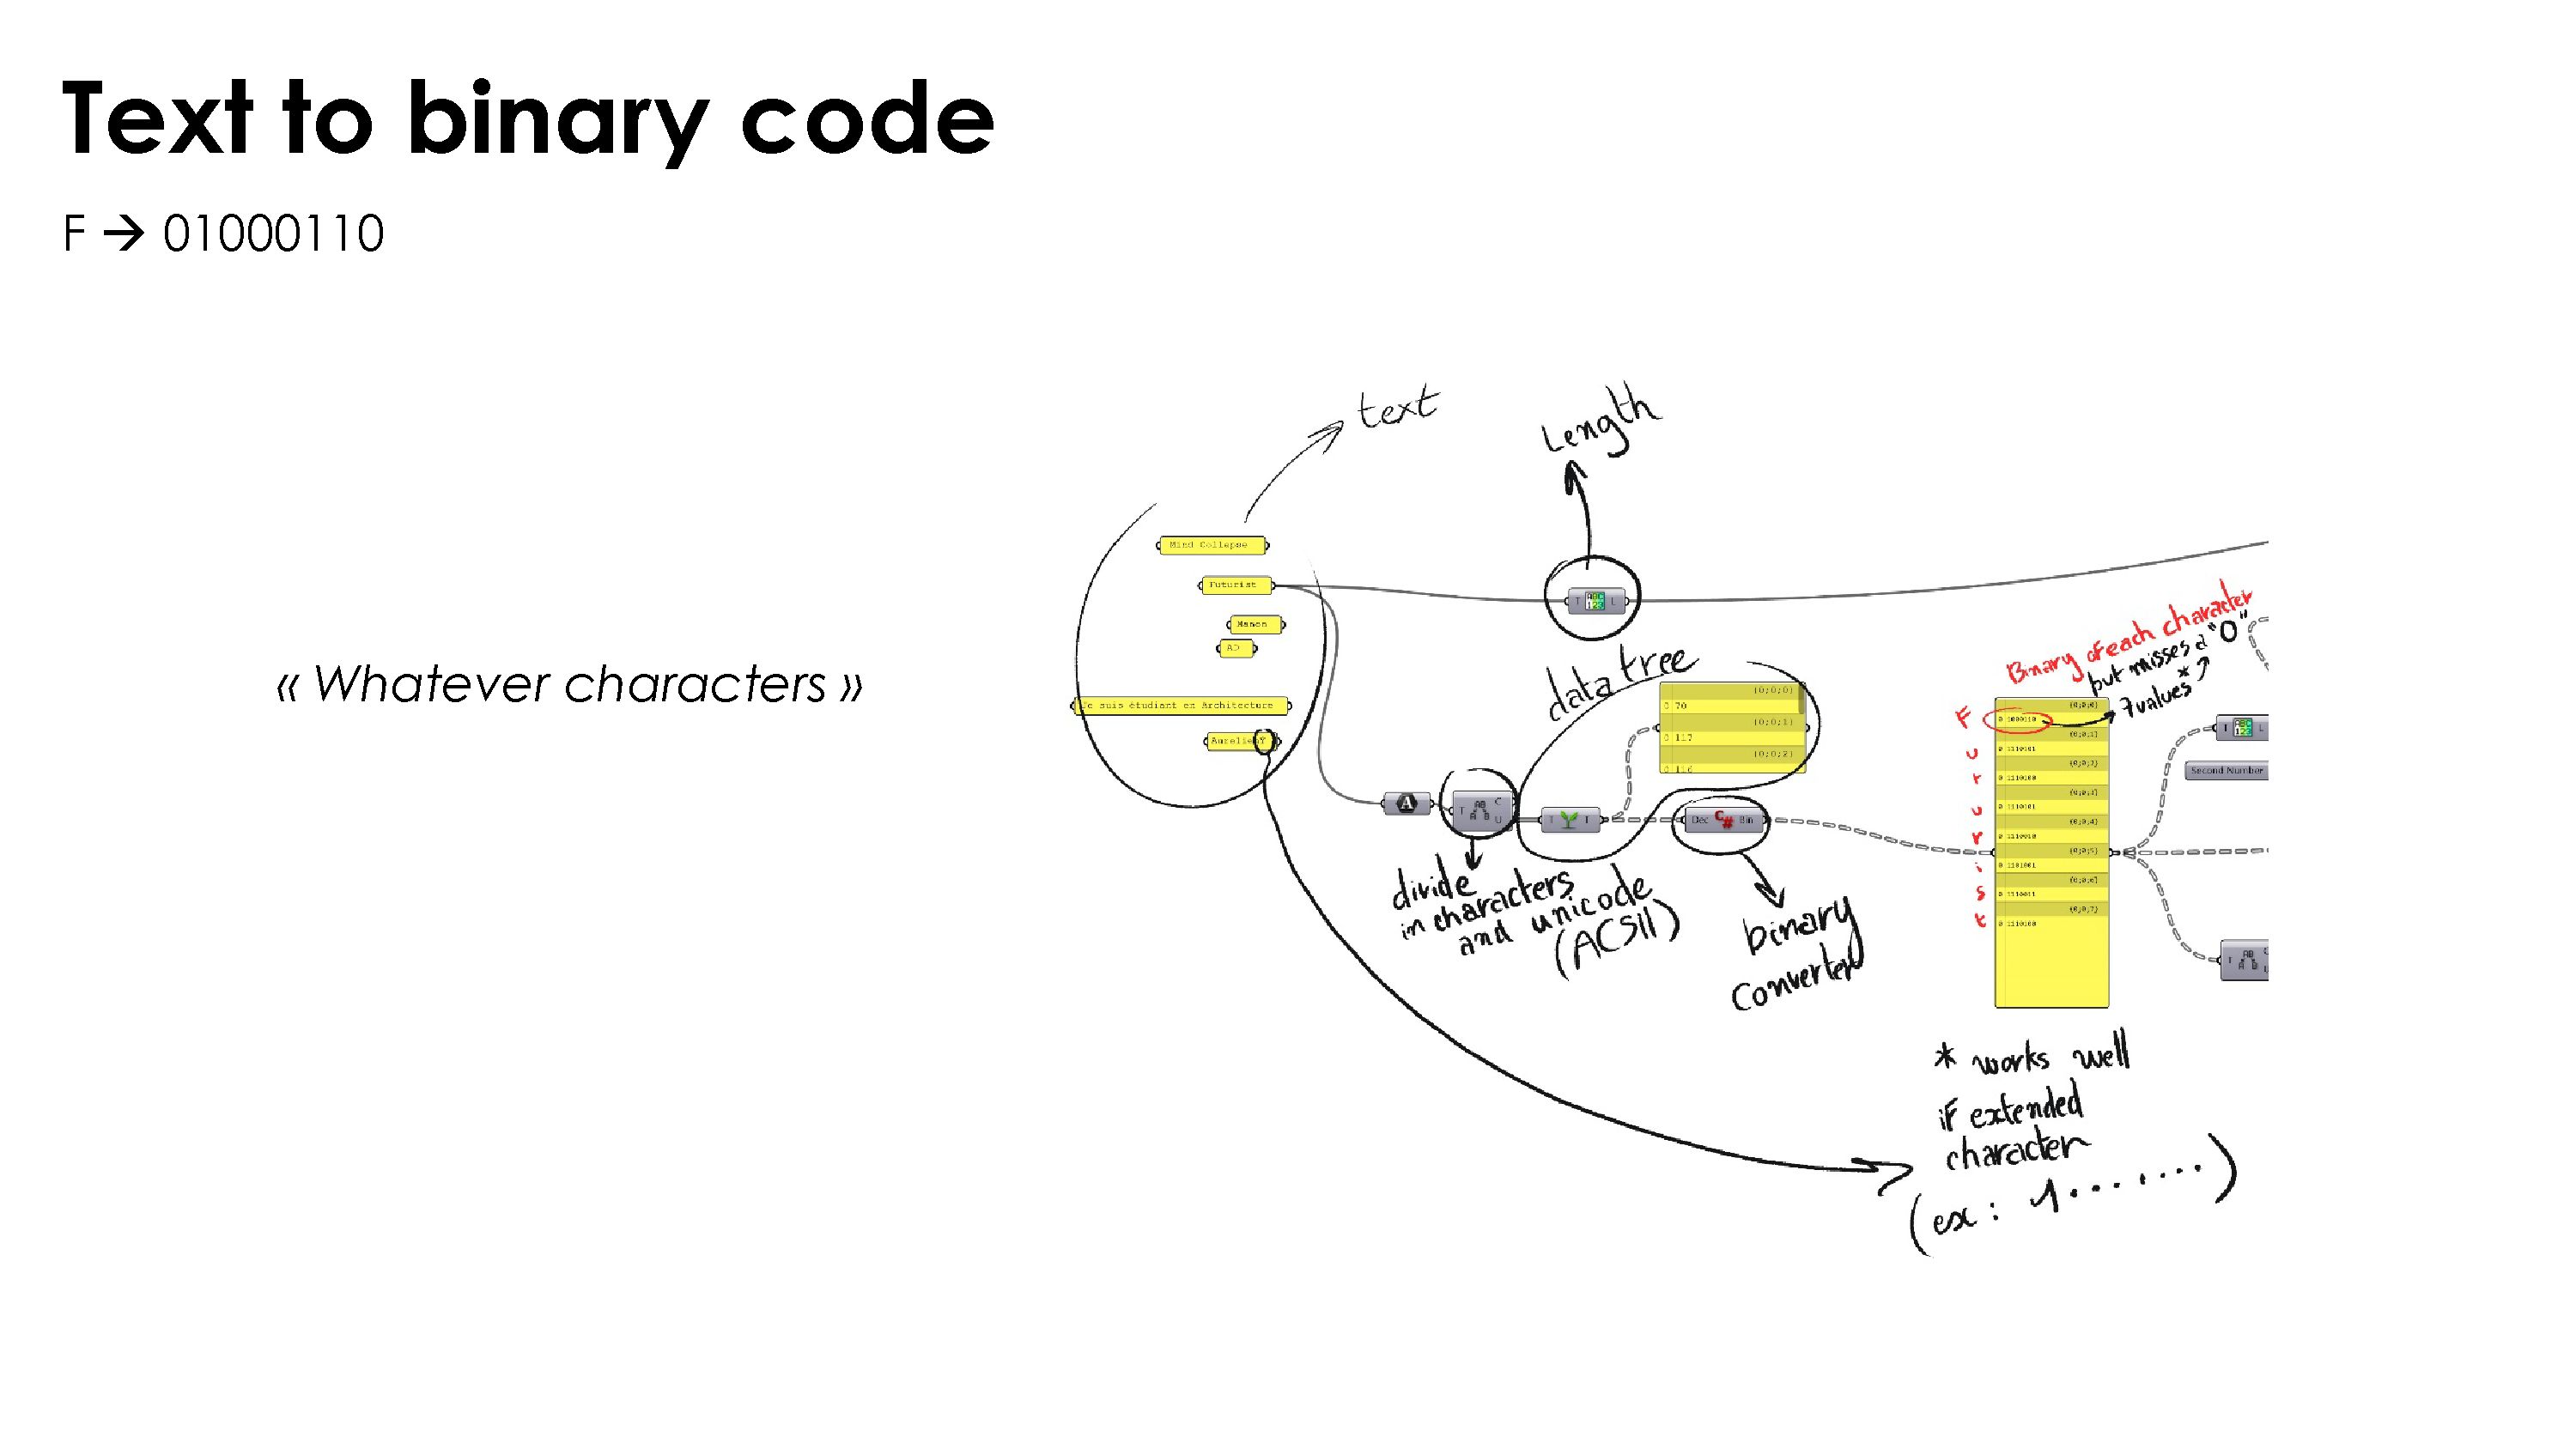
Step n°2 :
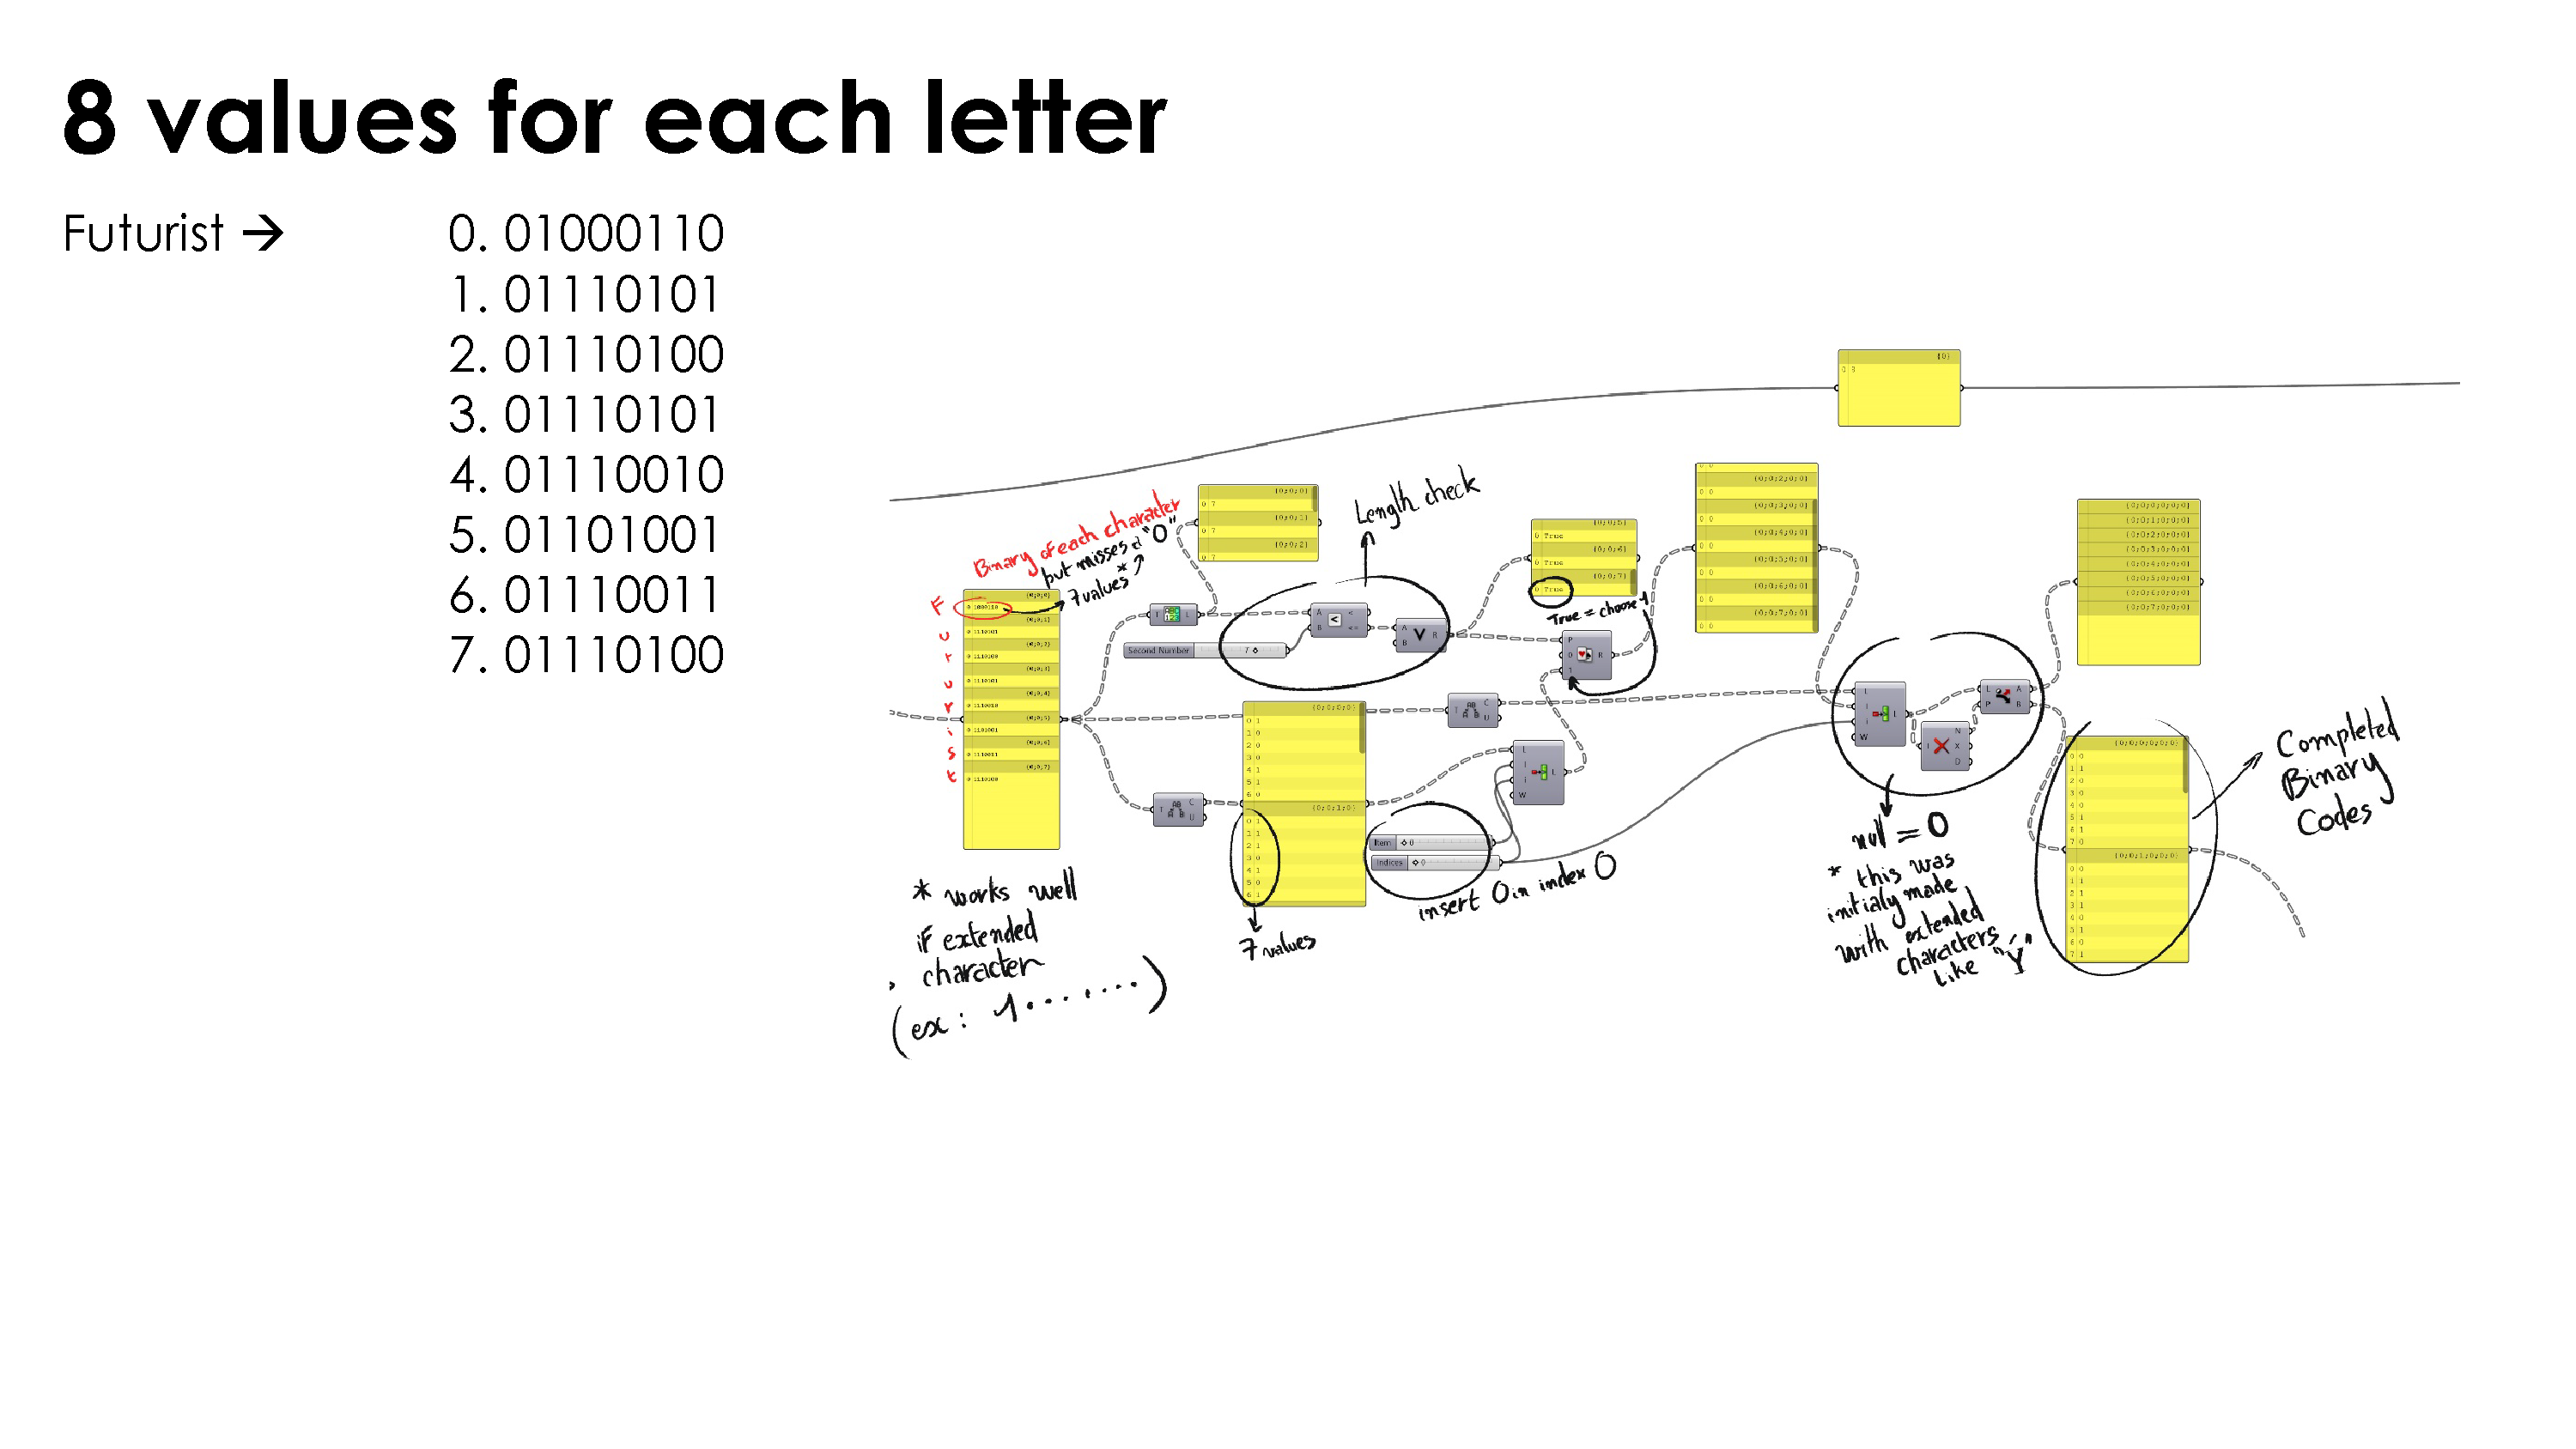
In my case the binary converter wasn’t working as I would expect because it wasn’t displaying 8 values for each characters (forgetting the first “0” which signify the character is the first part of the ASCII Table, characters with binary code looking like this 0*******). So i had to use length check on the data tree list and add a value when the length equals 7. This way I’m able to have 8 values for each letter which correspond to the binary code of each character.
Step n°3 :
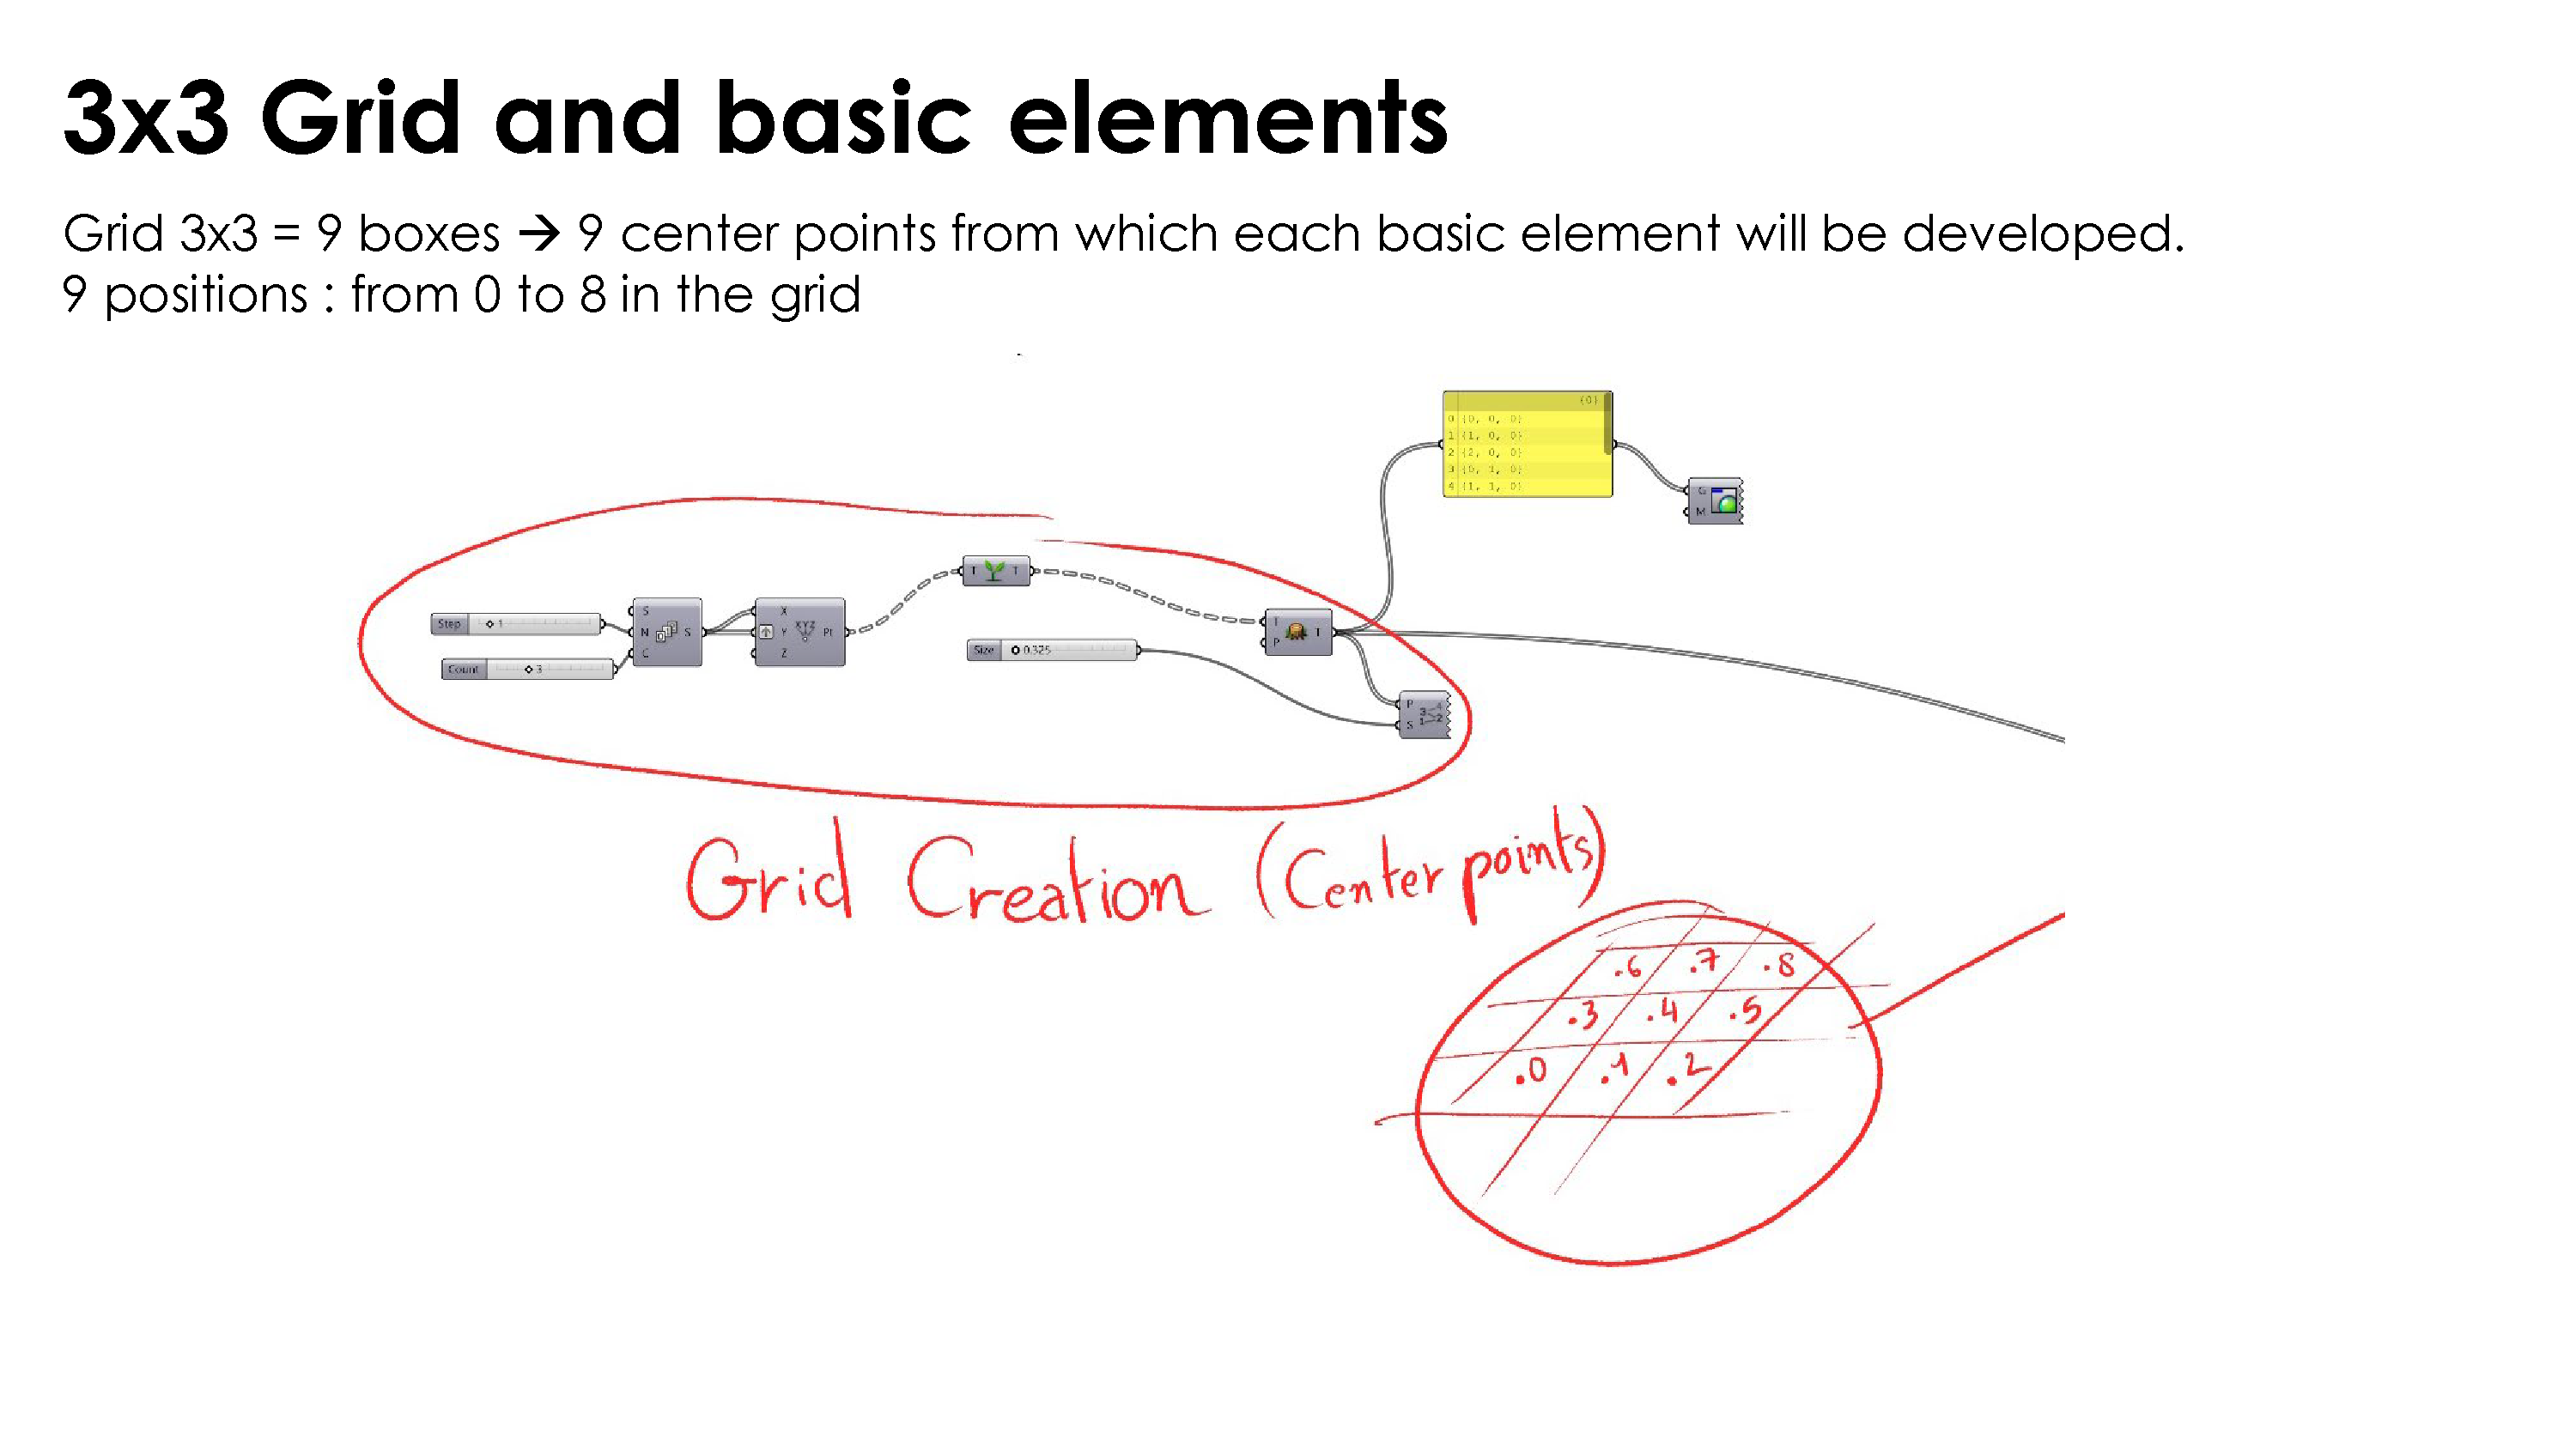
Alongside the binary code, we will be building a 3×3 grid consisting of 9 boxes and 9 center points.
Later on we will be using these center points to develop “Basic elements”
9 positions in the grid mean that we have the position 0, the position 1, […] and the position 8.
As we have 8 values for each character, we will have to add one more value for each part of the data tree to get 9 values for each one.
Step n°4 :
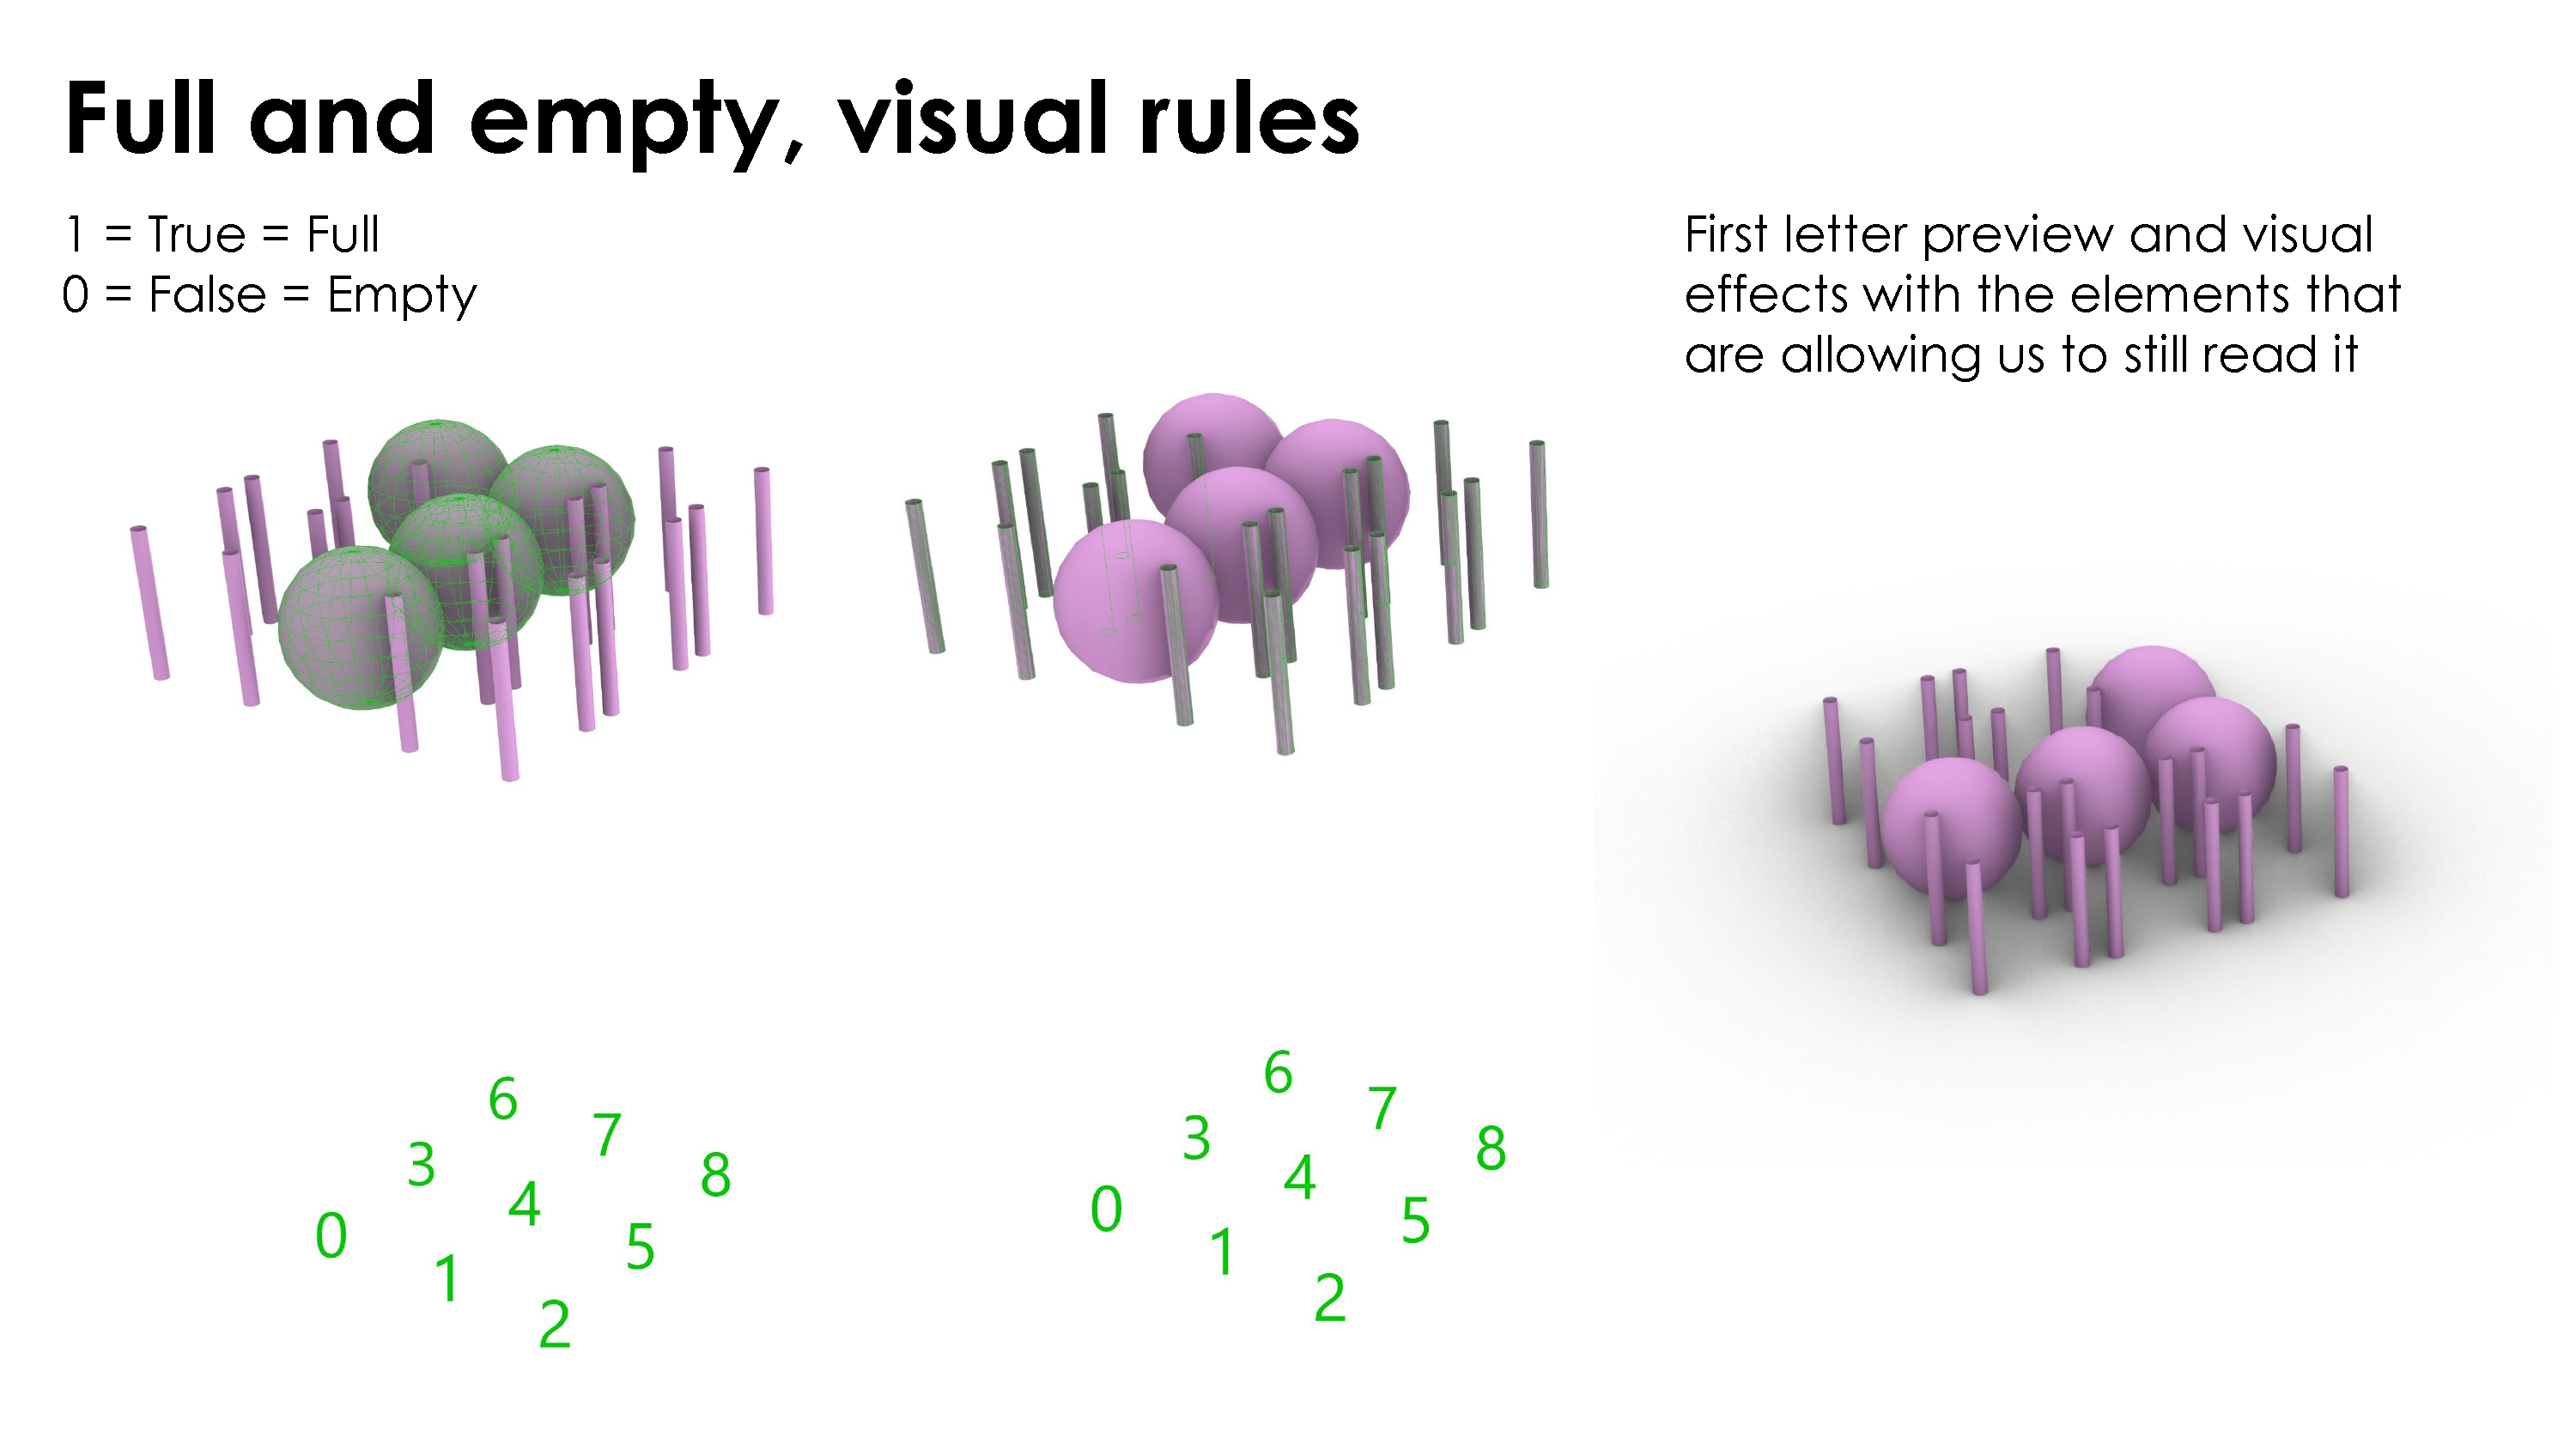
The “Basic elements” in this example are spheres and group of 4 cylinders, centered on the center points we have created with the grid.

The spheres are going to represent our “FULL” element whereas the group of 4 cylinders is going to represent our “EMPTY” element as it highlights an empty space between them.
In the binary code we are either getting “1” or “0” and in our process “1” is going to mean that our condition is “TRUE” and therefore it is “FULL”.
On the other hand, “0” is going to be “FALSE” and represented by the “EMPTY” element.
Step n°5 :
As I said earlier, we need to add a 9th value to each branch of the data tree.
Considering the fact that we are going to build a 3D vertical structure such as a tower, I wanted to make a core position of the tower. This core position is the 4th position in the grid which is the center position.
In the case of a tower the center structure point must be full as it is going to support each layer.
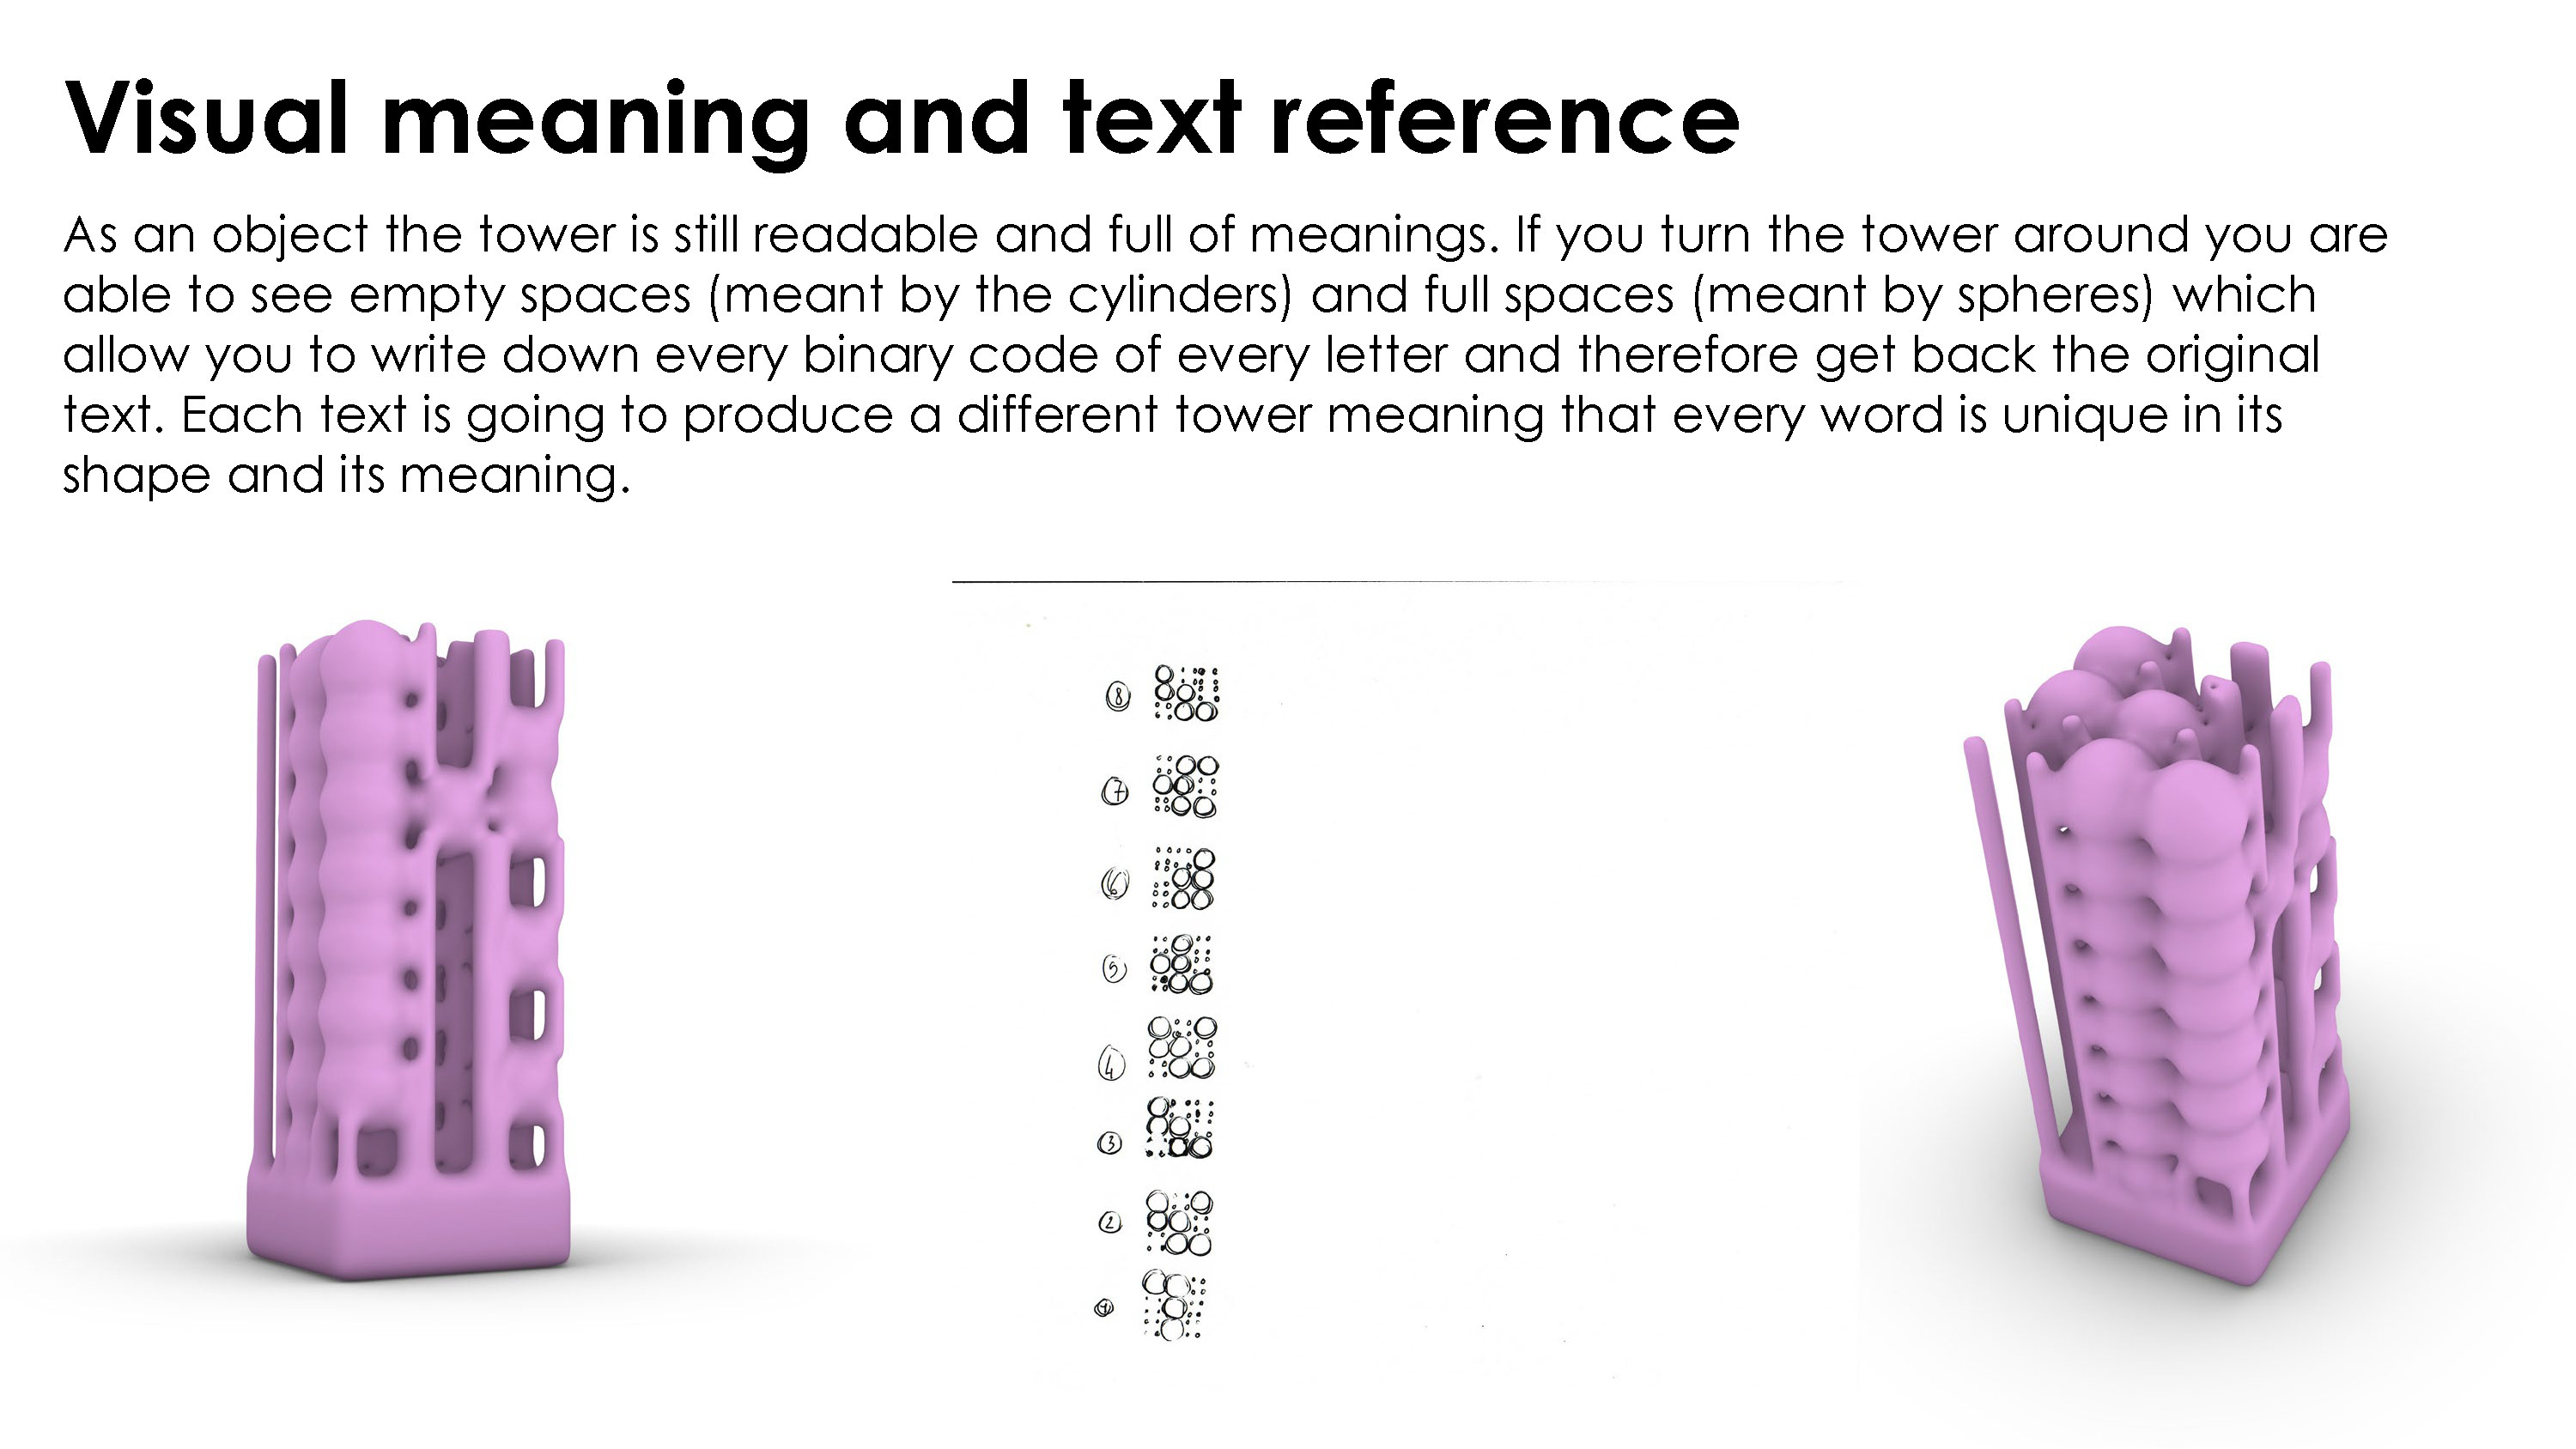
In our process, as we also want to still be able to read the text we previously add in, going around each external positions of each layer of the tower, we won’t be able to read if the center position is full or not.
Stating that, we are going to make the 4th position of every layer (4th character in each branch) always “FULL”. This step consist of adding/inserting a “1” in each branch at the fourth position. (Green circled part on the following image)

Step n°6 :
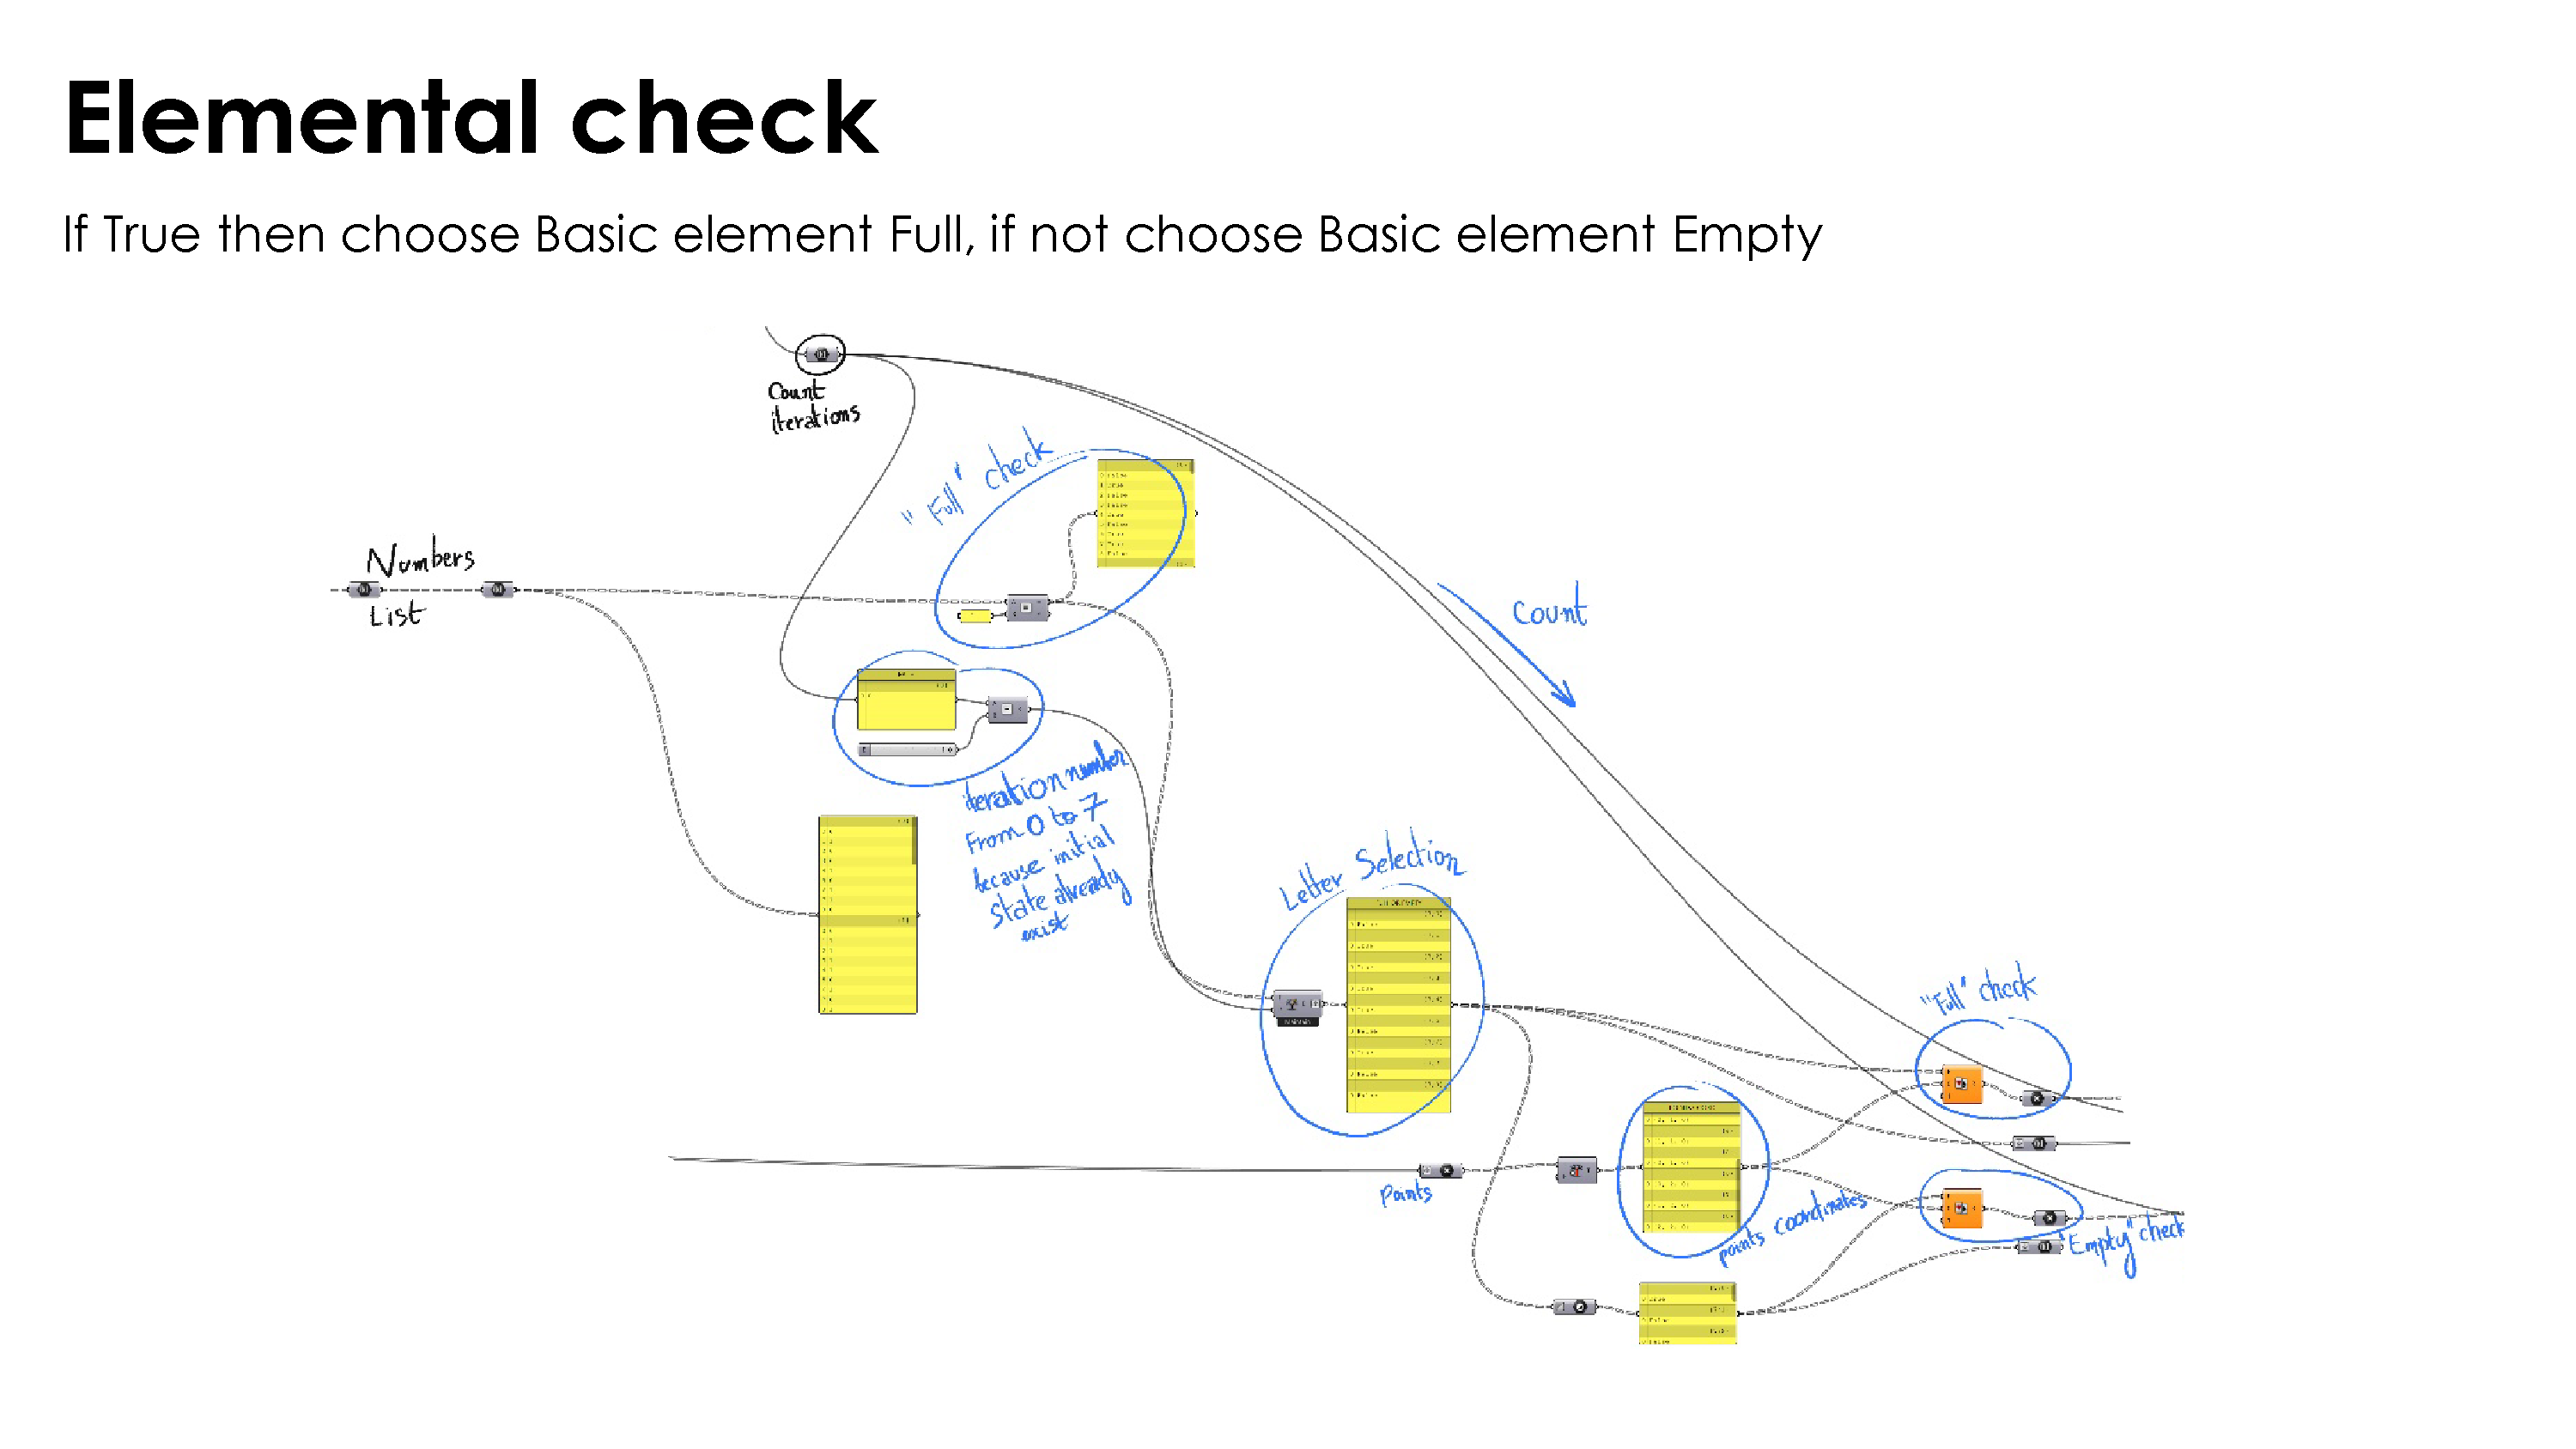
Now that we have our data tree completed, we can set up and elemental check.
The elemental check is going to analyse what’s “TRUE” depending on your settings. In our case, it will allow us to create 2 different list of points for each character, a group of points which are “TRUE” which are going to be filled by “FULL” elements and a group of points which are “FALSE” which are going to be filled by “EMPTY” elements. In this step you have to keep in mind that the first position and its center point is linked to the first value of each branch and so on.
As an example, the word “Futurist” is composed of 8 characters.
The first character is “F” and his binary code is “01000110” and after adding a 1 in the fourth position, we have “010010110”
For this character, the position “0” is FALSE, the position “1” is TRUE, the position “2” is FALSE, […] and the position “8” is FALSE.
The elemental check is going make two different list :
– the first one is going to have the following points (0;2;3;5;8) –> “FALSE” List
– the second one is going to have the following points (1;4;6;7) –> “TRUE” List
Step n°7 :
With both of these 2 group of points, we are going to create the basic elements centered on them (as we have shown them earlier), spheres and groups of 4 cylinders.
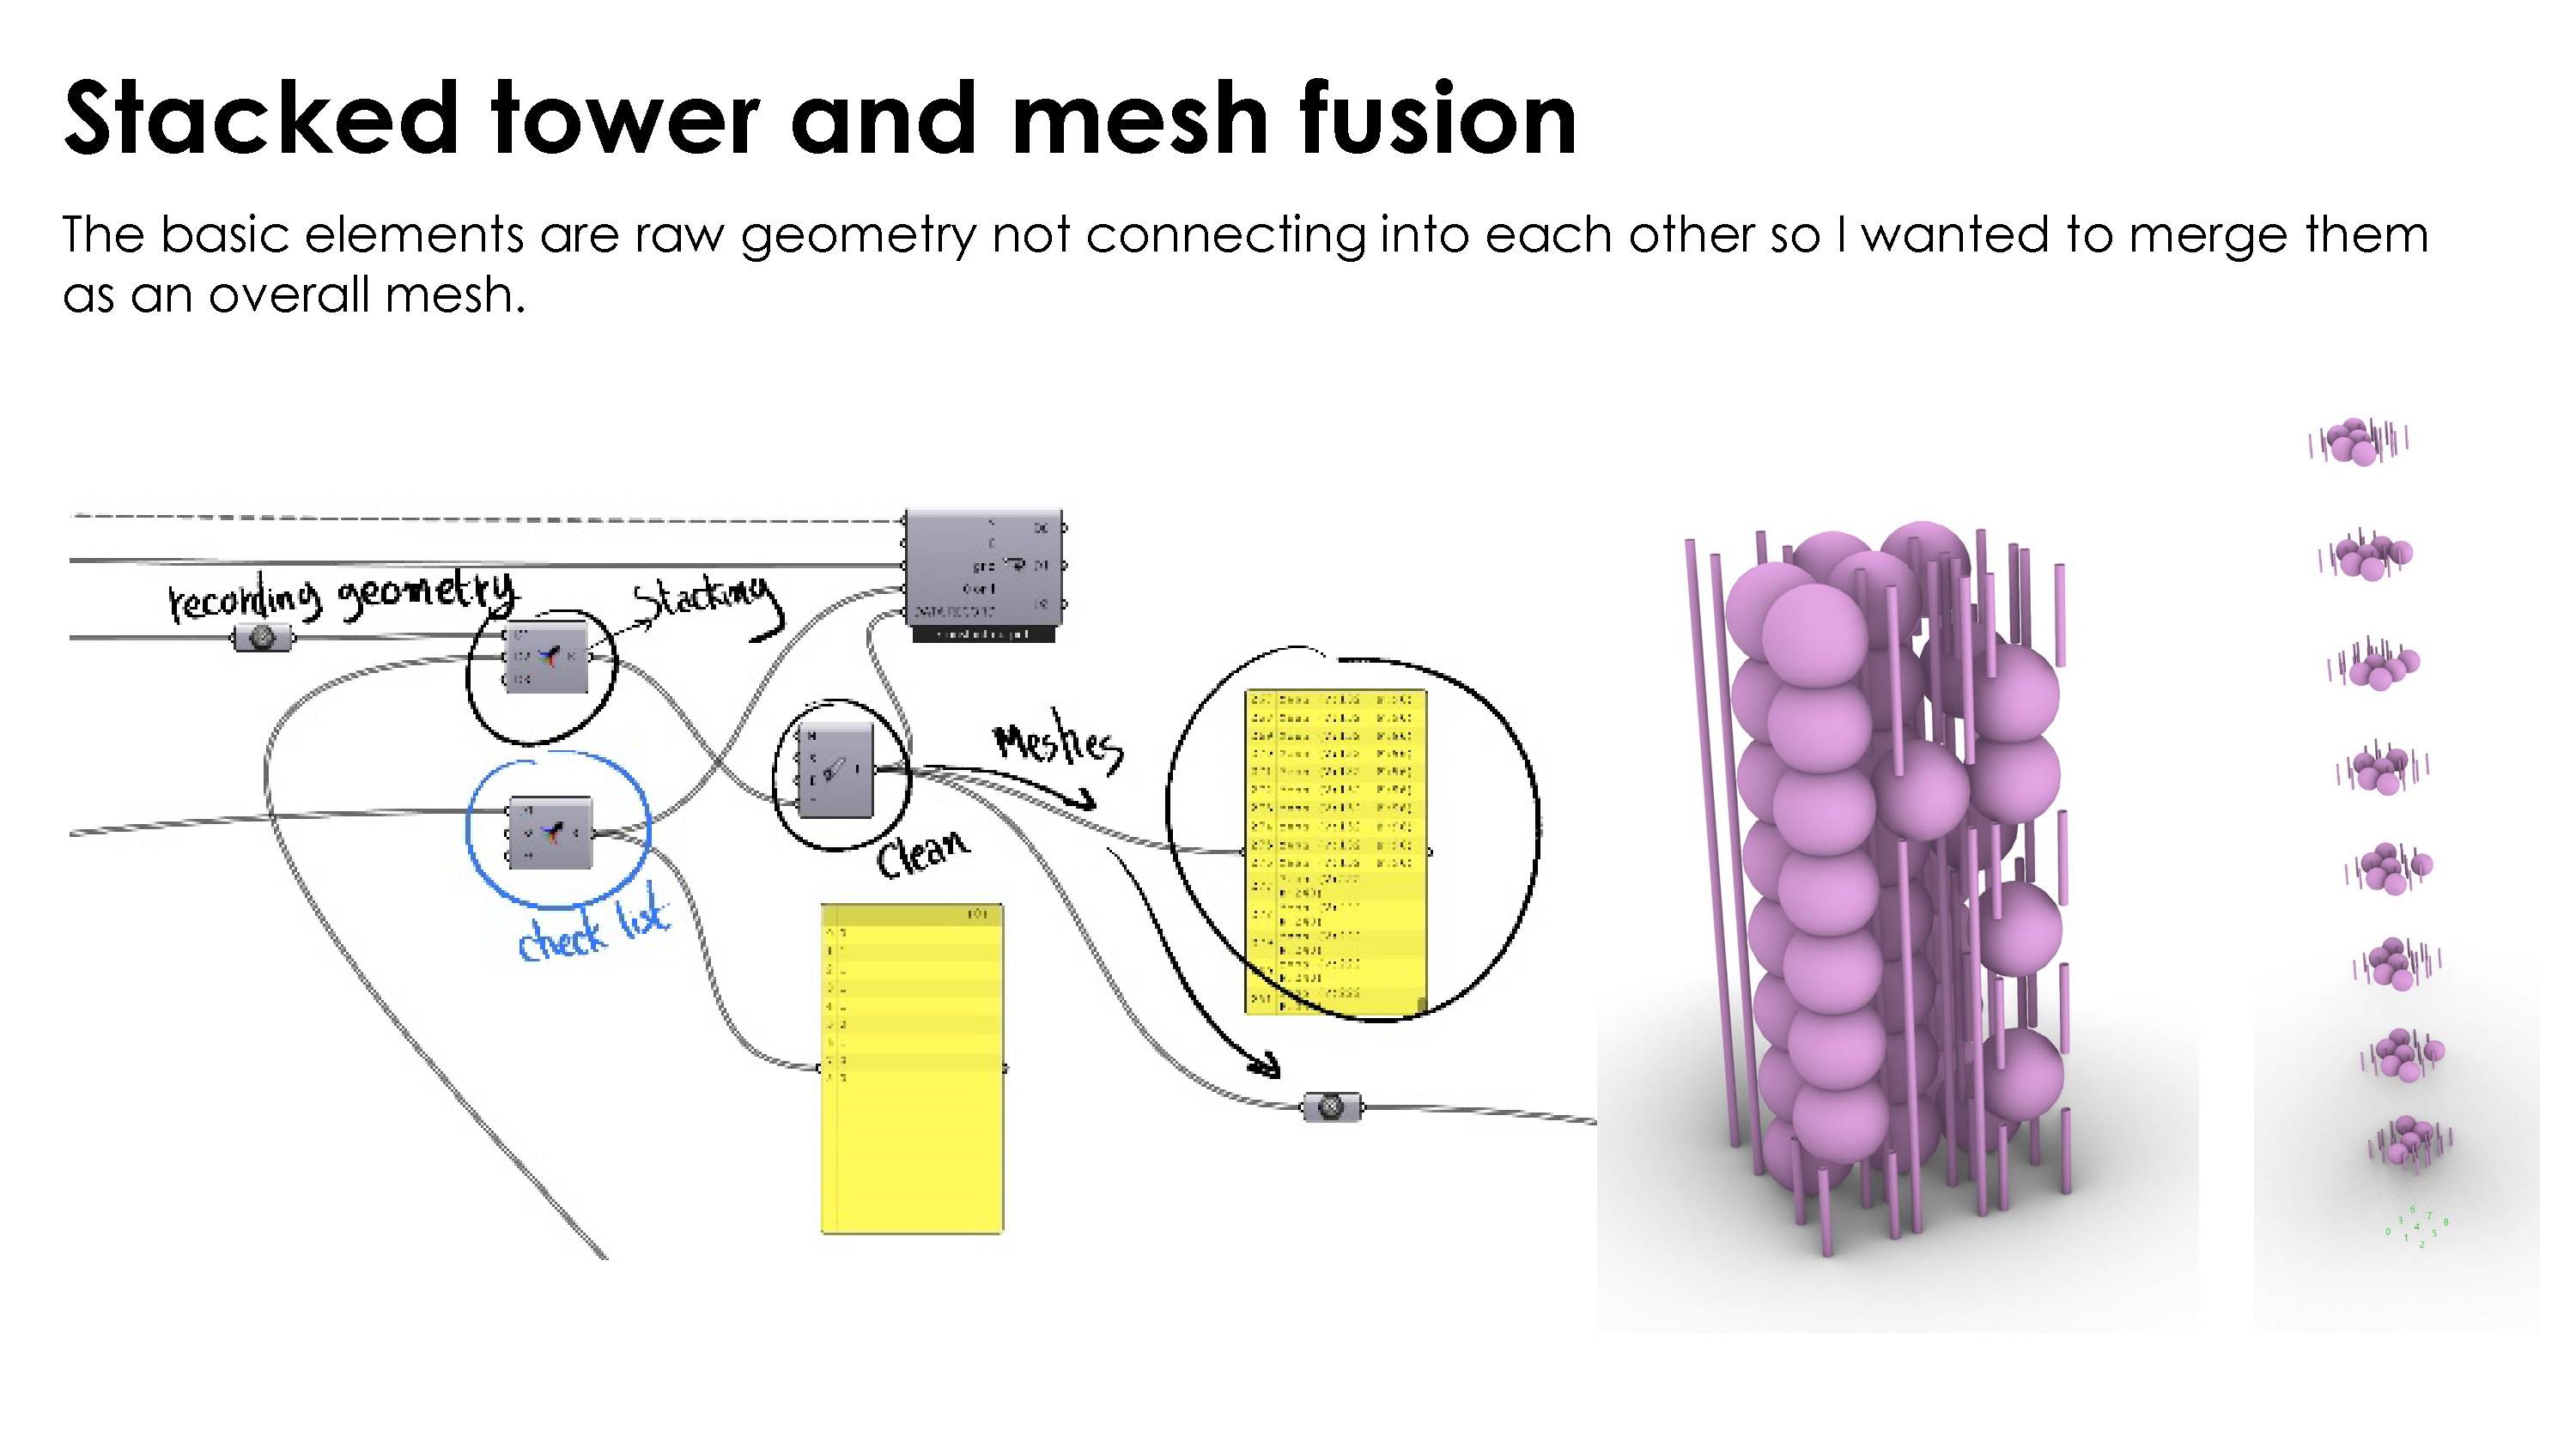
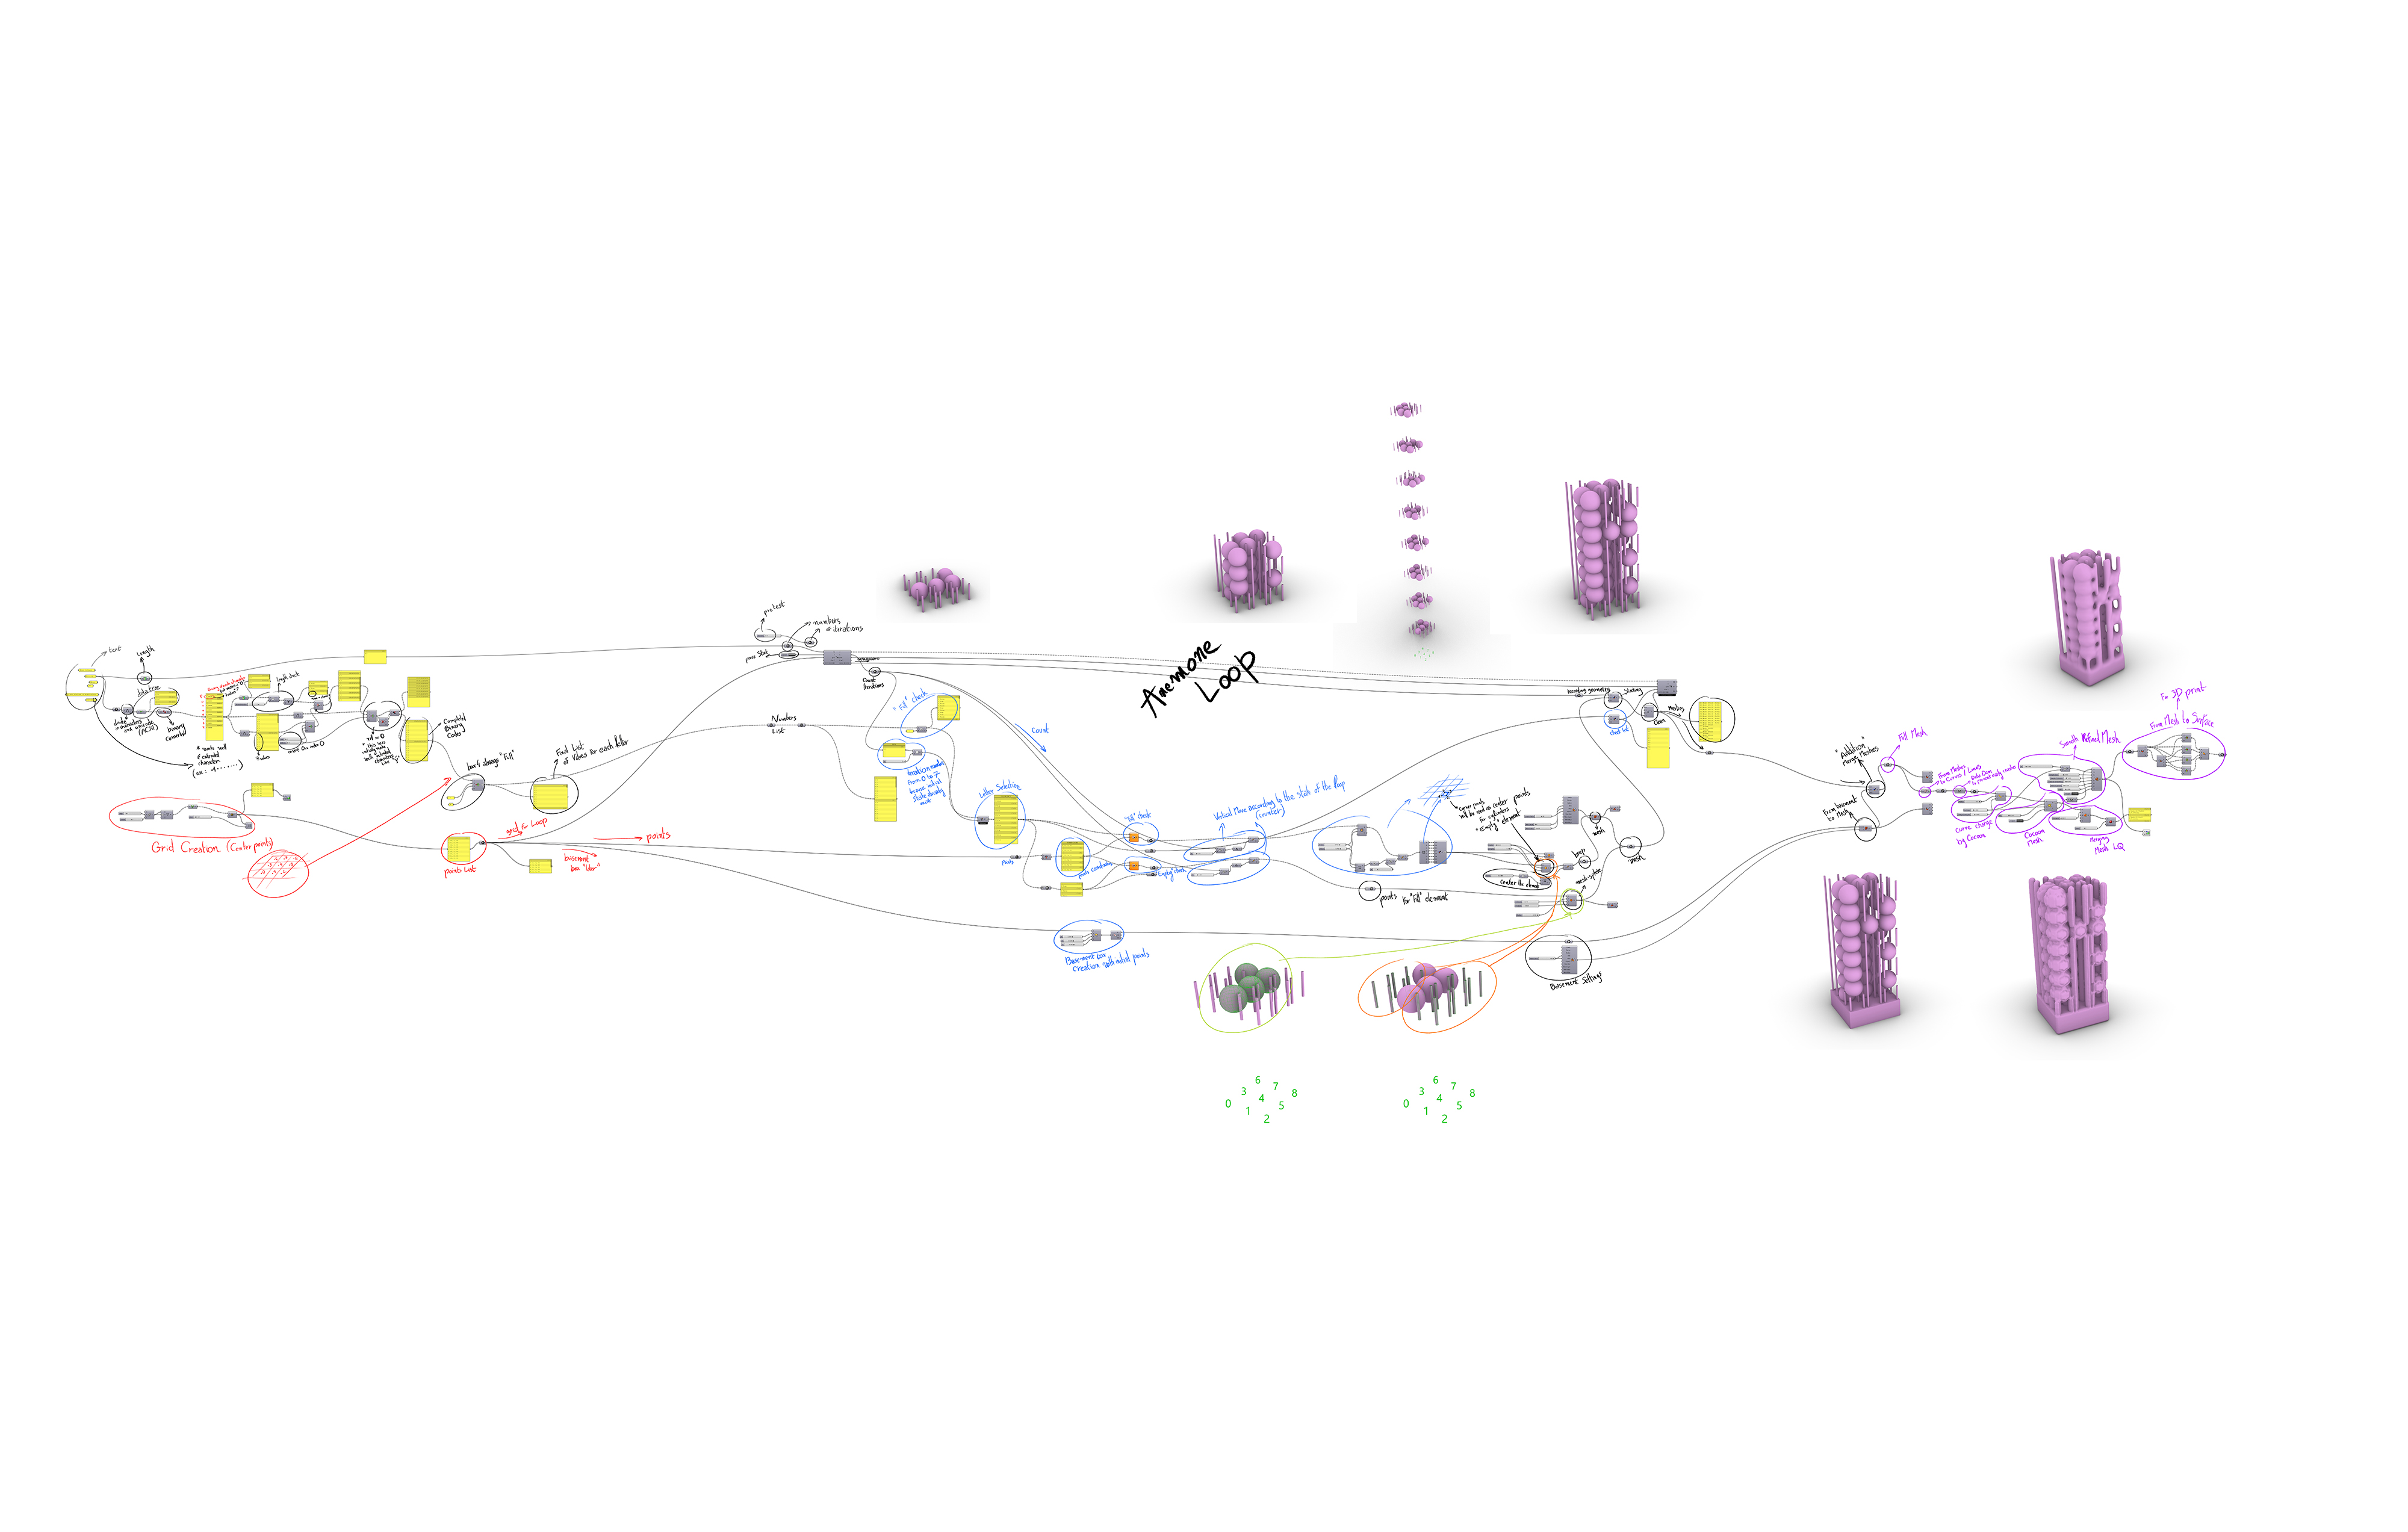
In this step we are able to create the first layer of the tower. While understanding that and with the plugin Anemone, we are going to create each layer with each character and stacking them up on top of each other.
The process is going to create the first character and then go up by 1 unit each iteration. This Z unit can be edited and in my example, I have chosen a Z unit which is a bit less than the diameter of my sphere so that my elements are colliding while stacking and create an overall shape which will later be transformed in a mesh.

The iteration count integrated in the Anemone Loop component is allowing us to see in which state we are currently into the loop and therefore the final number is giving us the number of iterations, in our case this number is the number of characters in our text.
Each layer is going to be merged at the end of the loop so we are able to have the 3D tower completed.

Step n°8 :
Although at this point the tower was still made of raw geometric elements, not really connecting into each other so in the last steps of my program I have worked on a way to combine and merge these geometric elements, but also smooth the overall mesh to create a real 3D object, which will later be 3D printable.
Step n°9 :
In this part I used another plugin called Cocoon, which allow me to smooth the overall mesh with different settings.
I created a first version mesh which could be considered as the low quality version, as it isn’t the smoothest solution. (see IMAGE (1))
And then I processed to go deeper with the Cocoon plugin to create an high quality version of the mesh, which is much more smooth. (see IMAGE(2))
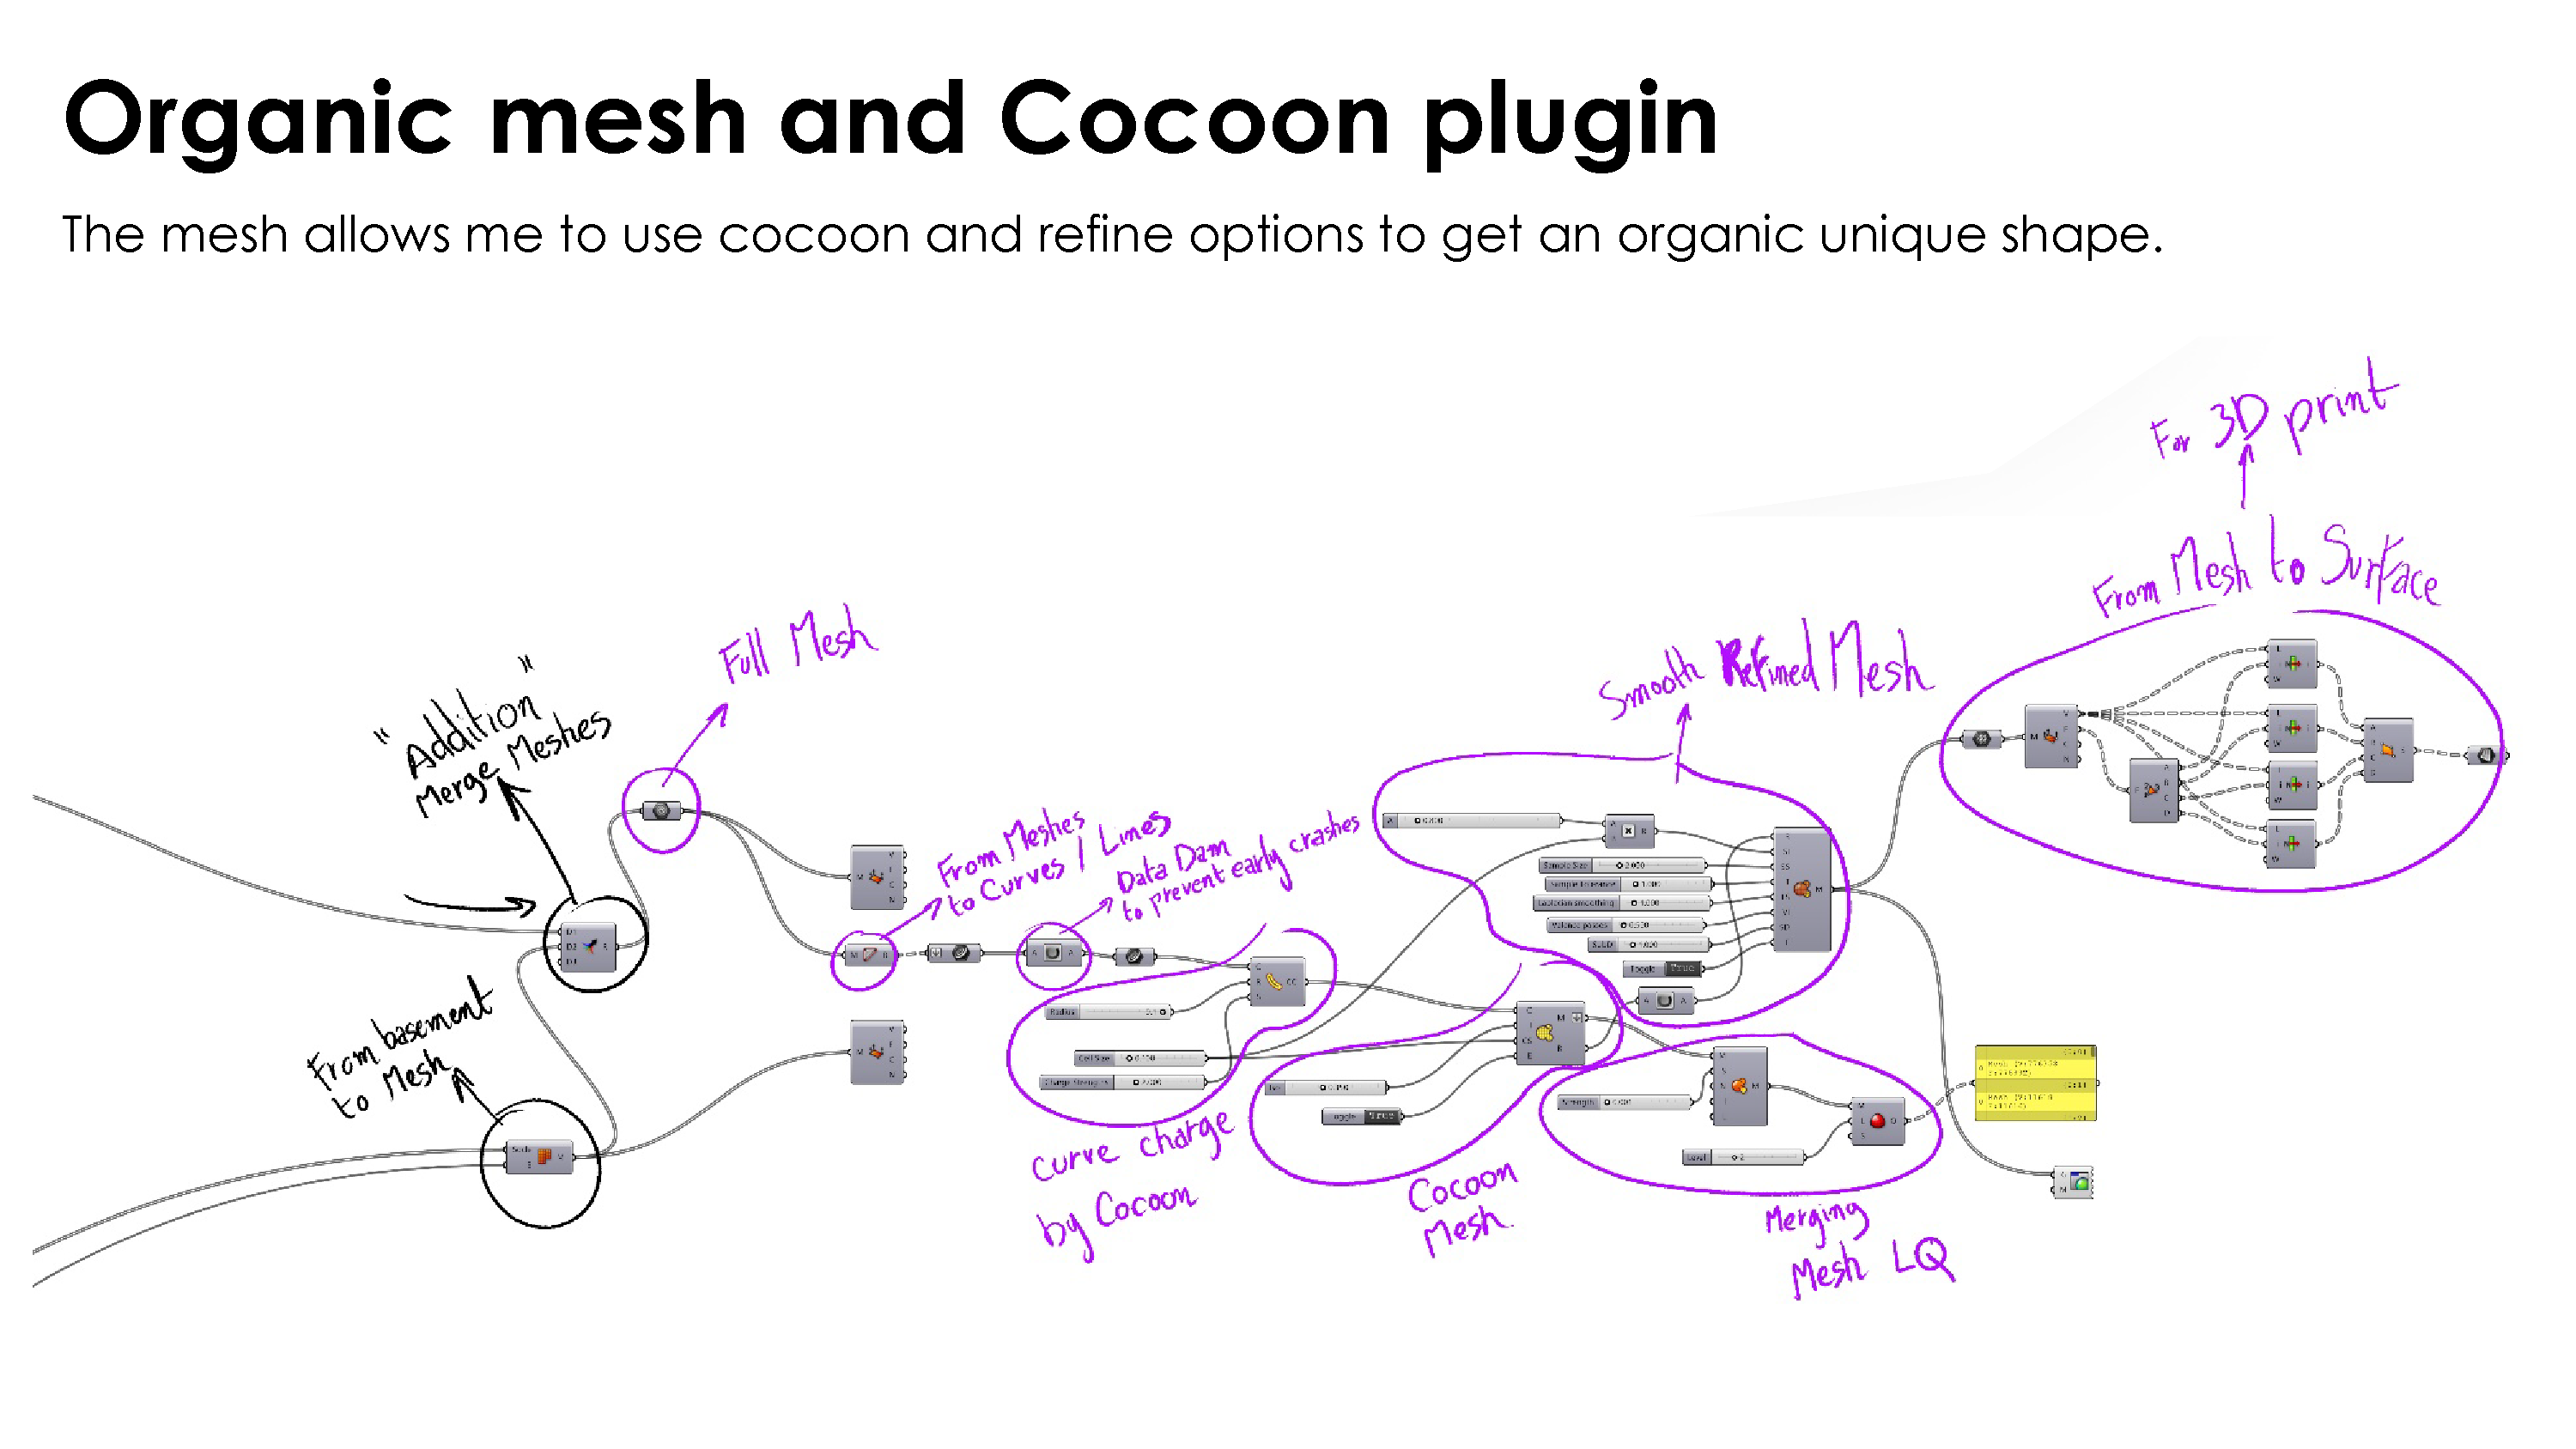
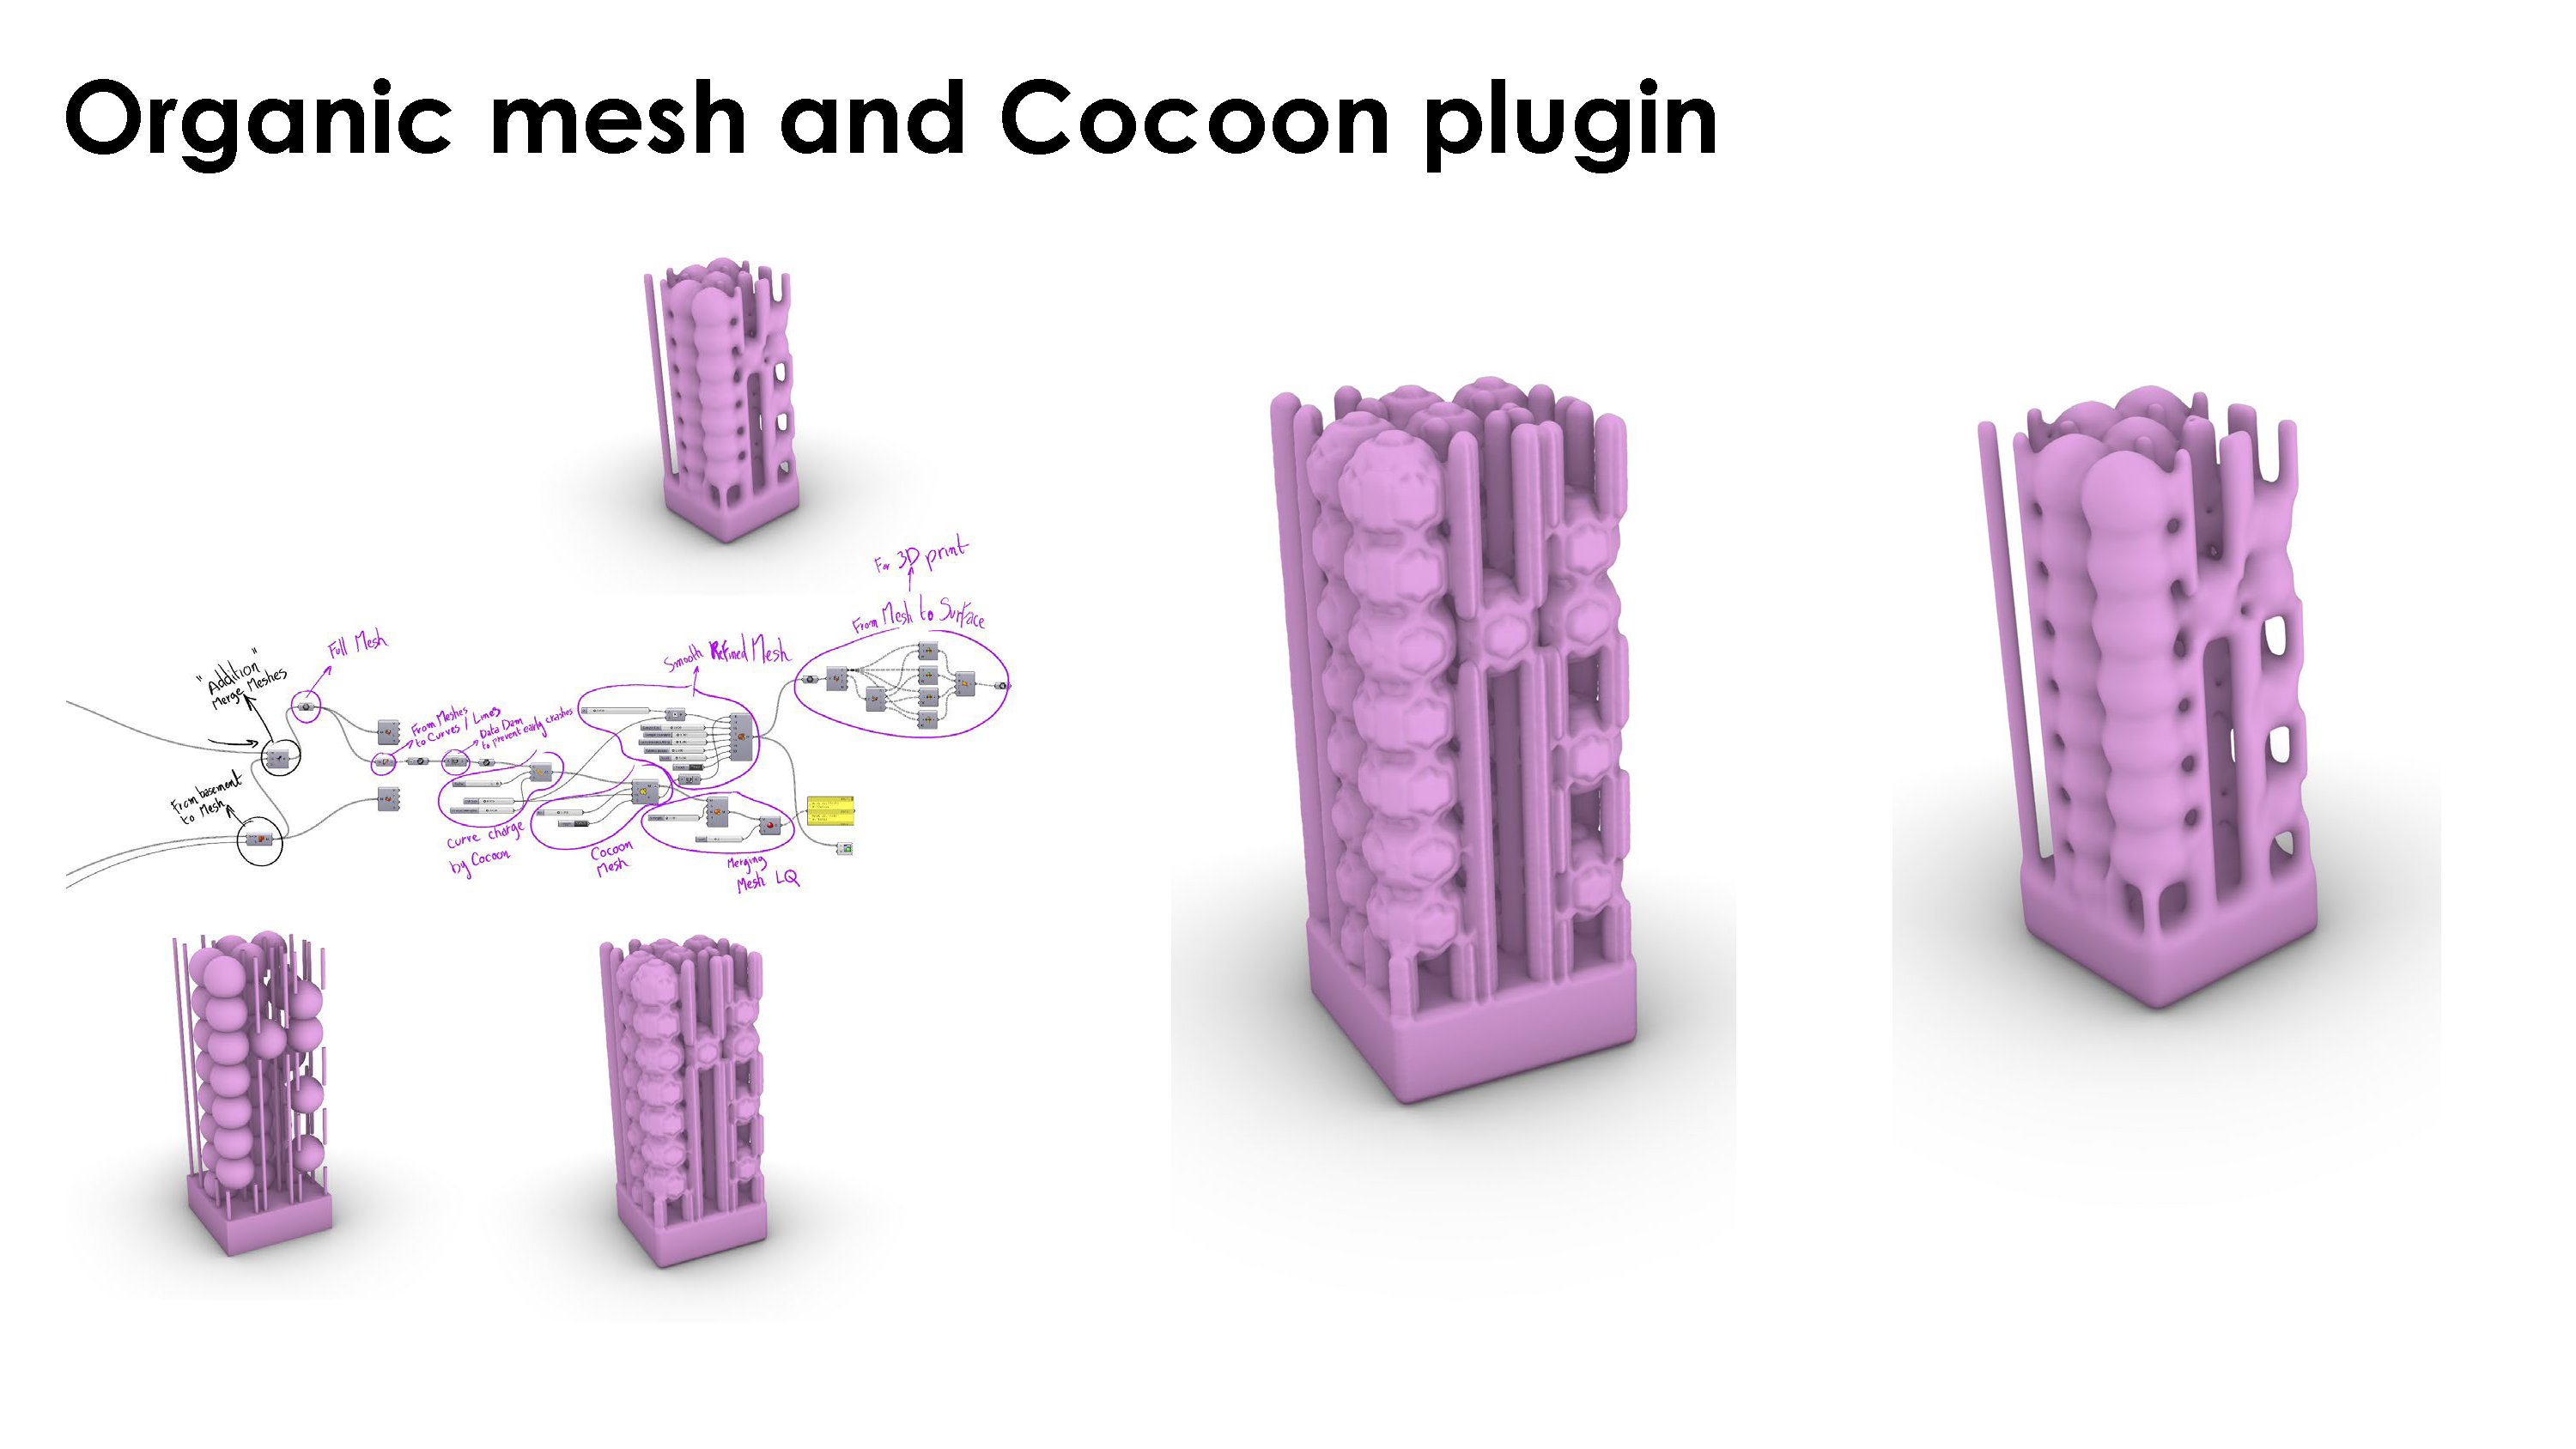
IMAGE (1)
IMAGE (2)

Comments :
The high quality version is taking a lot of time to be created so if you are looking for a fast render of the overall process, it is better to start with the low quality version. you can also simplify the “Basic elements” shown in the beginning as this process is working with every geometric element (centered on the points of the grid).
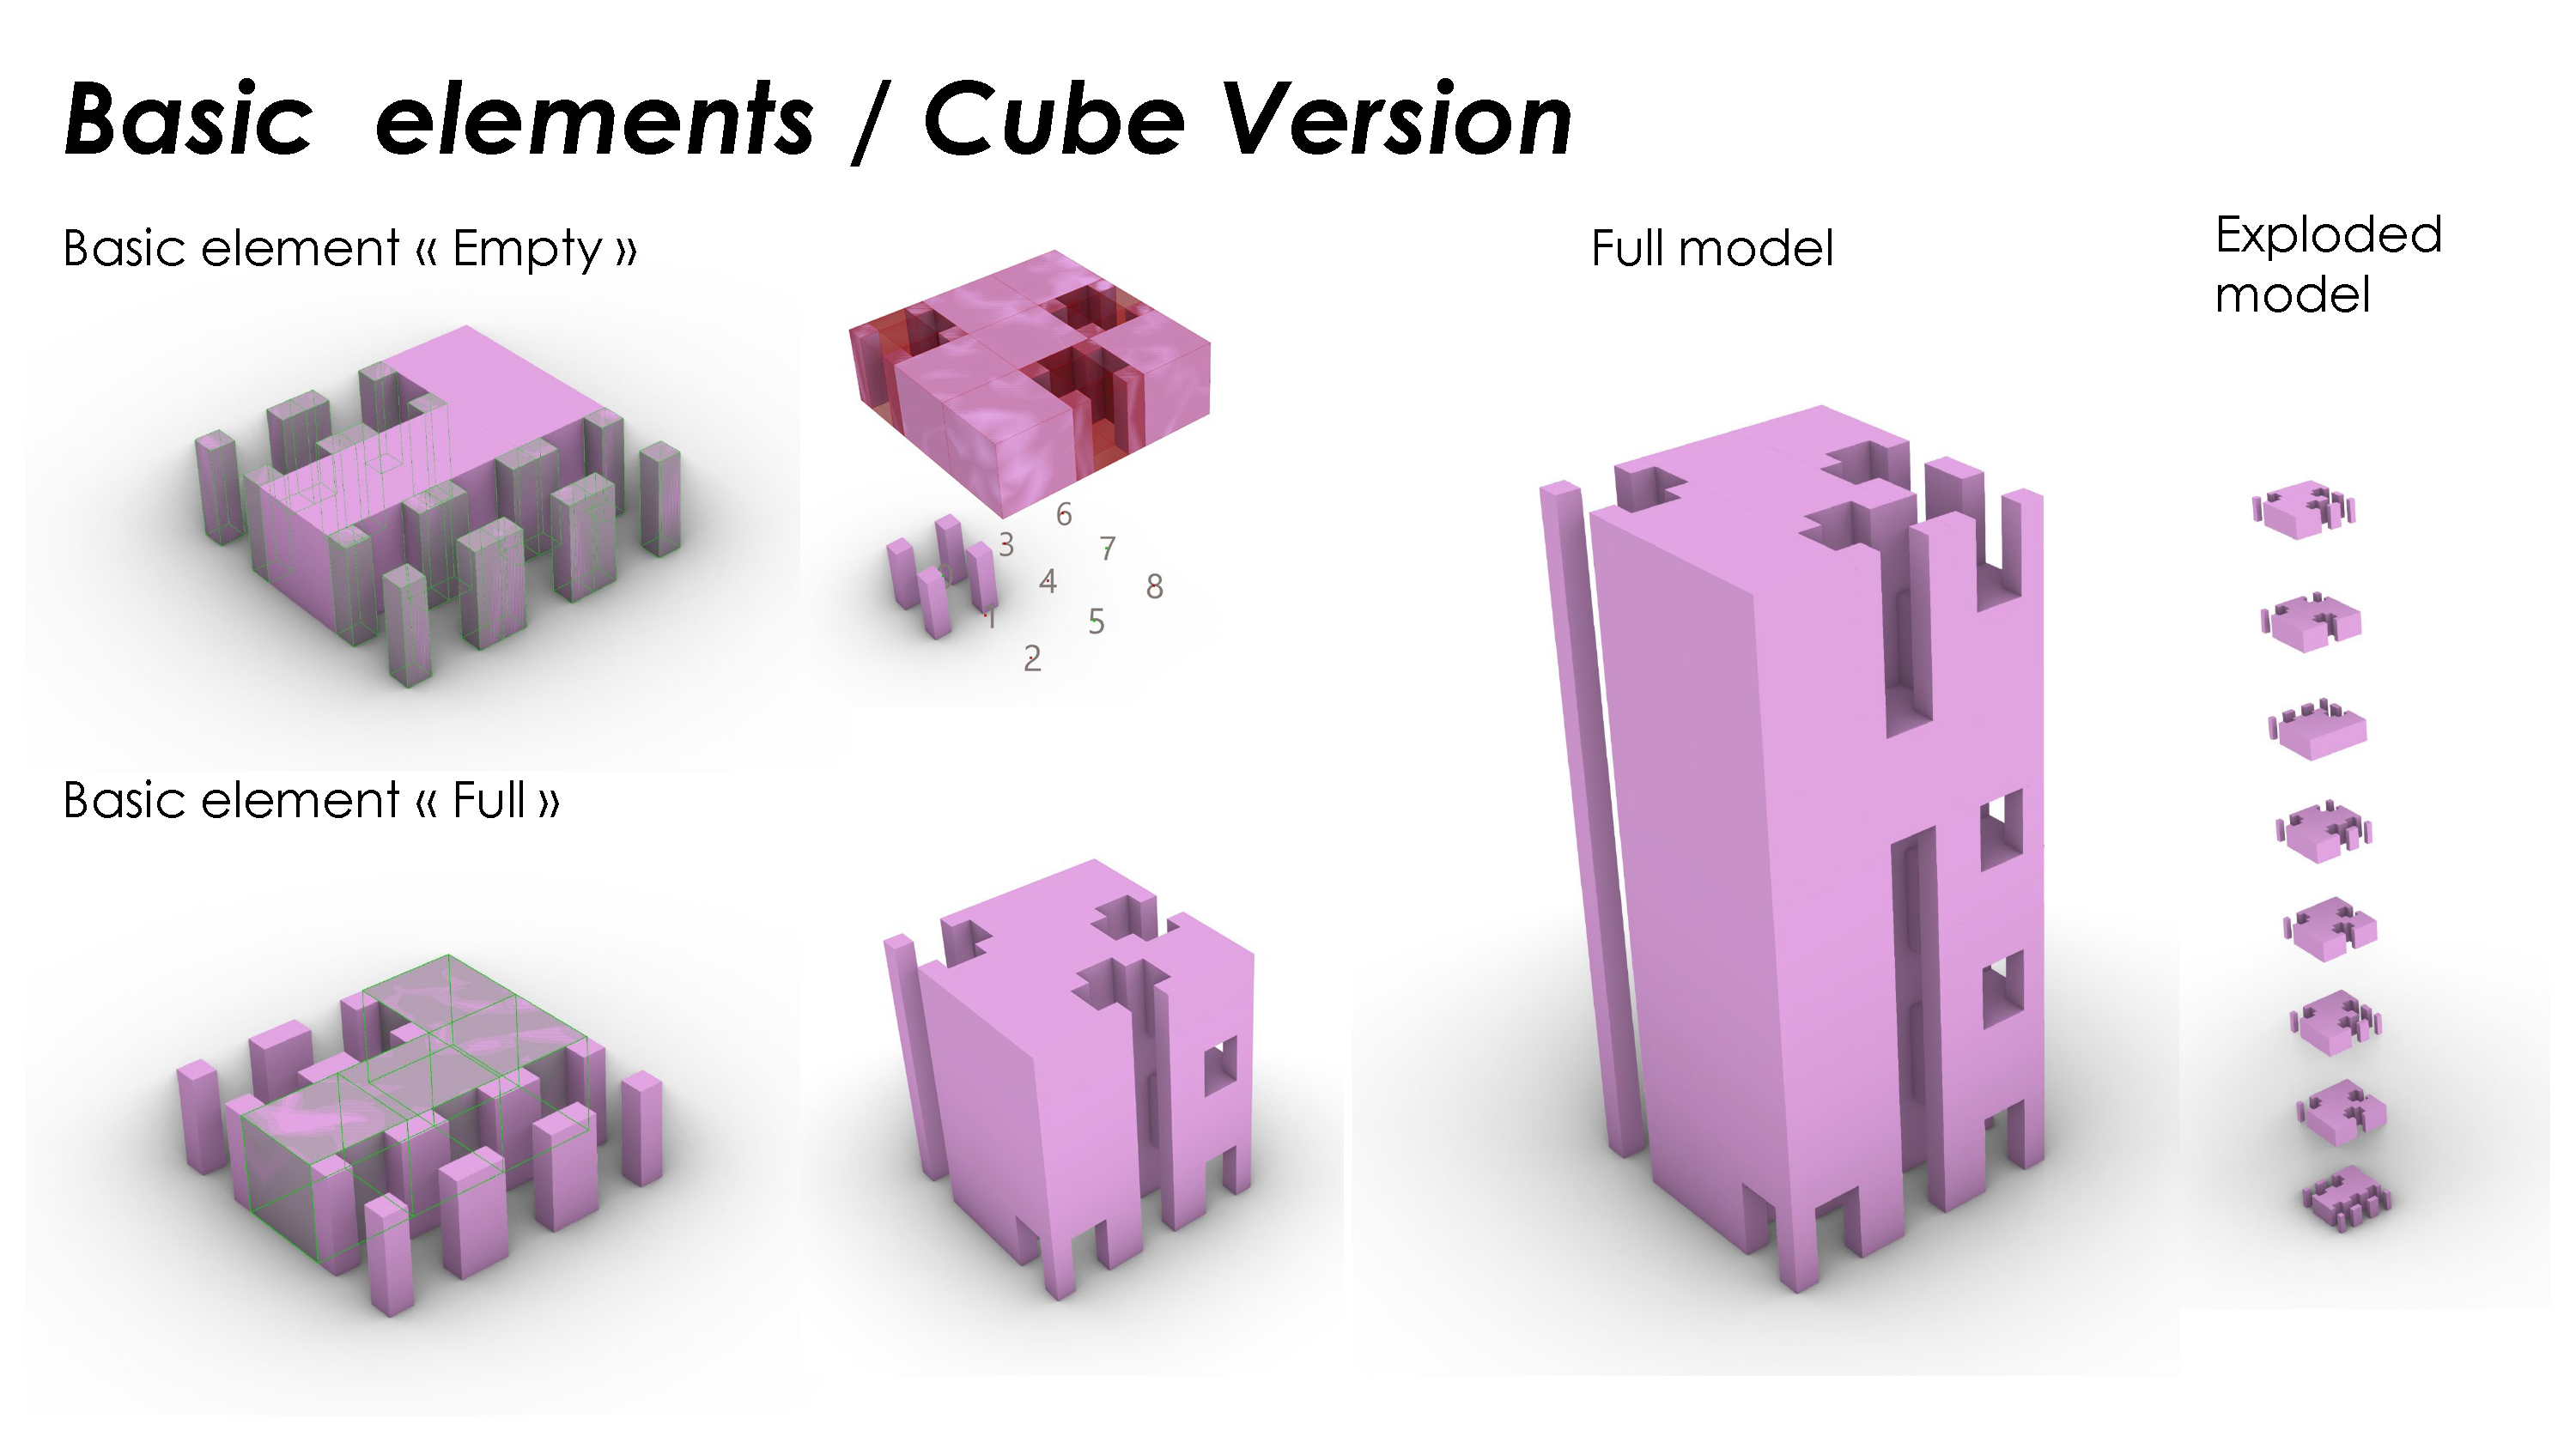
Alternative version / Simplifying the basic elements :
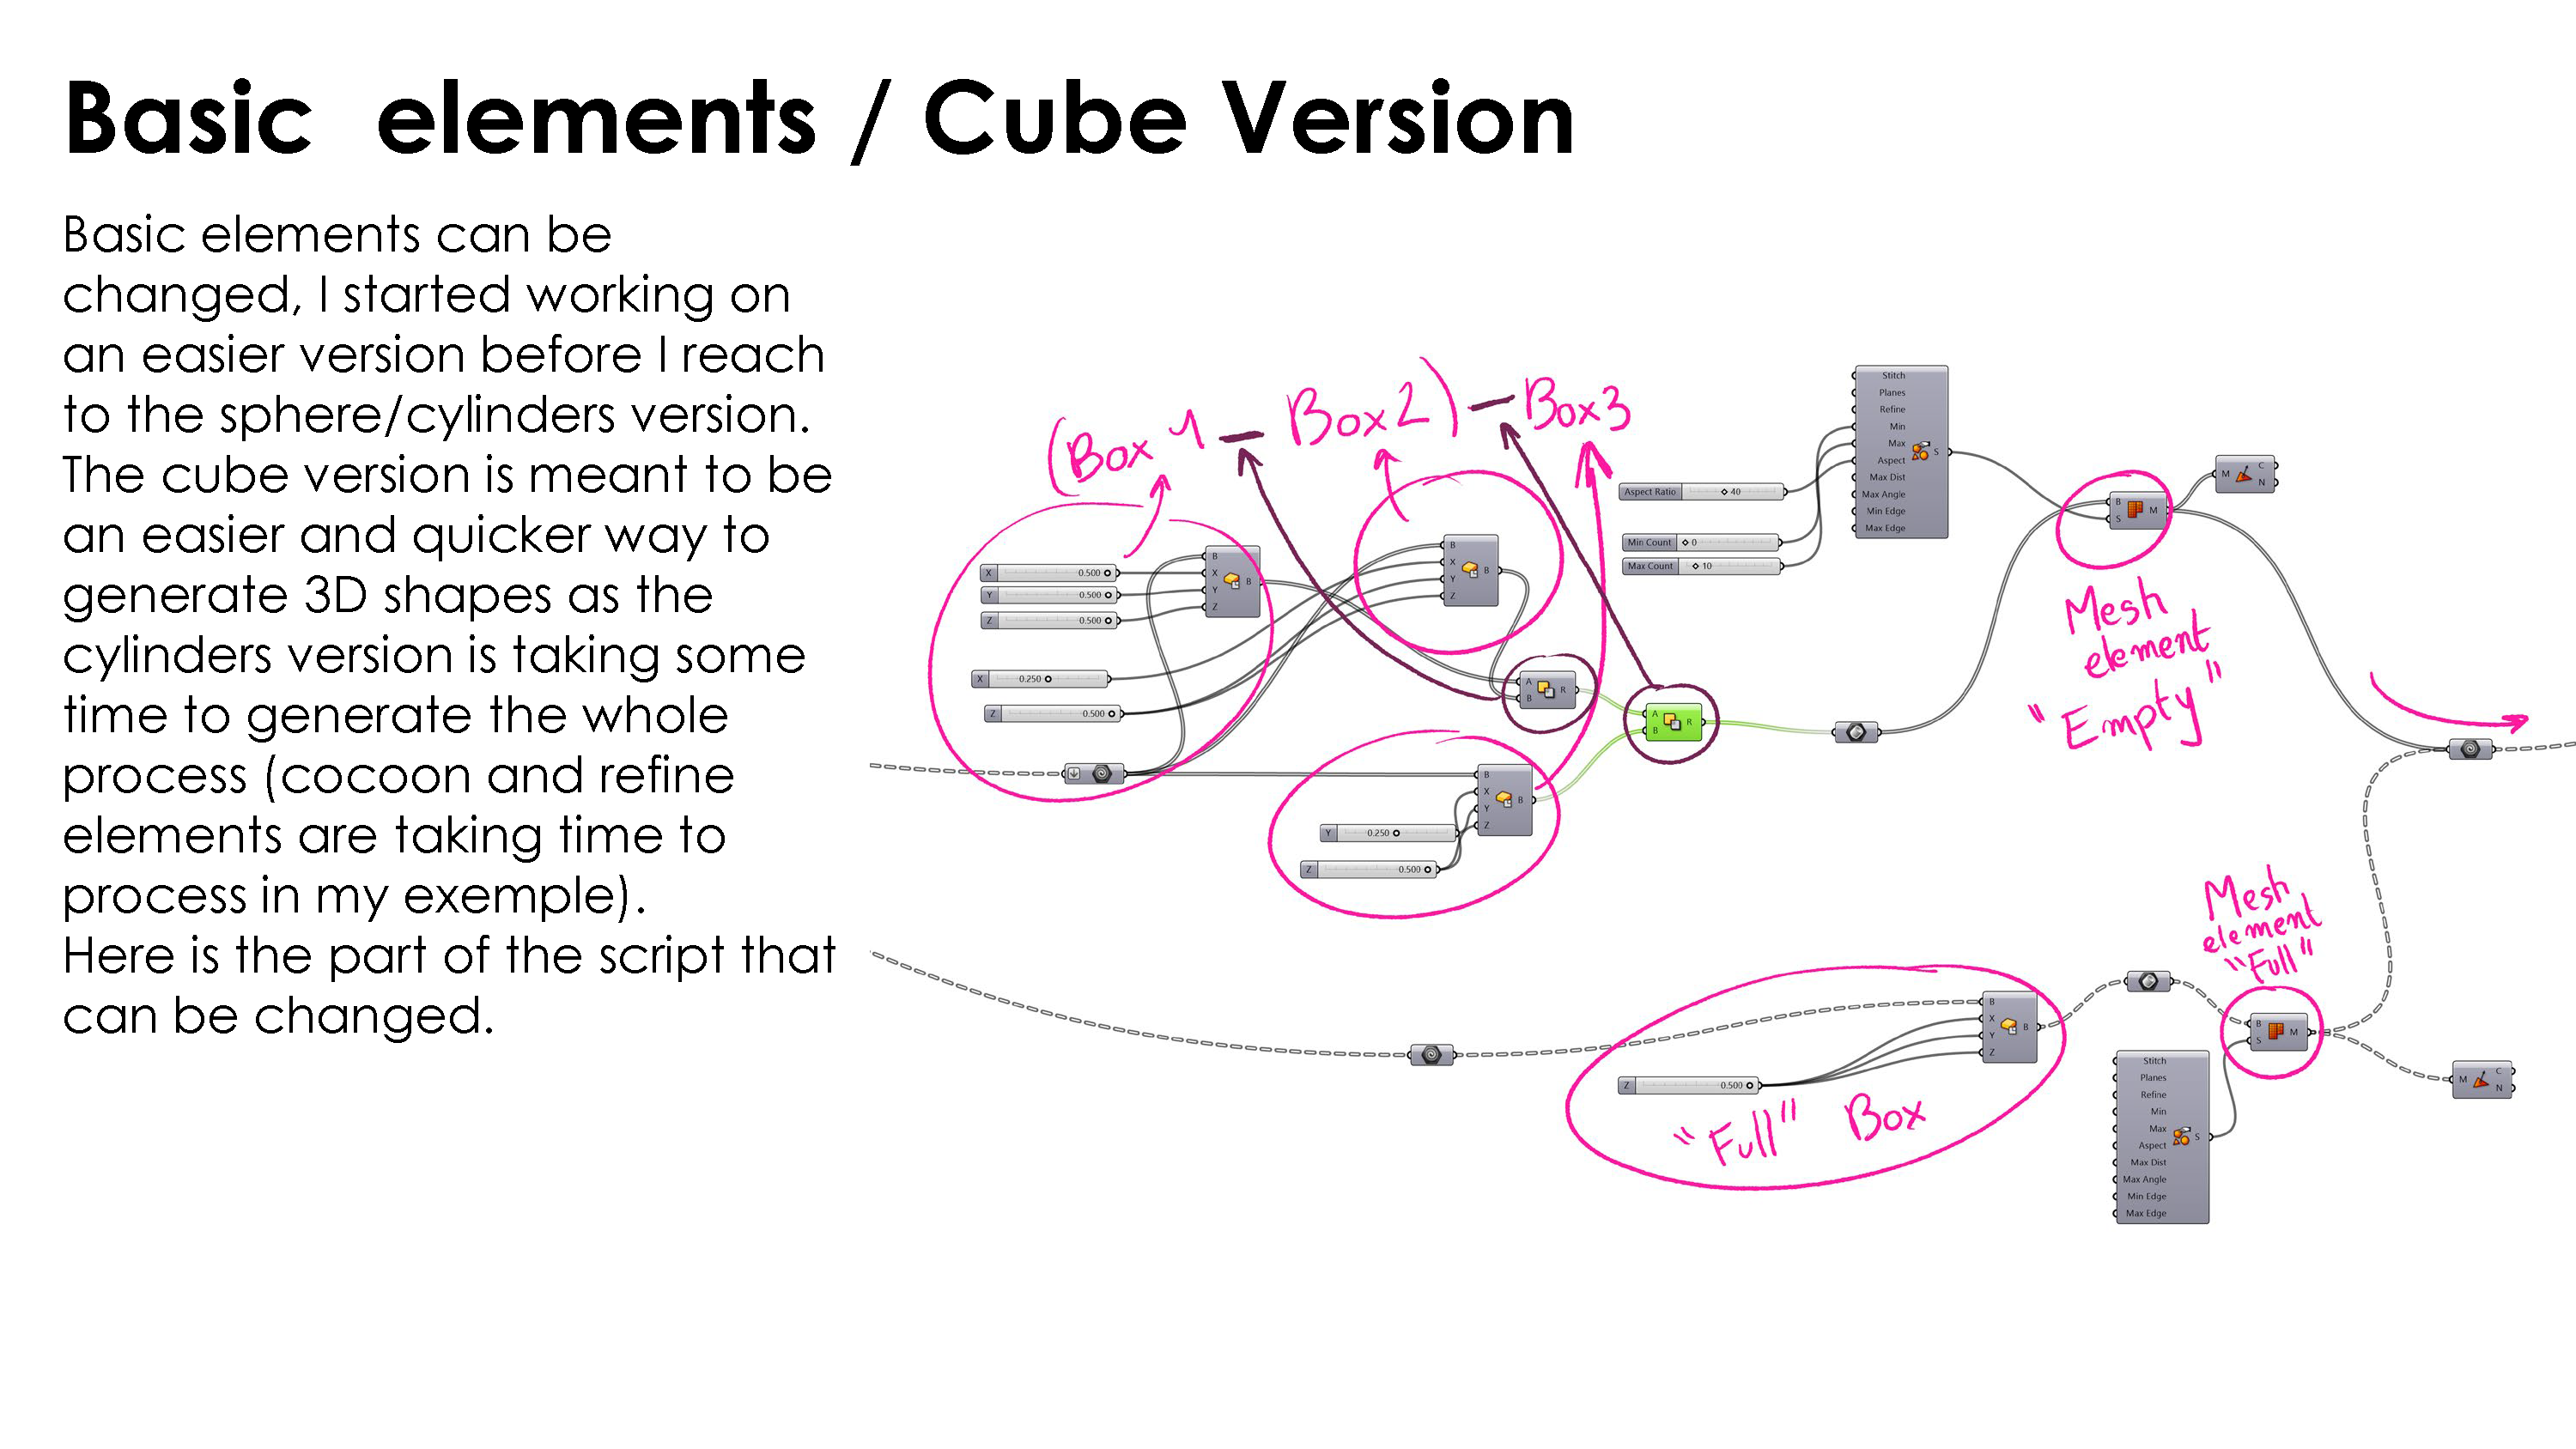
The red part in the following image of the script is controlling the “Basic elements”, you can replace it with whatever geometric components you want to use.

In this cube version, I used a cube (replacing the sphere) and a group of 4 square columns (replacing the cylinders)
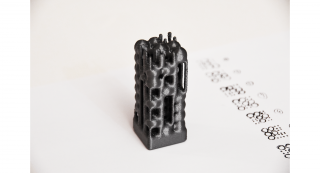
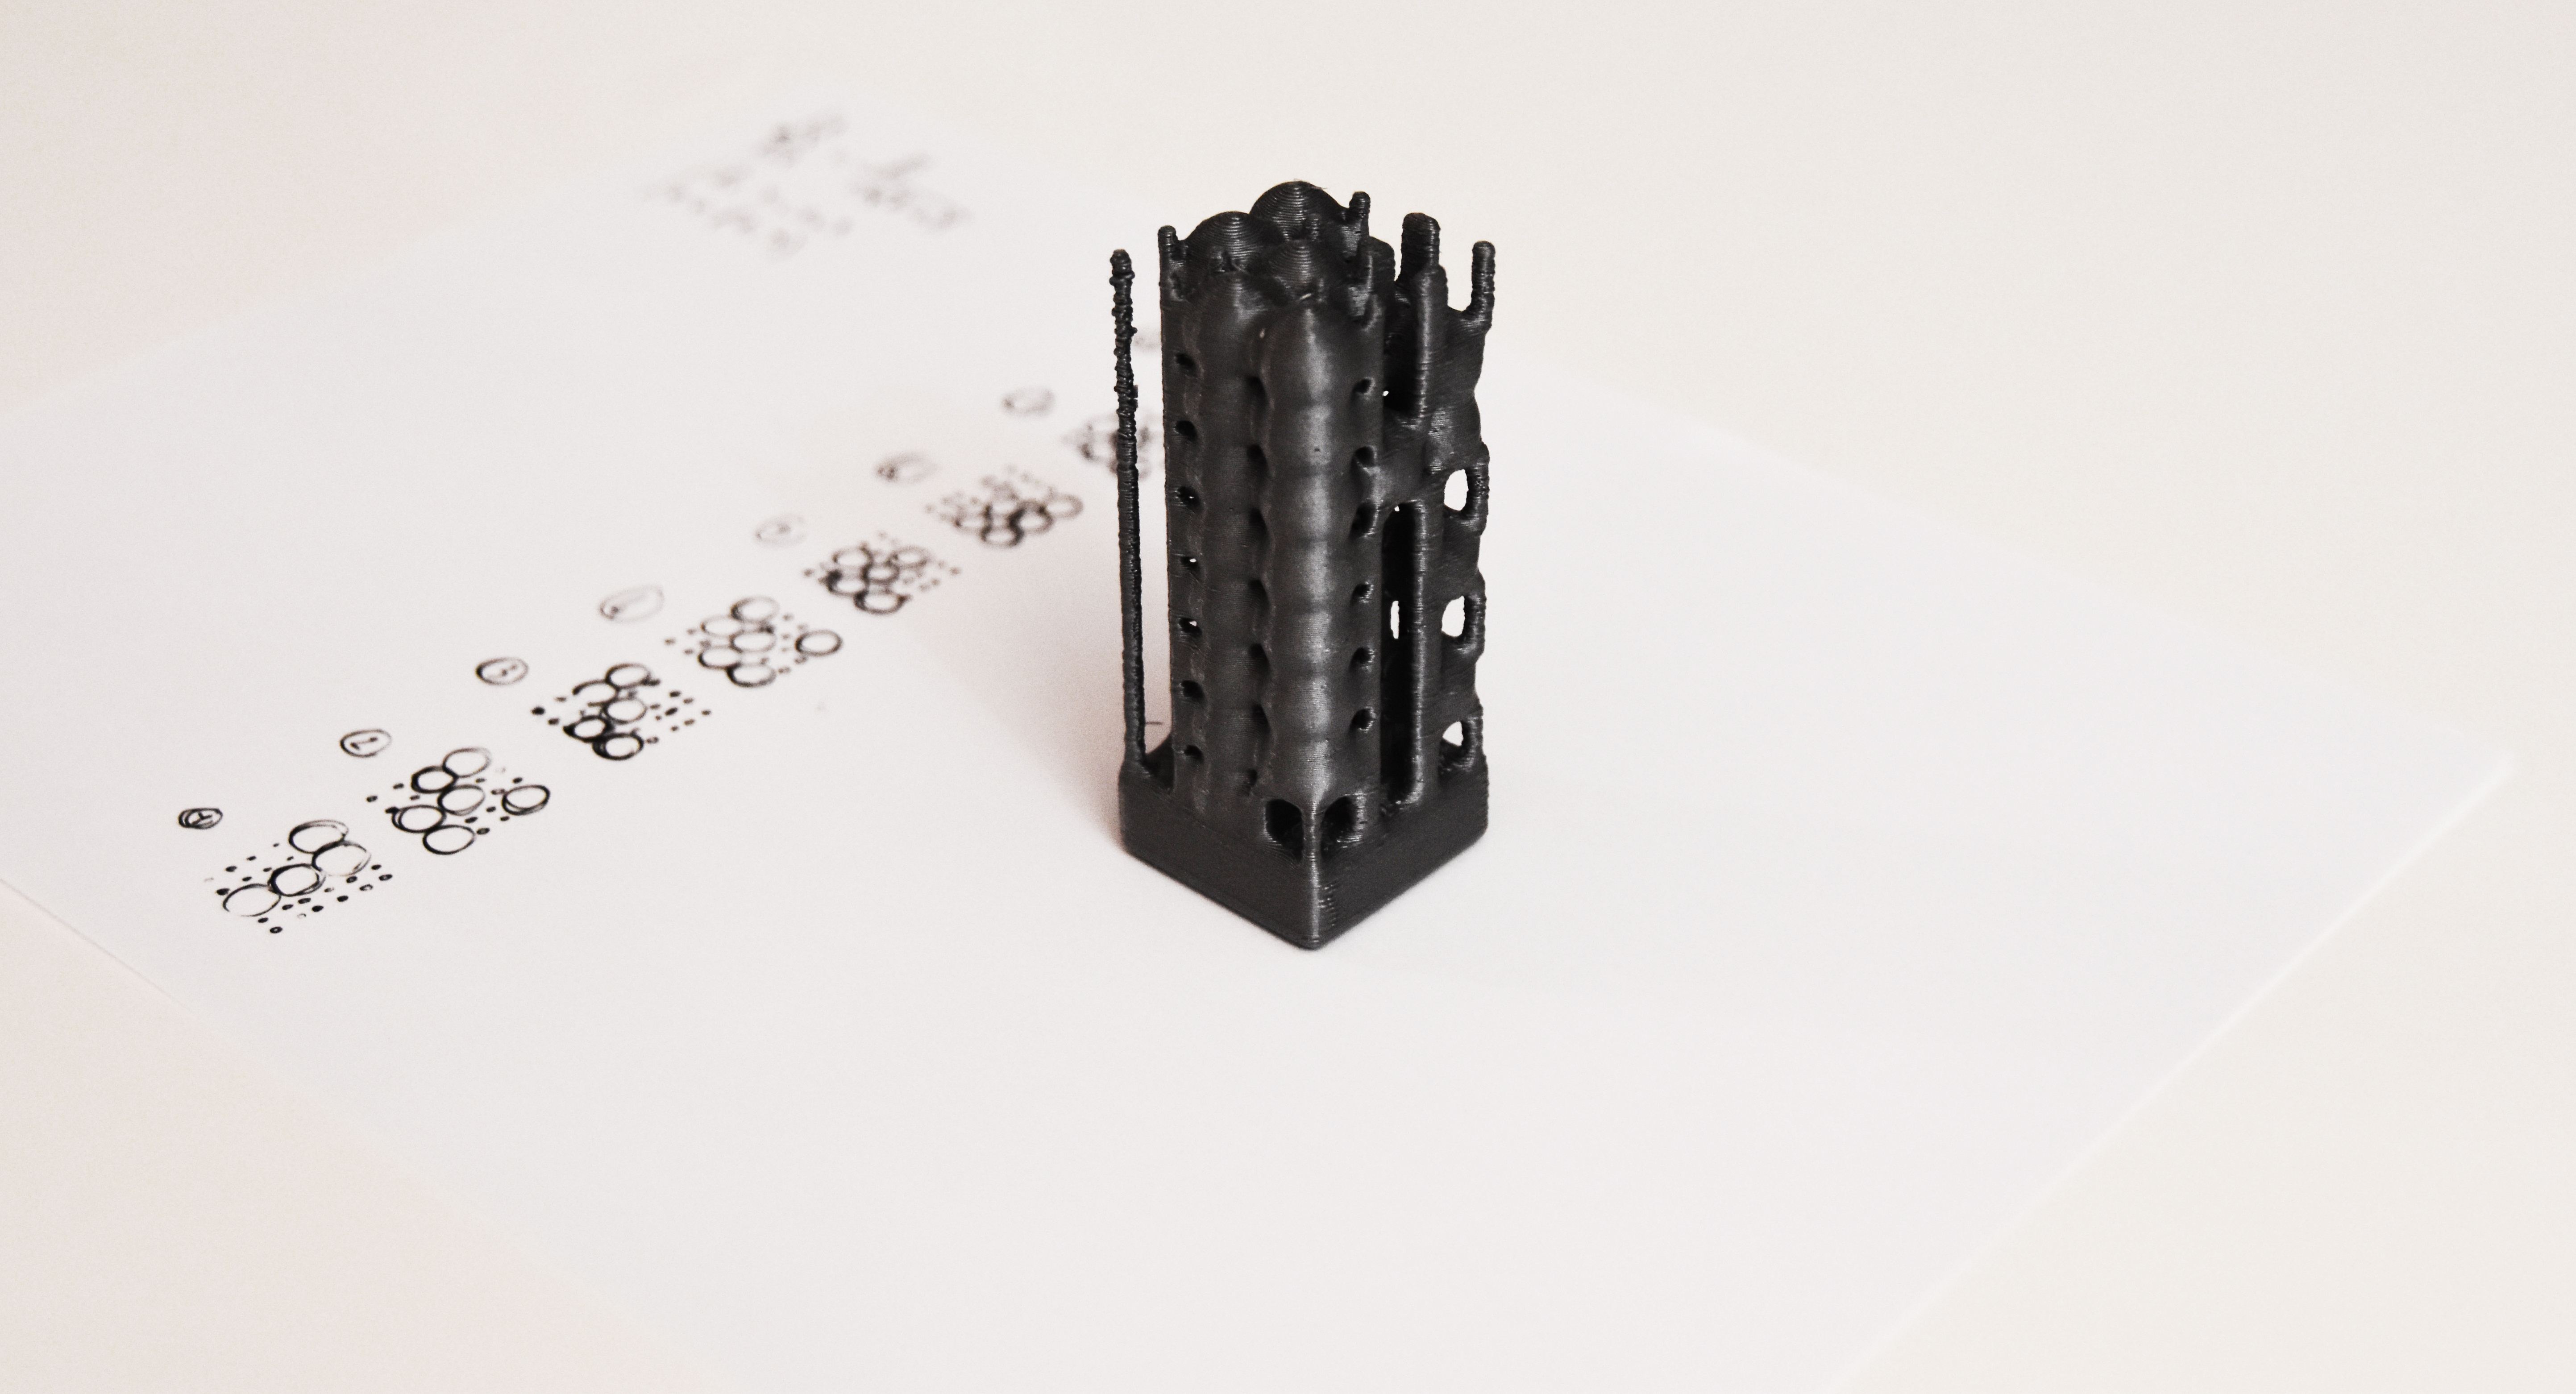
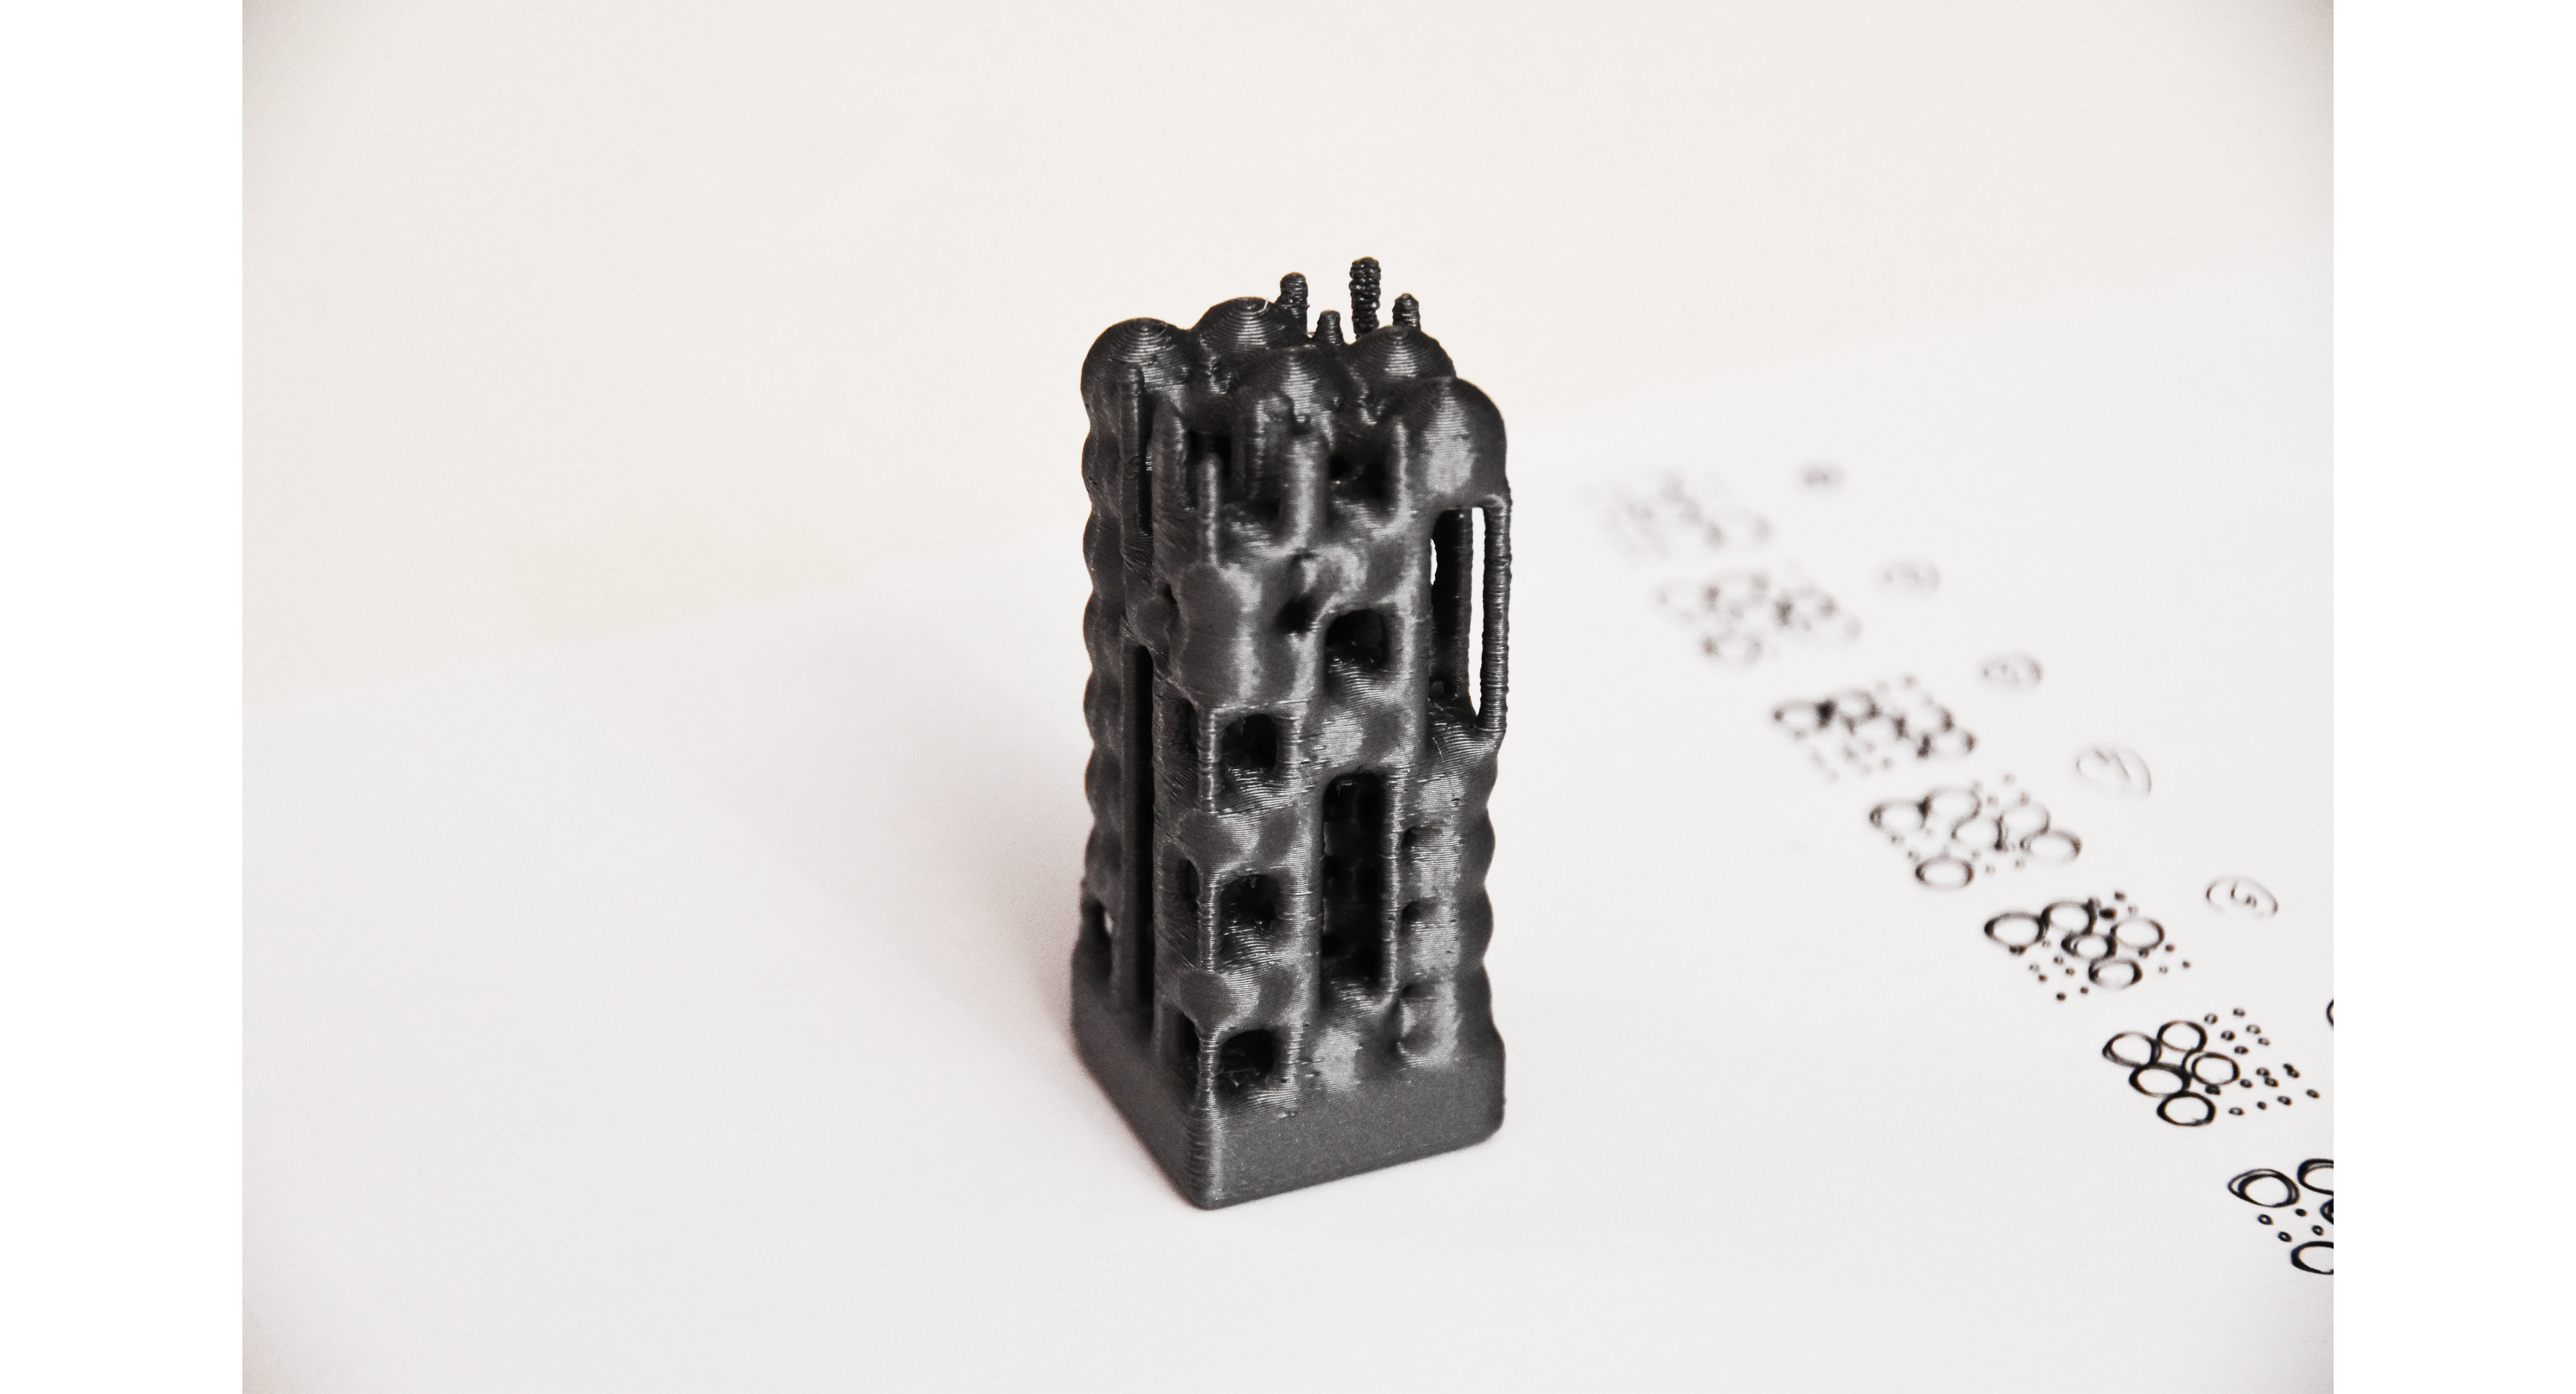
“Futurist” Experience :
With this process, I created a 3D printed vertical tower object, working on the word “Futurist”
Here are the final results.
PN3 // Prague // 2020 // LAPERGUE Aurélien
Grasshoper file link : Lapergue_TextTo3DShapes_GHfile_clean2
Credits :
Special thanks goes to my teachers for their support and their advice, the plugins creators of Anemone and Cocoon.
Links for the plugins :
https://www.food4rhino.com/app/anemone
https://grasshopperdocs.com/addons/cocoon.html