Through this tutorial, we are making an algorithm which can replicate a randomised version of the Hungarian Folk Tales intro. To make it happen we are going to use grasshopper, specifically the plugin: „Wasp” created by Andrea Rossi
(https://www.food4rhino.com/en/app/wasp).
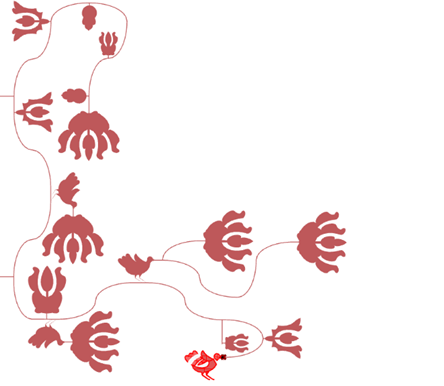
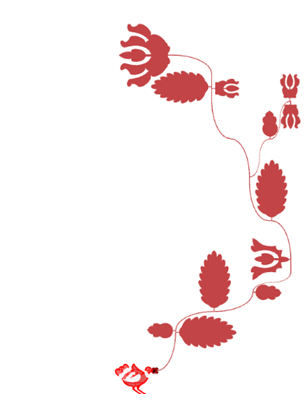
INSPIRATION/ THE ORIGINAL INTRO:
https://www.youtube.com/watch?v=HUtoXmpUqsA&ab_channel=charlye22

USING THE WASP PLUGIN
For the wasp plugin to work, we are going to need 3 different types of information:
-Basic parts (as geometries)
-Connection points (and orientations)
-Conencting rules
+1 the generation limits
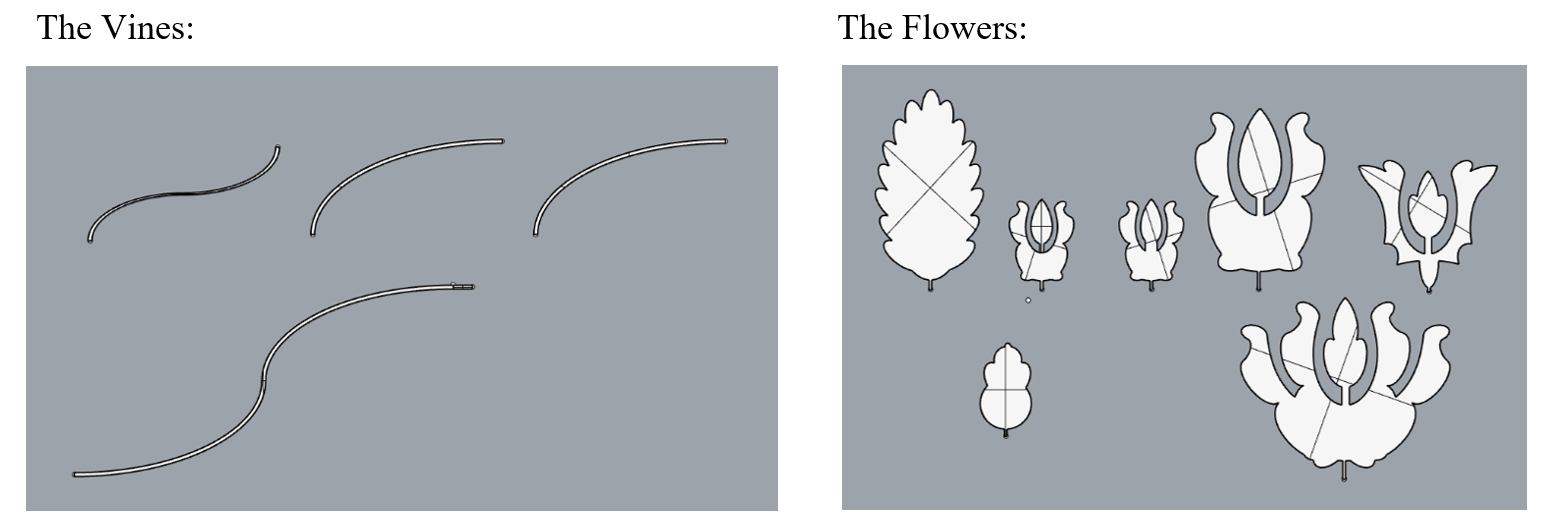
- BASIC PARTS:
This project relies heavily on pre-drawn elements, such as the Vines, Flowers, and Birds. These elements are going to set the style of the generated structure, so it is very important to have a bigger variety in the shapes.
For this Project we are going to use:
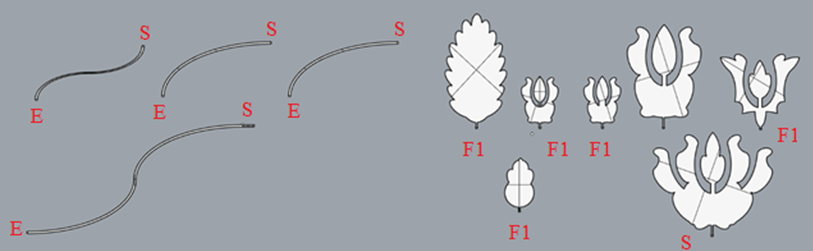
– 4 different basic Vine shapes
– 6 different Flower shapes (5 connecting from sideways, 1 for closing the vine)
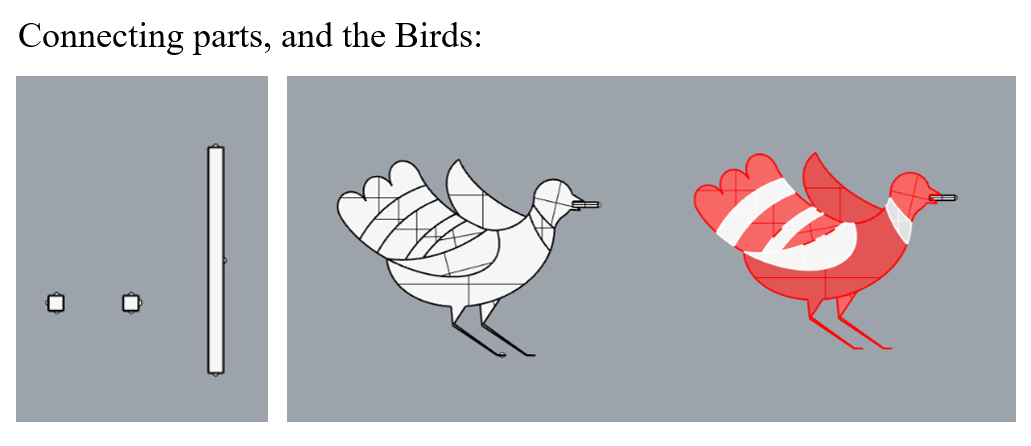
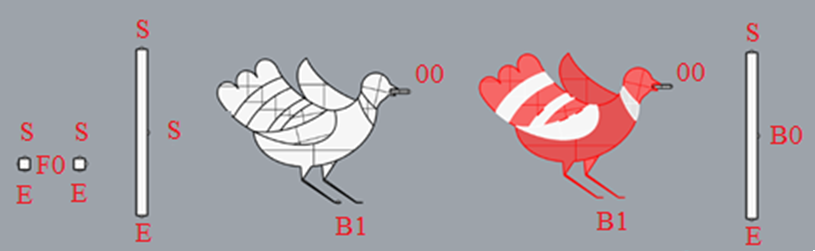
– 2 different Bird shapes (one origin, and one who sits on the vine)
– 2 different base elements where the flowers can connect (mirrored versions, so it can grow into both sides)
– 1 branching element
– 1 element when the additional Birds can connect („sit to the branch”)
Although these elements are enought for doing the basic replica, this system is always expandable, and adding new elements is going to create even more organic effect.
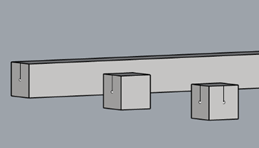
Here i have to mention, that although this pattern is 2 dimensional, the Wasp plugin is desighned to work with 3D elements, so the basic parts have a negligible thickness, just to avoid complications. This is going to be important when we make the connection points, and their orientations.
- CONNECTION POINTS:
Still in Rhino, we have to add point to the geometries, where we want them to connect to each other. Because this plugin was designed to work with 3D, and we have a thickness for our elements, these points are not enough for the connections, we have to define the XY plane as the patterns only growing dimension. For this, we are adding to the surfaces linear lines, which are going to determinate the orientations.
- CONNECTION RULES:
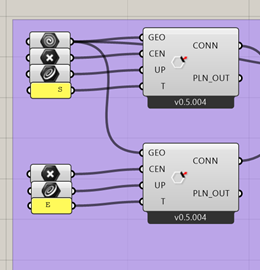
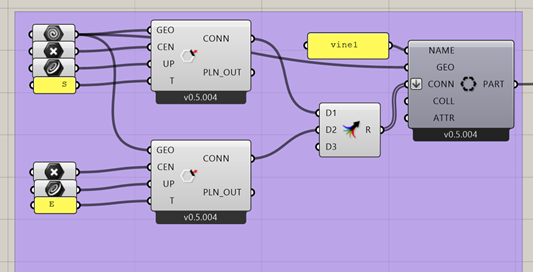
Now we can open Grasshopper, and start to enter the data for the geometries. We go one by one, and creating the elements as „Wasp_Basic Part”-s.
To make a „Wasp_Basic Part”, we have to create as many „Wasp_Connection From Direction” elements as many Connections we want to add to the geometry.
We set the geometry, conenct it to the „GEO”,
we set the point, connect it to the „CEN”,
and we set the line belonging to the point and connect it to the „UP”.
We also have to name this Connection element, if we want to determinate later what elements can connect to it.
-The Base geometry has one connection point, on the beak, named: „00”
-We name one of the Vine elements connection points to „S” (start) and one to E (end).
-The branchmaking elements have 1 „S”, and 2 „E” connection points.
-The Flower base elements have 1 „S”, 1 „E” and 1 „F0” point, where the flowers can connect into in the future.
-The Basic Flowers has 1 connecting point, named as „F1”
-The Vine Ending Flower has 1 connection pont, names „S”, so it is going to act like a basic structure element.
-The Bird base element have 1 „S”, 1 „E” and 1 „B0” point, where the bird can connect into in the future.
-The Bird has 1 „B1” point in the leg, and one „00” point in the beak.
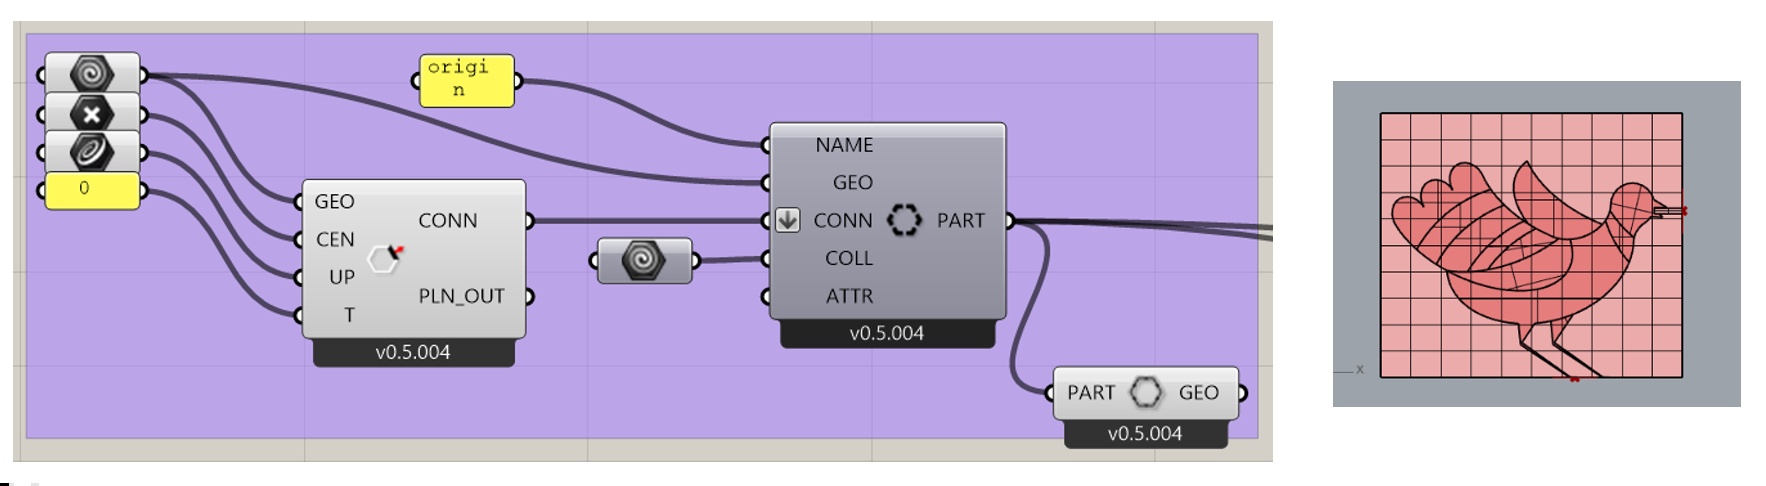
Now we can merge the same elements points together and connect it up with the „Wasp_Basic Part”, as a Flattern data, and for transparency we should also name the different elements.
Some elements may have overcomplicated geometry, what confuses the program, so for the Flowers, or Birds I recommend use a custom set Collider geometry.
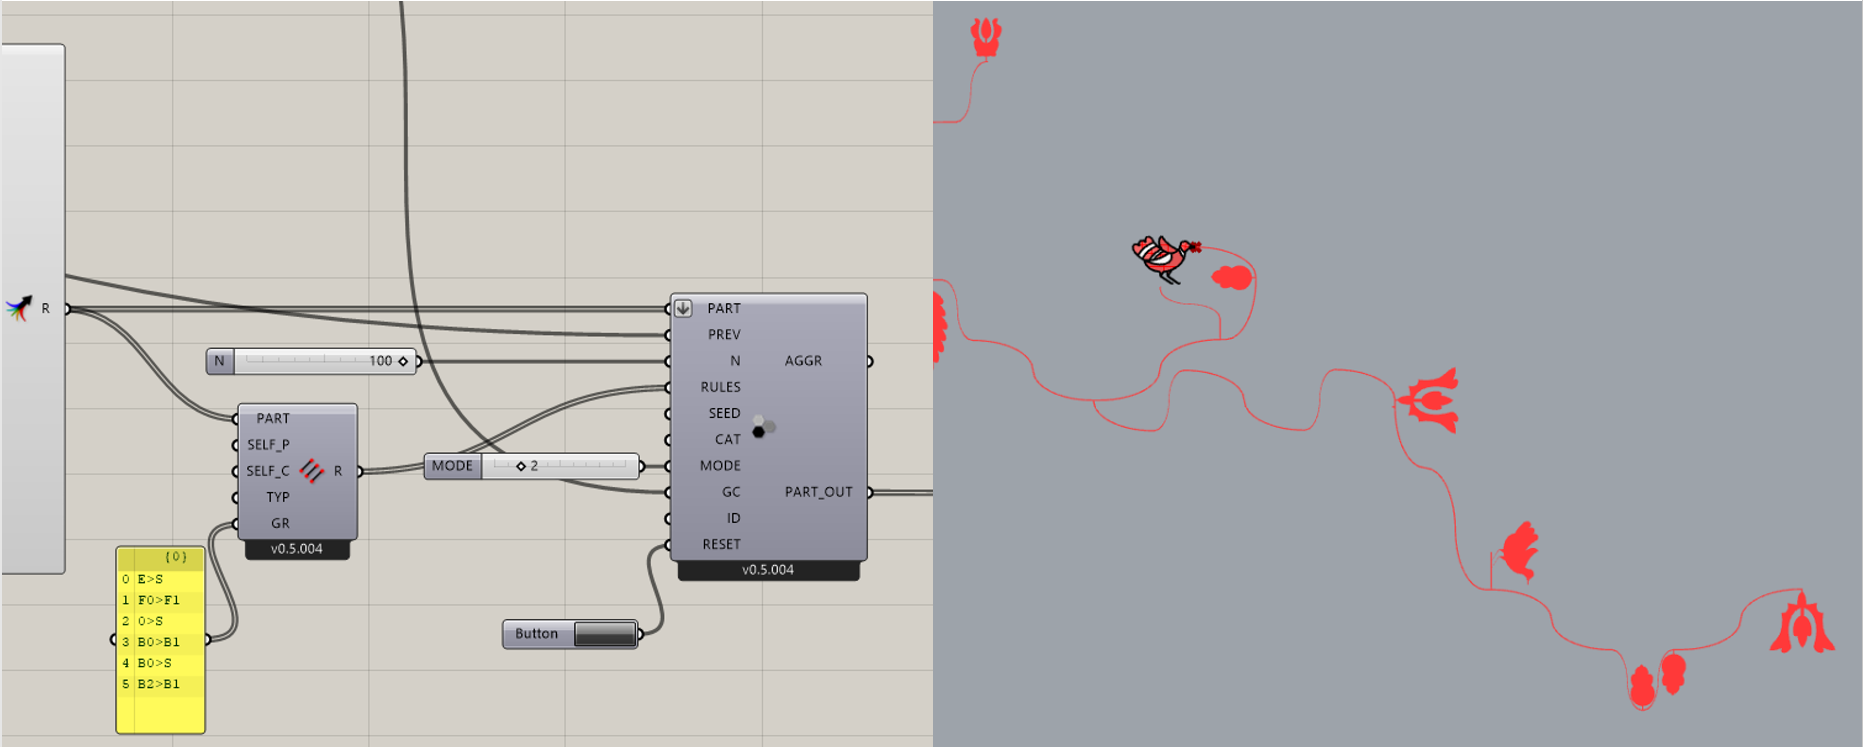
STOCHASTIC AGGREGATION
We now have all the basic elements to start making our pattern. For this, we need the component called “Wasp_Stochastic Aggregation”. This component will select randomly our elements, and put them together, using our rule-system.
To make it happen, first we have to merge our elements and connect them to the PART.
Now we have to select our Origin element and connect it to the PREV, so our pattern will start from here.
We make a number slider and connect it to N, to controll how many elements we want to add to our pattern. For this scale I recommend somewhere between 50, and 100.
Now we will create the rules, which the aggregation must follow. To do this we will need the “Wasp_Rules Generator” component to which we connect the merge of the basic parts to PART. Then we need to creat a panel, writing the rules: the conenction part we want to connect to, folowed by “>” sign and than the second part what we want to connect. We connect than this panel to the GR, and than we connect the Wasp_Rules Generator” to RULES.
In the future we will create a field, where we want the pattern to be generated inside, so we need to add another slider, set it to 2, and connect it to MODE, so the aggregation will calculate with global constrains.
Finally we add a Button to RESET, so we can generate new aggregations.
Now the Agrregation should work, but to have the original intro feeling we should delineat the generation field.
VISUALISATION:
Now we need to make an area, where the pattern can generate inside. For this porpuse we create a box, and convert it into a mesh with “Mesh_Brep”. We connect this mesh to “Wasp_Mesh Constrain”. We want our pattern to generate inside of this box, so we add a boolean toggle as “True” to the parameter IN, and we don’t want our elements to stick out from the zone, so we add another boolean toggle as “False” to theparameter SOFT. Now we connect the “Wasp_Mesh Constrain” to GC in “Wasp_Stochastic Aggregation”.
The Pattern is ready now, but for some visual improvement, we should add some color to the pattern, and create a background to it. First we make the background, the same size as generation limits. I recommend you to use the same sliders as we used for creating the “Mesh_Brep”, because this way we can altern the two boxes at the same time. After we have created the box, as background we only need to add the element “Custom Preview”, and set a color to it.
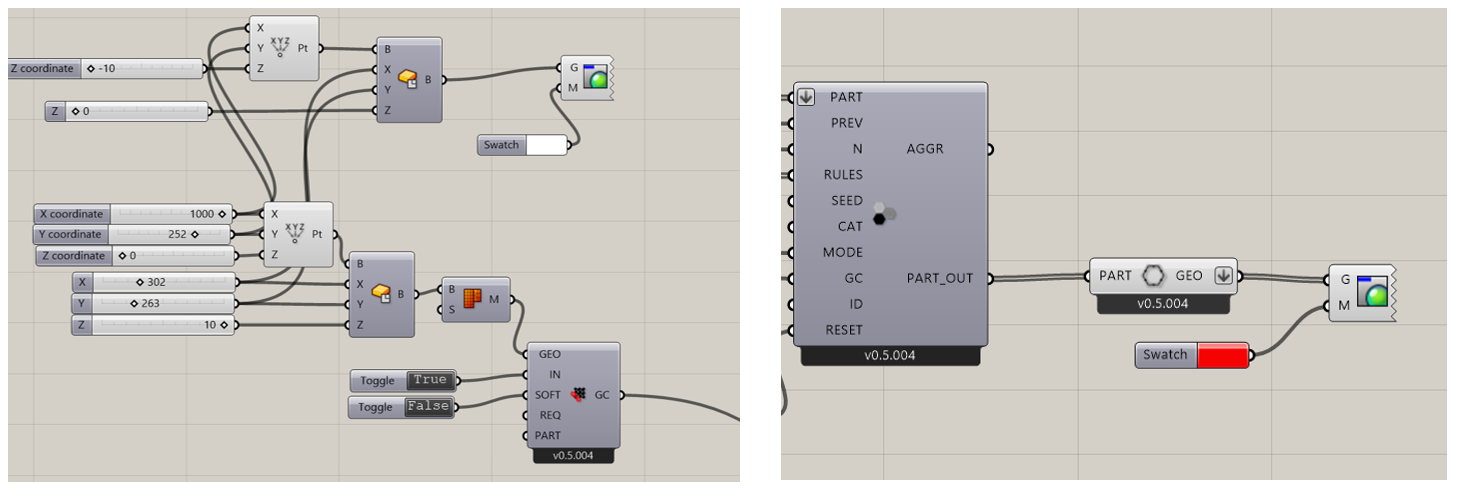
Now we can take the outcome from “Wasp_Stochastic Aggregation”, from PART_OUT and use the “Wasp_Get Part Geometry” to illuminate our pattern, and add the element “Custom Preview”, and set a color to it.