
This tutorial shows how to model a parametric “treehouse” structure from scratch. In the first part of the tutorial we are going to model an efficient script with variable shape, dimensions, number of cabins, etc. , which will be primary used in an early phase of planning. In the second part we will add some features, such as roof and stairs to one of the preferred variants selected from the first part.
Part 1 – basic geometry
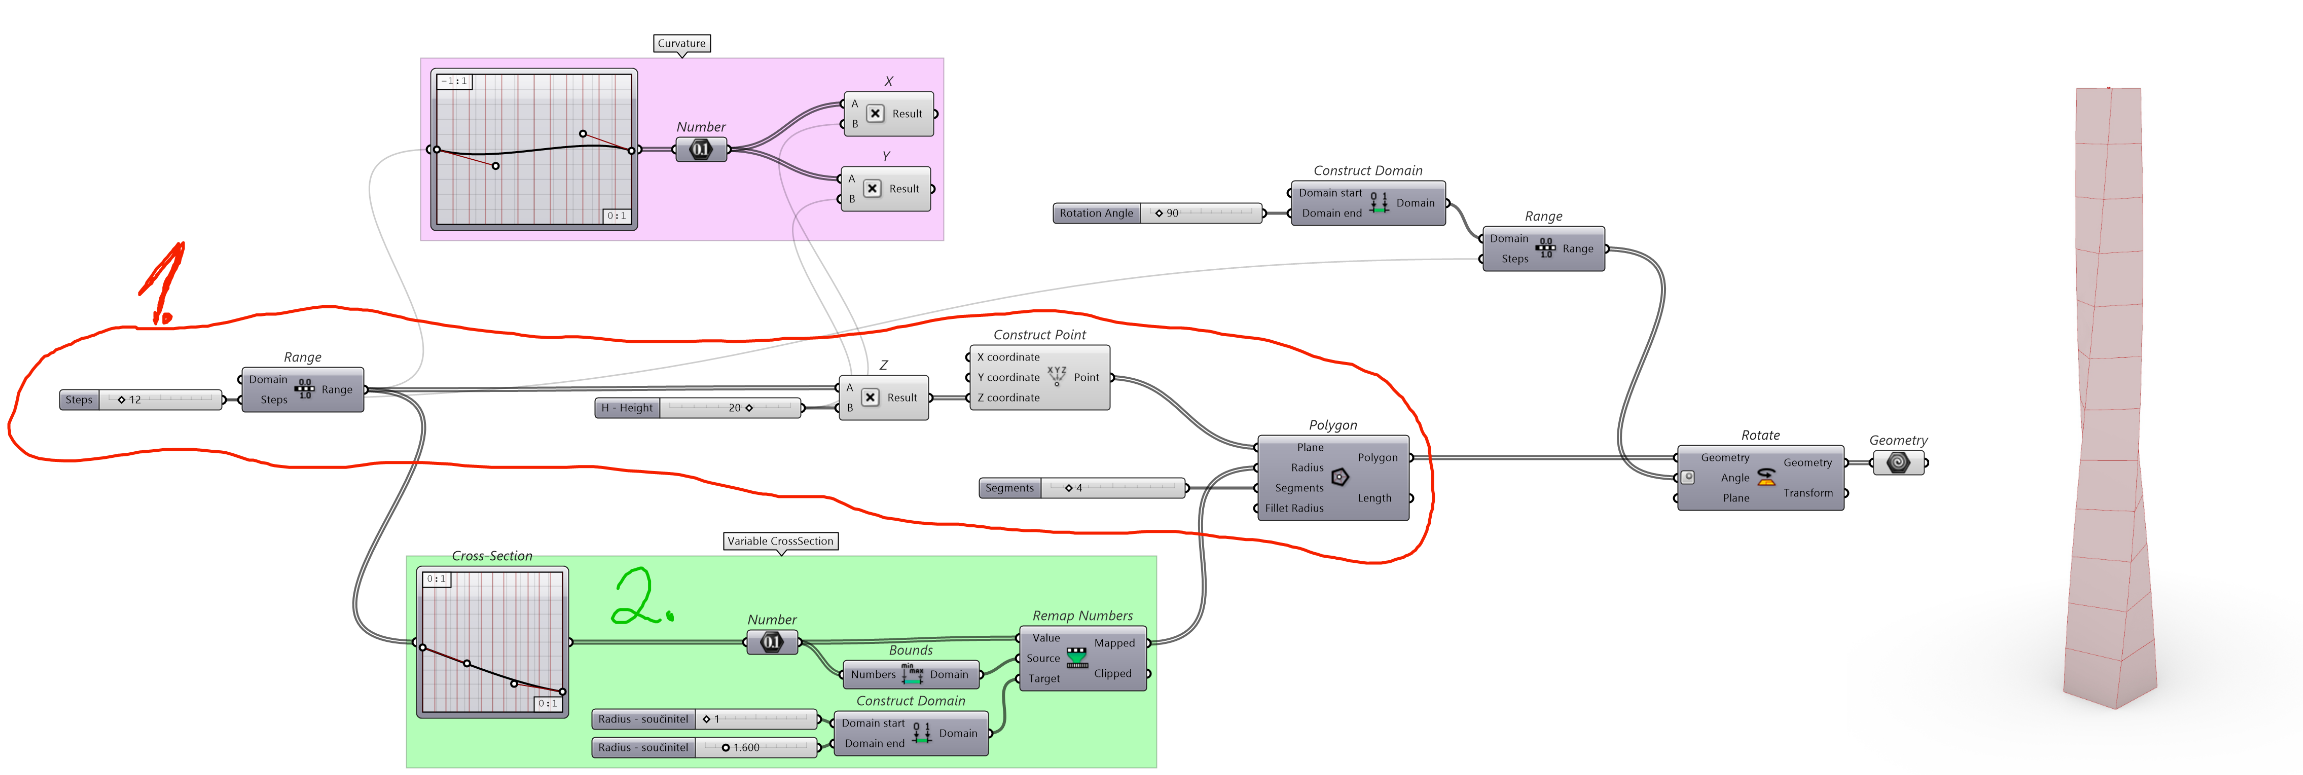
1. Range based geometry with variable height (20 meters) and number of sections – polygons
2. Graph Mapper Cross section – using Bezier curve to imitate the shape of a tree trunk and set boundaries using Remap, connect to Radius (Polygon)
3. Possible curvature of the tree trunk (column) when X and Y coordinates are connected to Construct Point
4. Twisting the column by rotating every polygon using range and domain with the seeked total rotation, e.g. 90 degrees
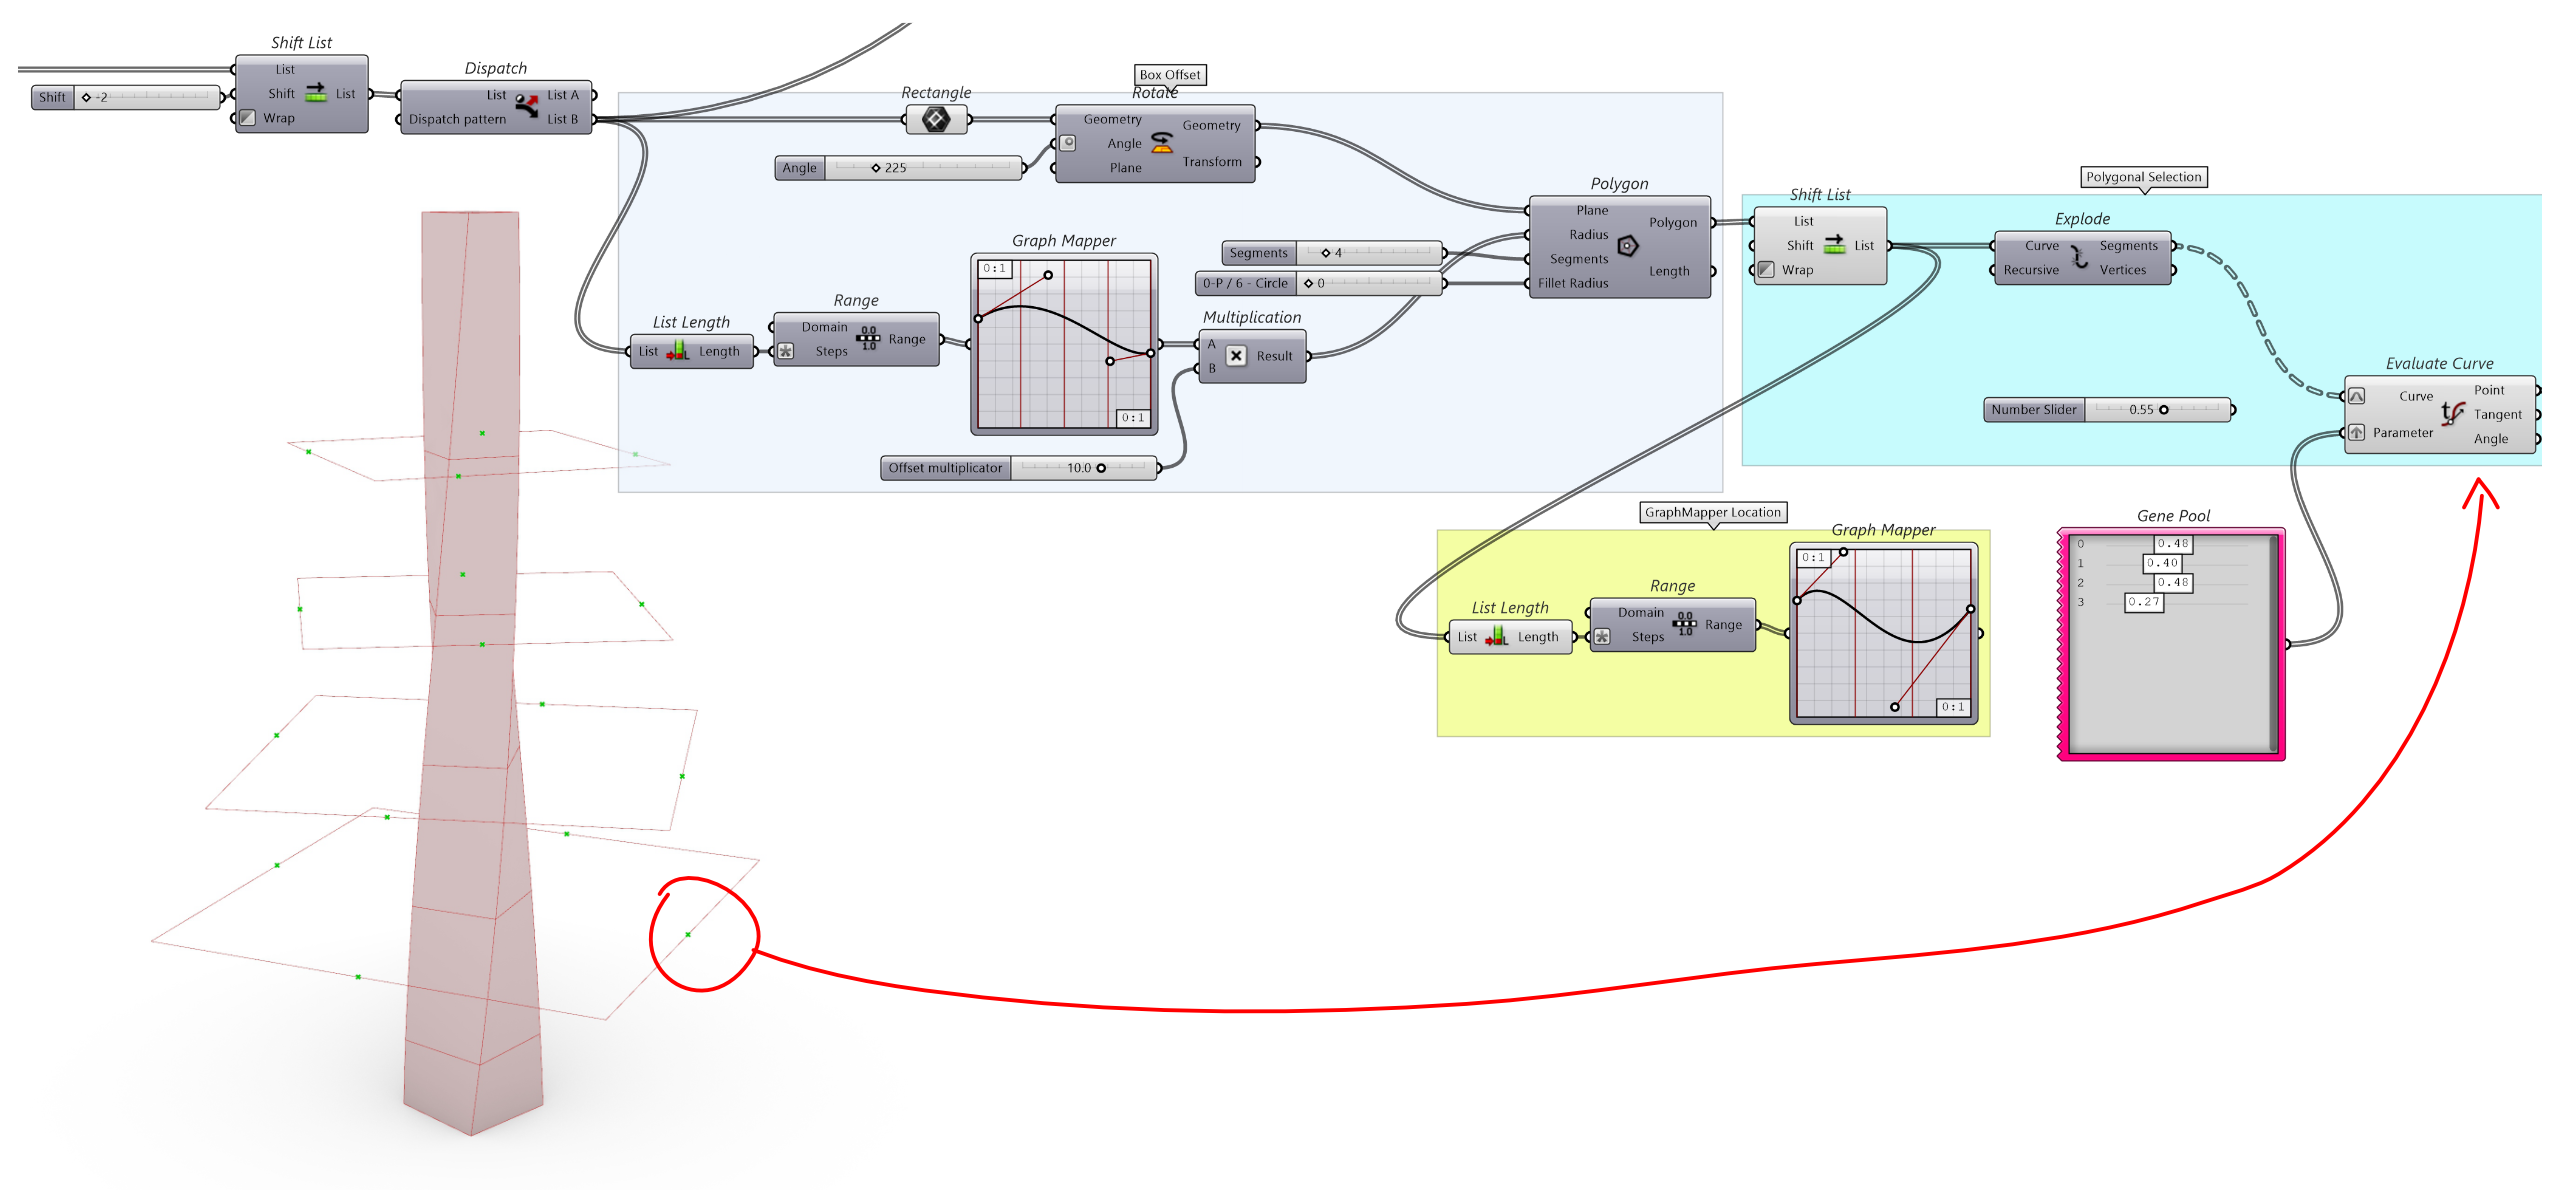
5. Select the right polygons for creating base points of cabin location by using Shift List and Dispatch
6. Variable offset using Graph Mapper and Polygon
7. Explode polygons into segments and find position of the end point by using Parameter, position can be set by Graph Mapper or more precisely with Gene Pool
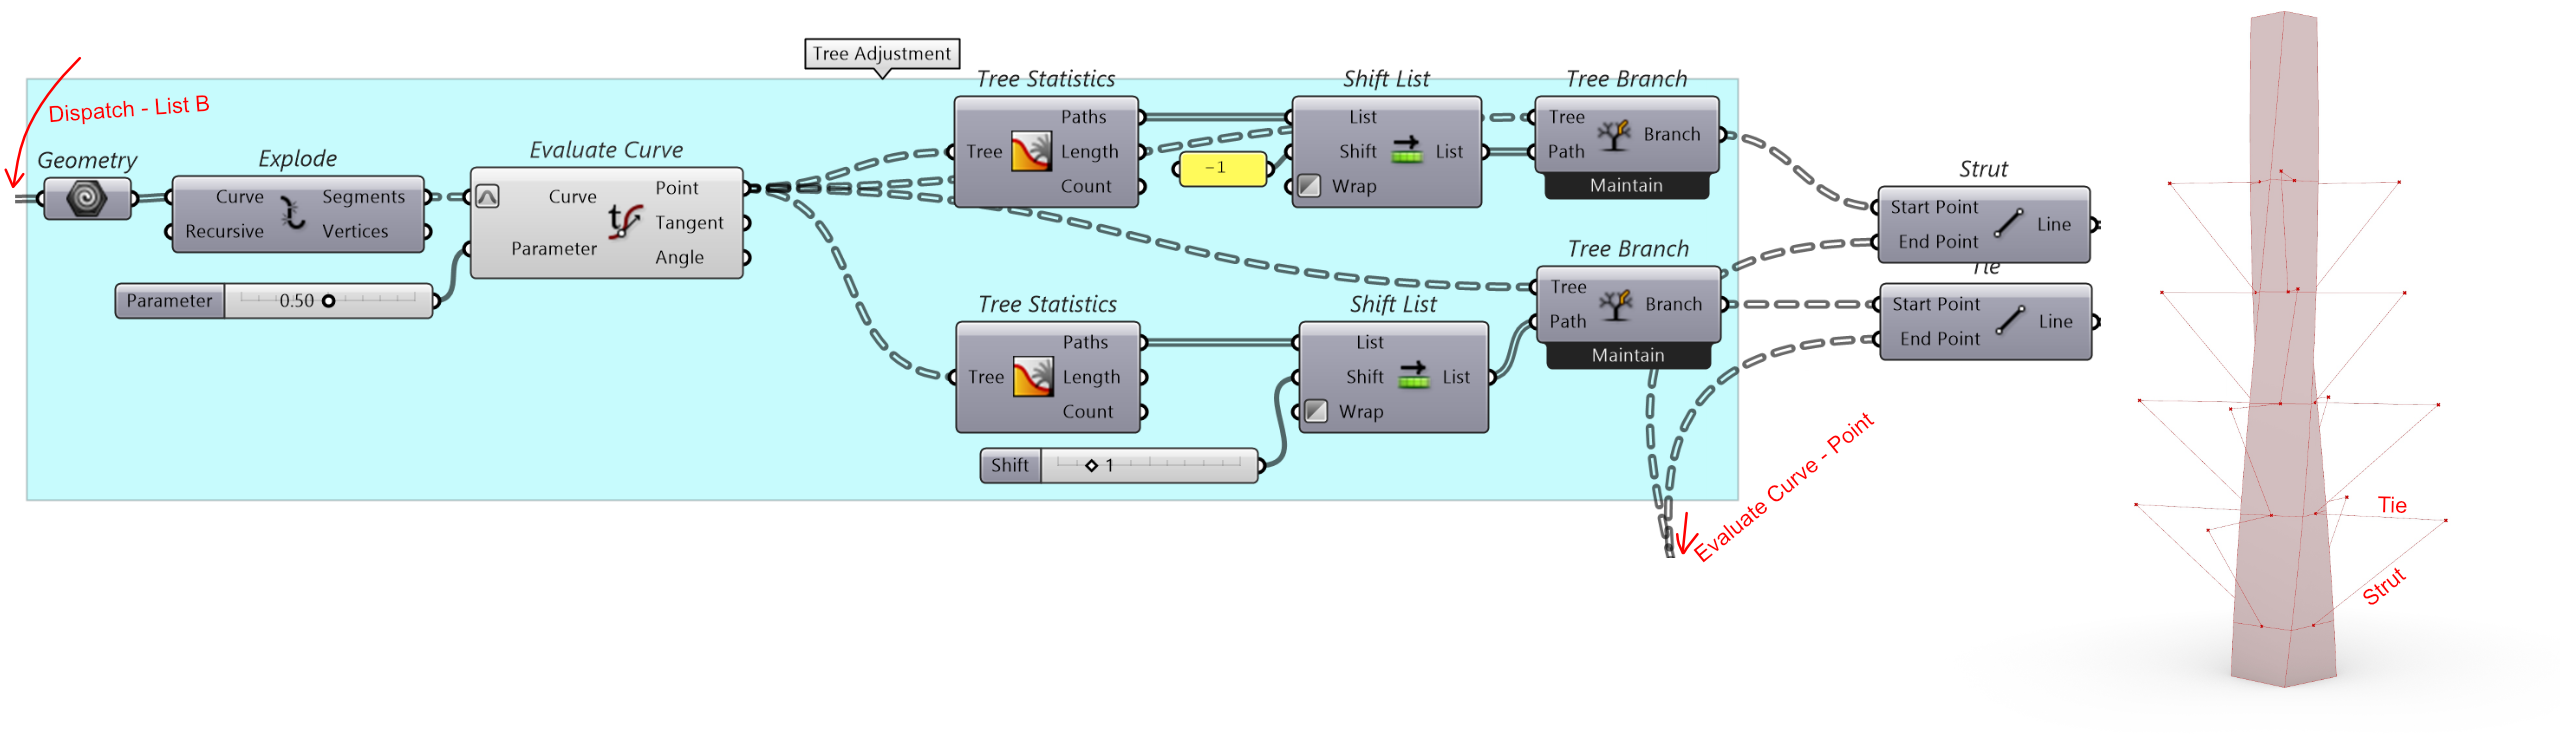
8. To find the Start Point of strut or tie we have to Explode and Evaluate the primary polygon from step 5.
9. Now we need to shift Tree to connect the points in the right order using Tree Statistics and Tree Branch – this is a cool feature worth saving to Snippets
![]()
10. Pick the right pairs of strut and tie using List Item and Dispatch
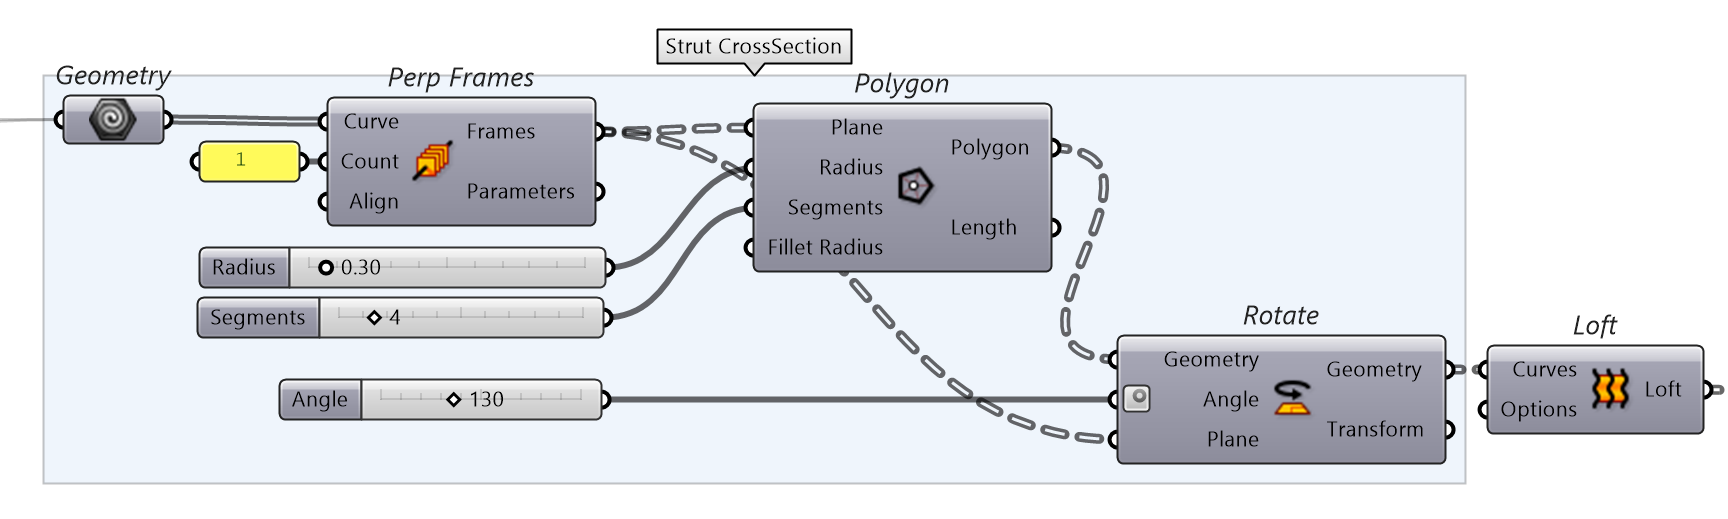
11. Create strut cross section by using Perp Frames , Polygon and Loft
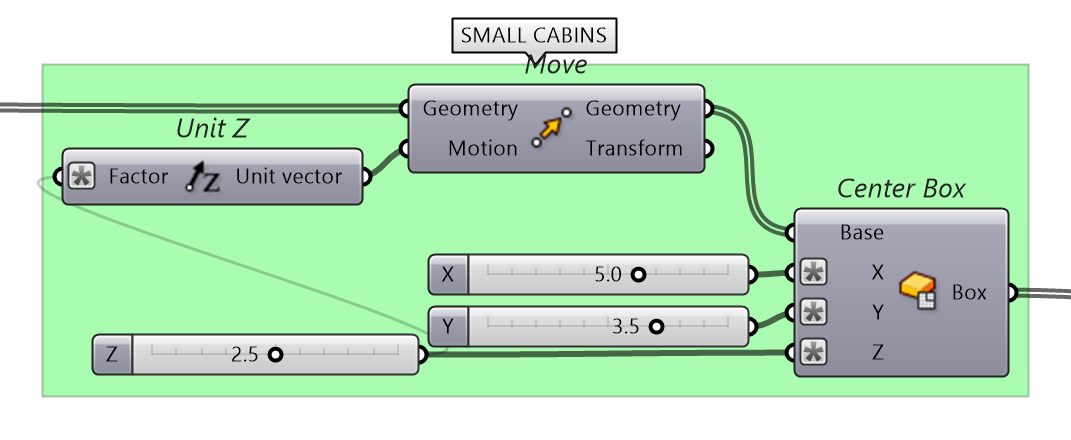
12. Create cabins as Center Box with base in the end point of struts, use Expression (x/2) to display user-friendly dimensions of cabins.

13. Save favorite Slider, Gene Pool, Graph Mapper settings as State and restore it later
Part 2 – Improved cabins, Kangaroo roof, stairs
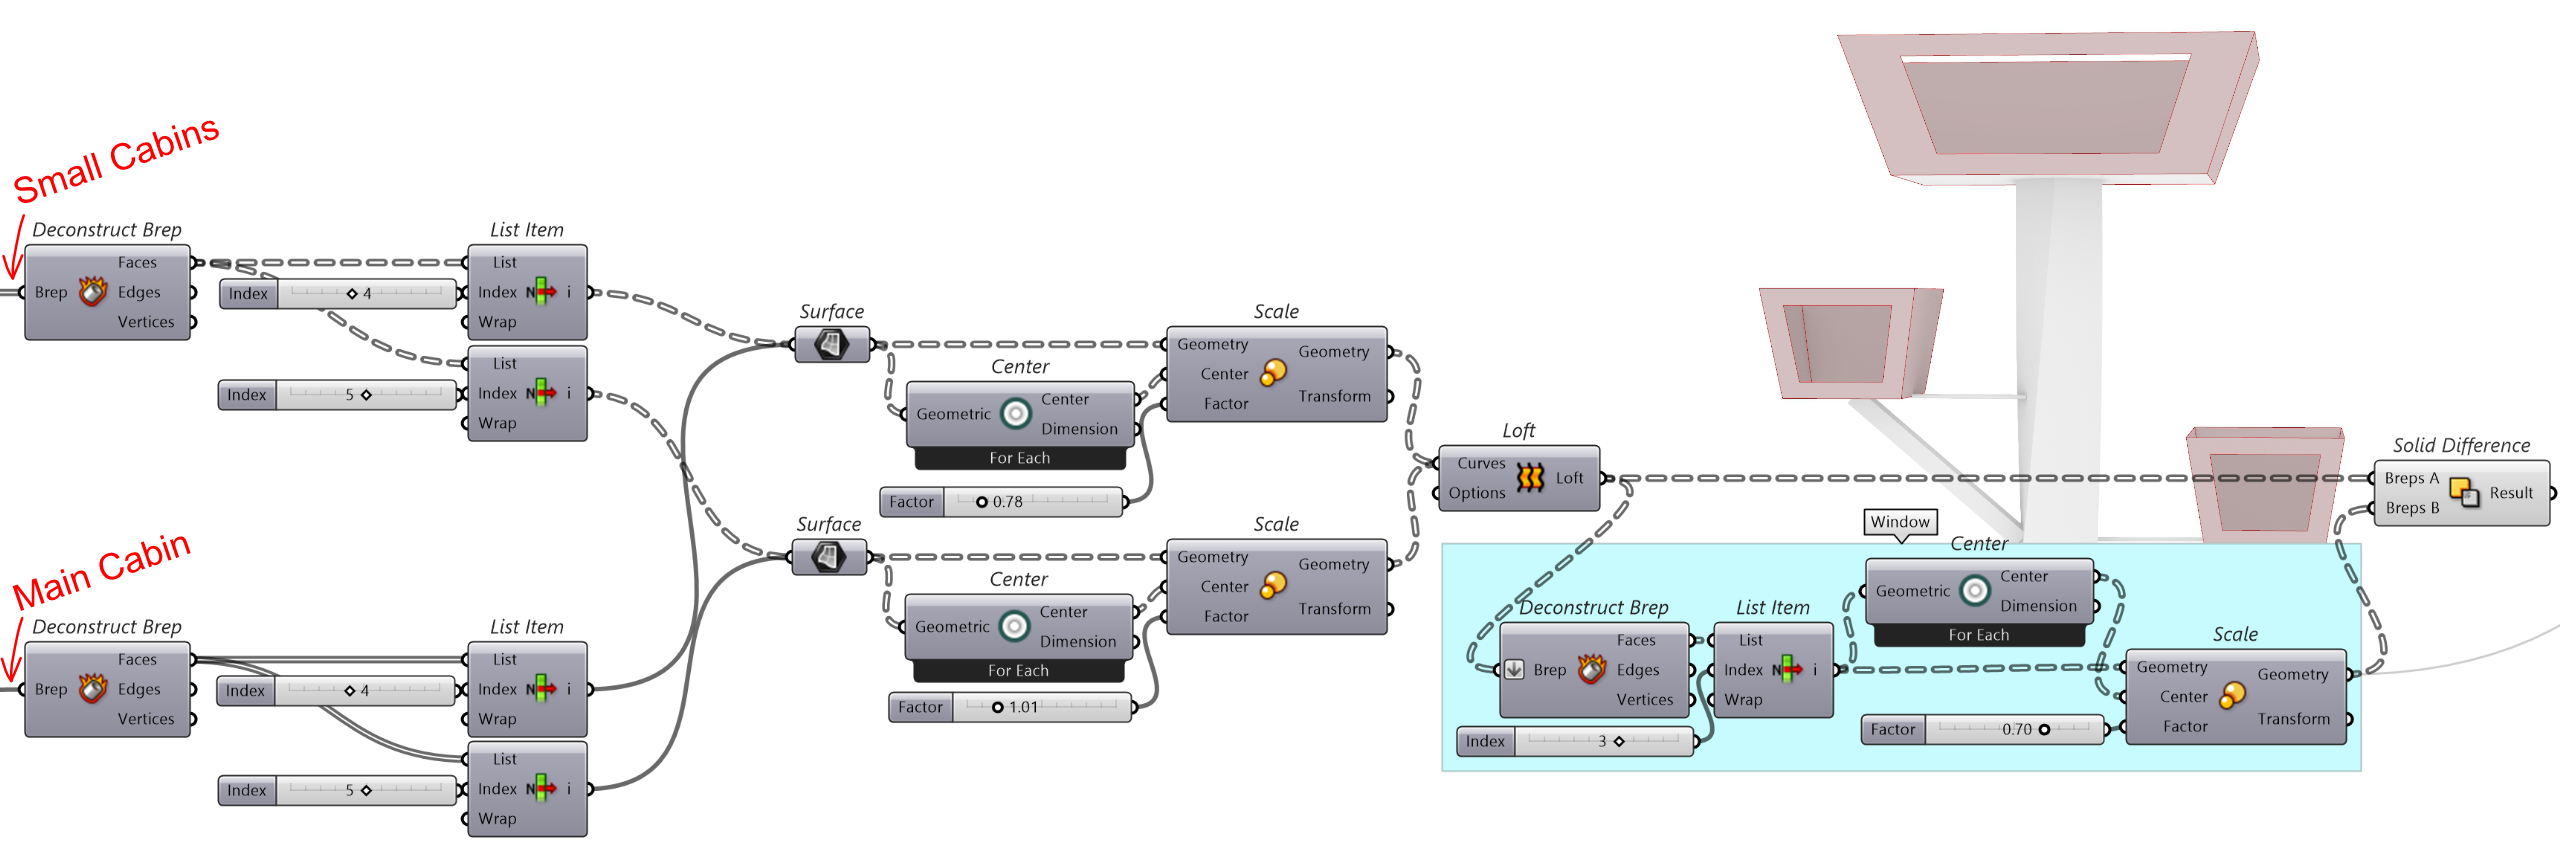
1. Deconstruct Brep to find the upper and bottom side of the box
2. Scale surfaces around center (found by Center from Heteroptera plugin – https://www.food4rhino.com/en/app/heteroptera), then Loft
3. Find front face of the solid using Deconstruct Brep and Scale it to create opening
4. Solid Difference to cut out scaled front face from the solid
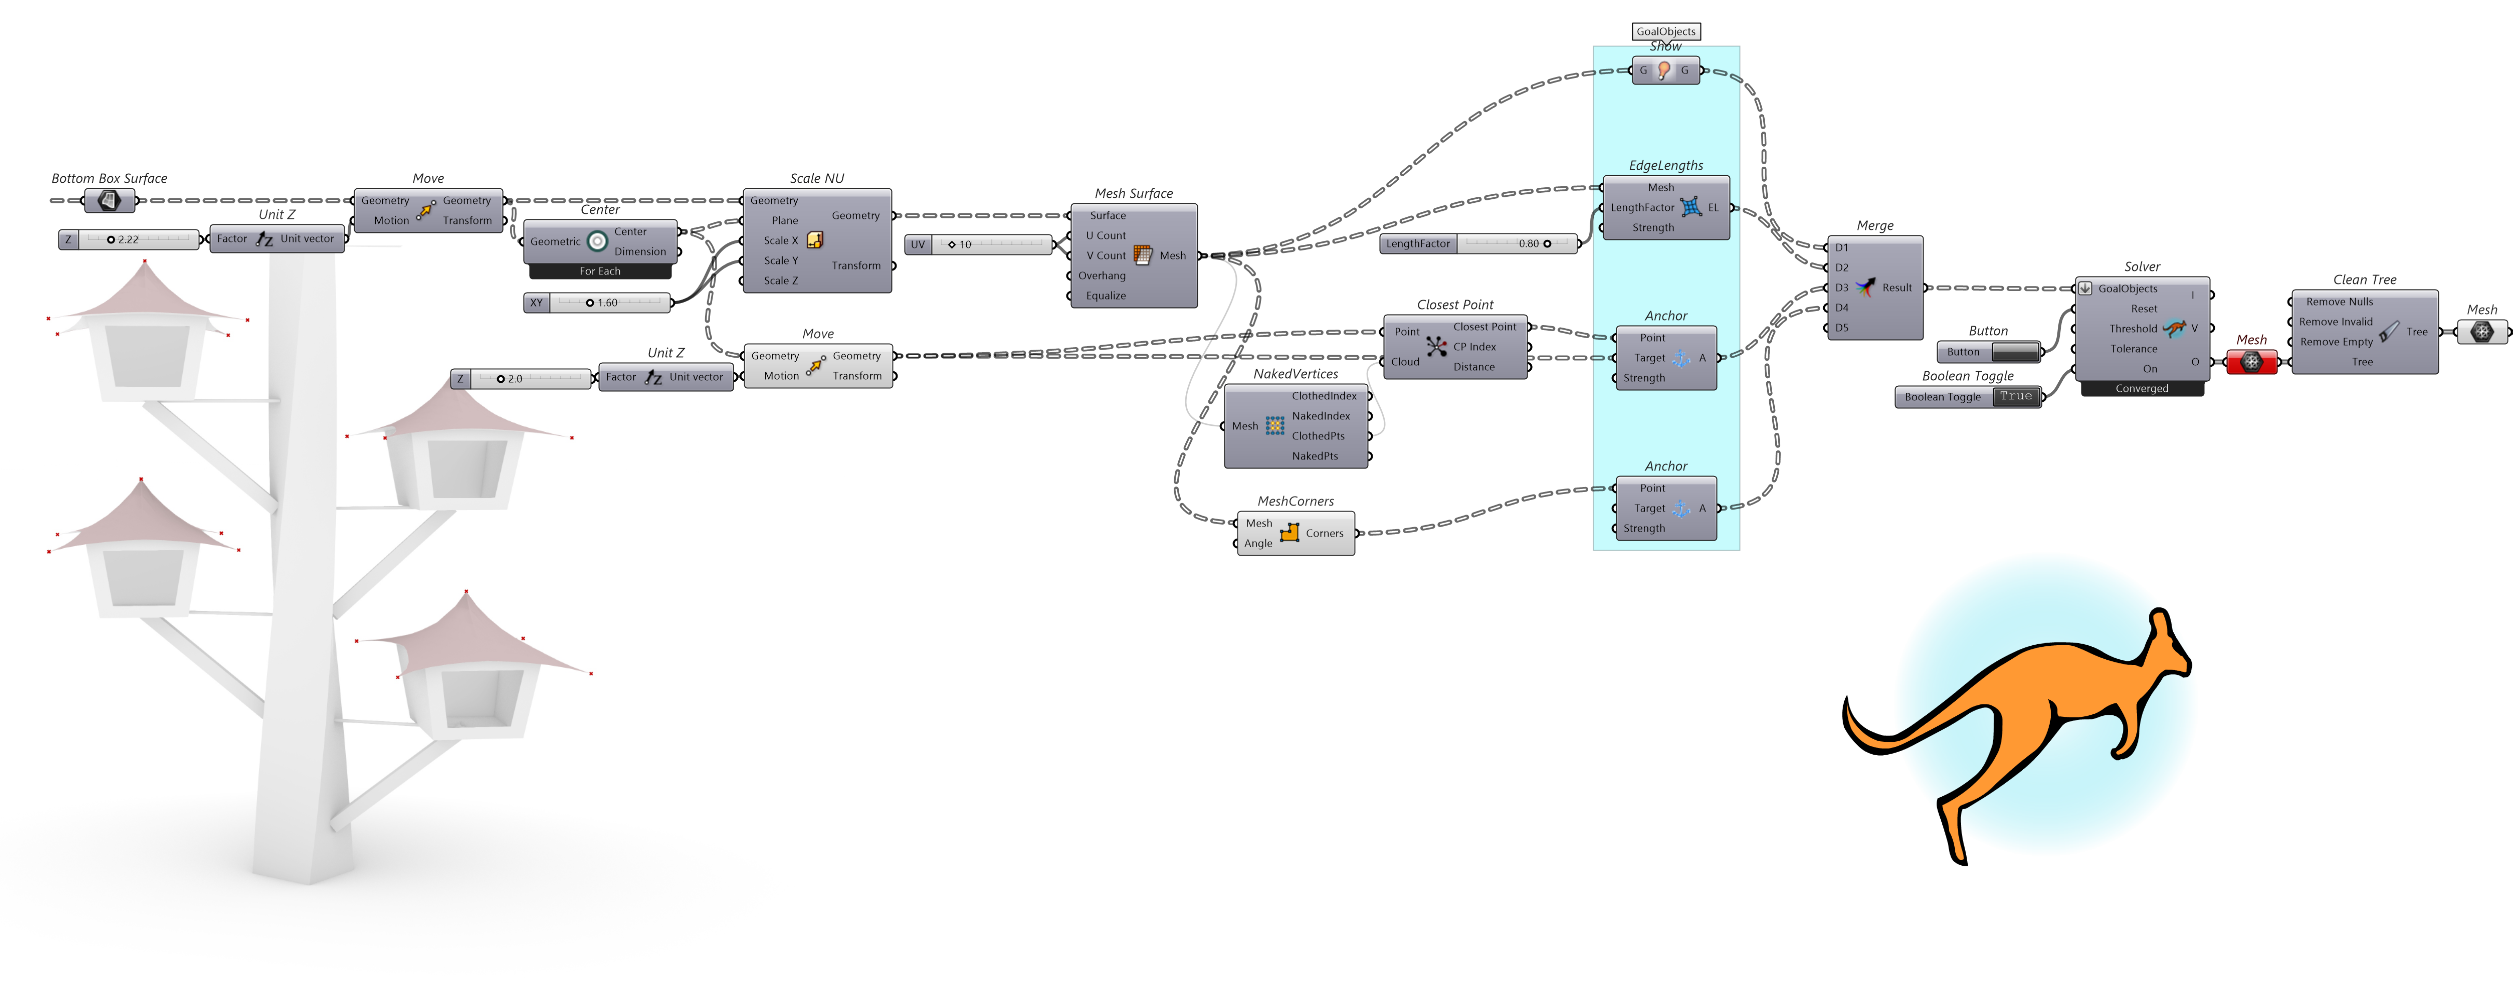
To make tensile roof structure in Kangaroo2 we first need to create mesh, here we use Mesh Surface component with surface taken from Step 1. (Deconstruct Brep – bottom surface)
5. Selected surface is moved and scaled around center, then we create mesh using Mesh Surface with adequate number of quads in both directions (U V count)
6. Create GoalObjects which will be connected to Kangaroo Solver
7. Show is used to select geometry which will be visualized during calculation; therefore, connect it to created Mesh
8. To set edge lengths of a mesh connect EdgeLengths
9. Create anchor points of future structure by using Anchor, to create corner points use component MeshCorners, to create peak anchor point use NakedVertices and Closest Point, which will find the center point in a mesh under the peak point
10. Merge and connect to Solver, add Button for Reset and Boolean Toggle for switching solver off and on.
11. To visualize smooth surface without lines and points connect Clean Tree with Mesh to select nothing but mesh (it will show error becouse it can’t convert lines to mesh, which is wanted result).
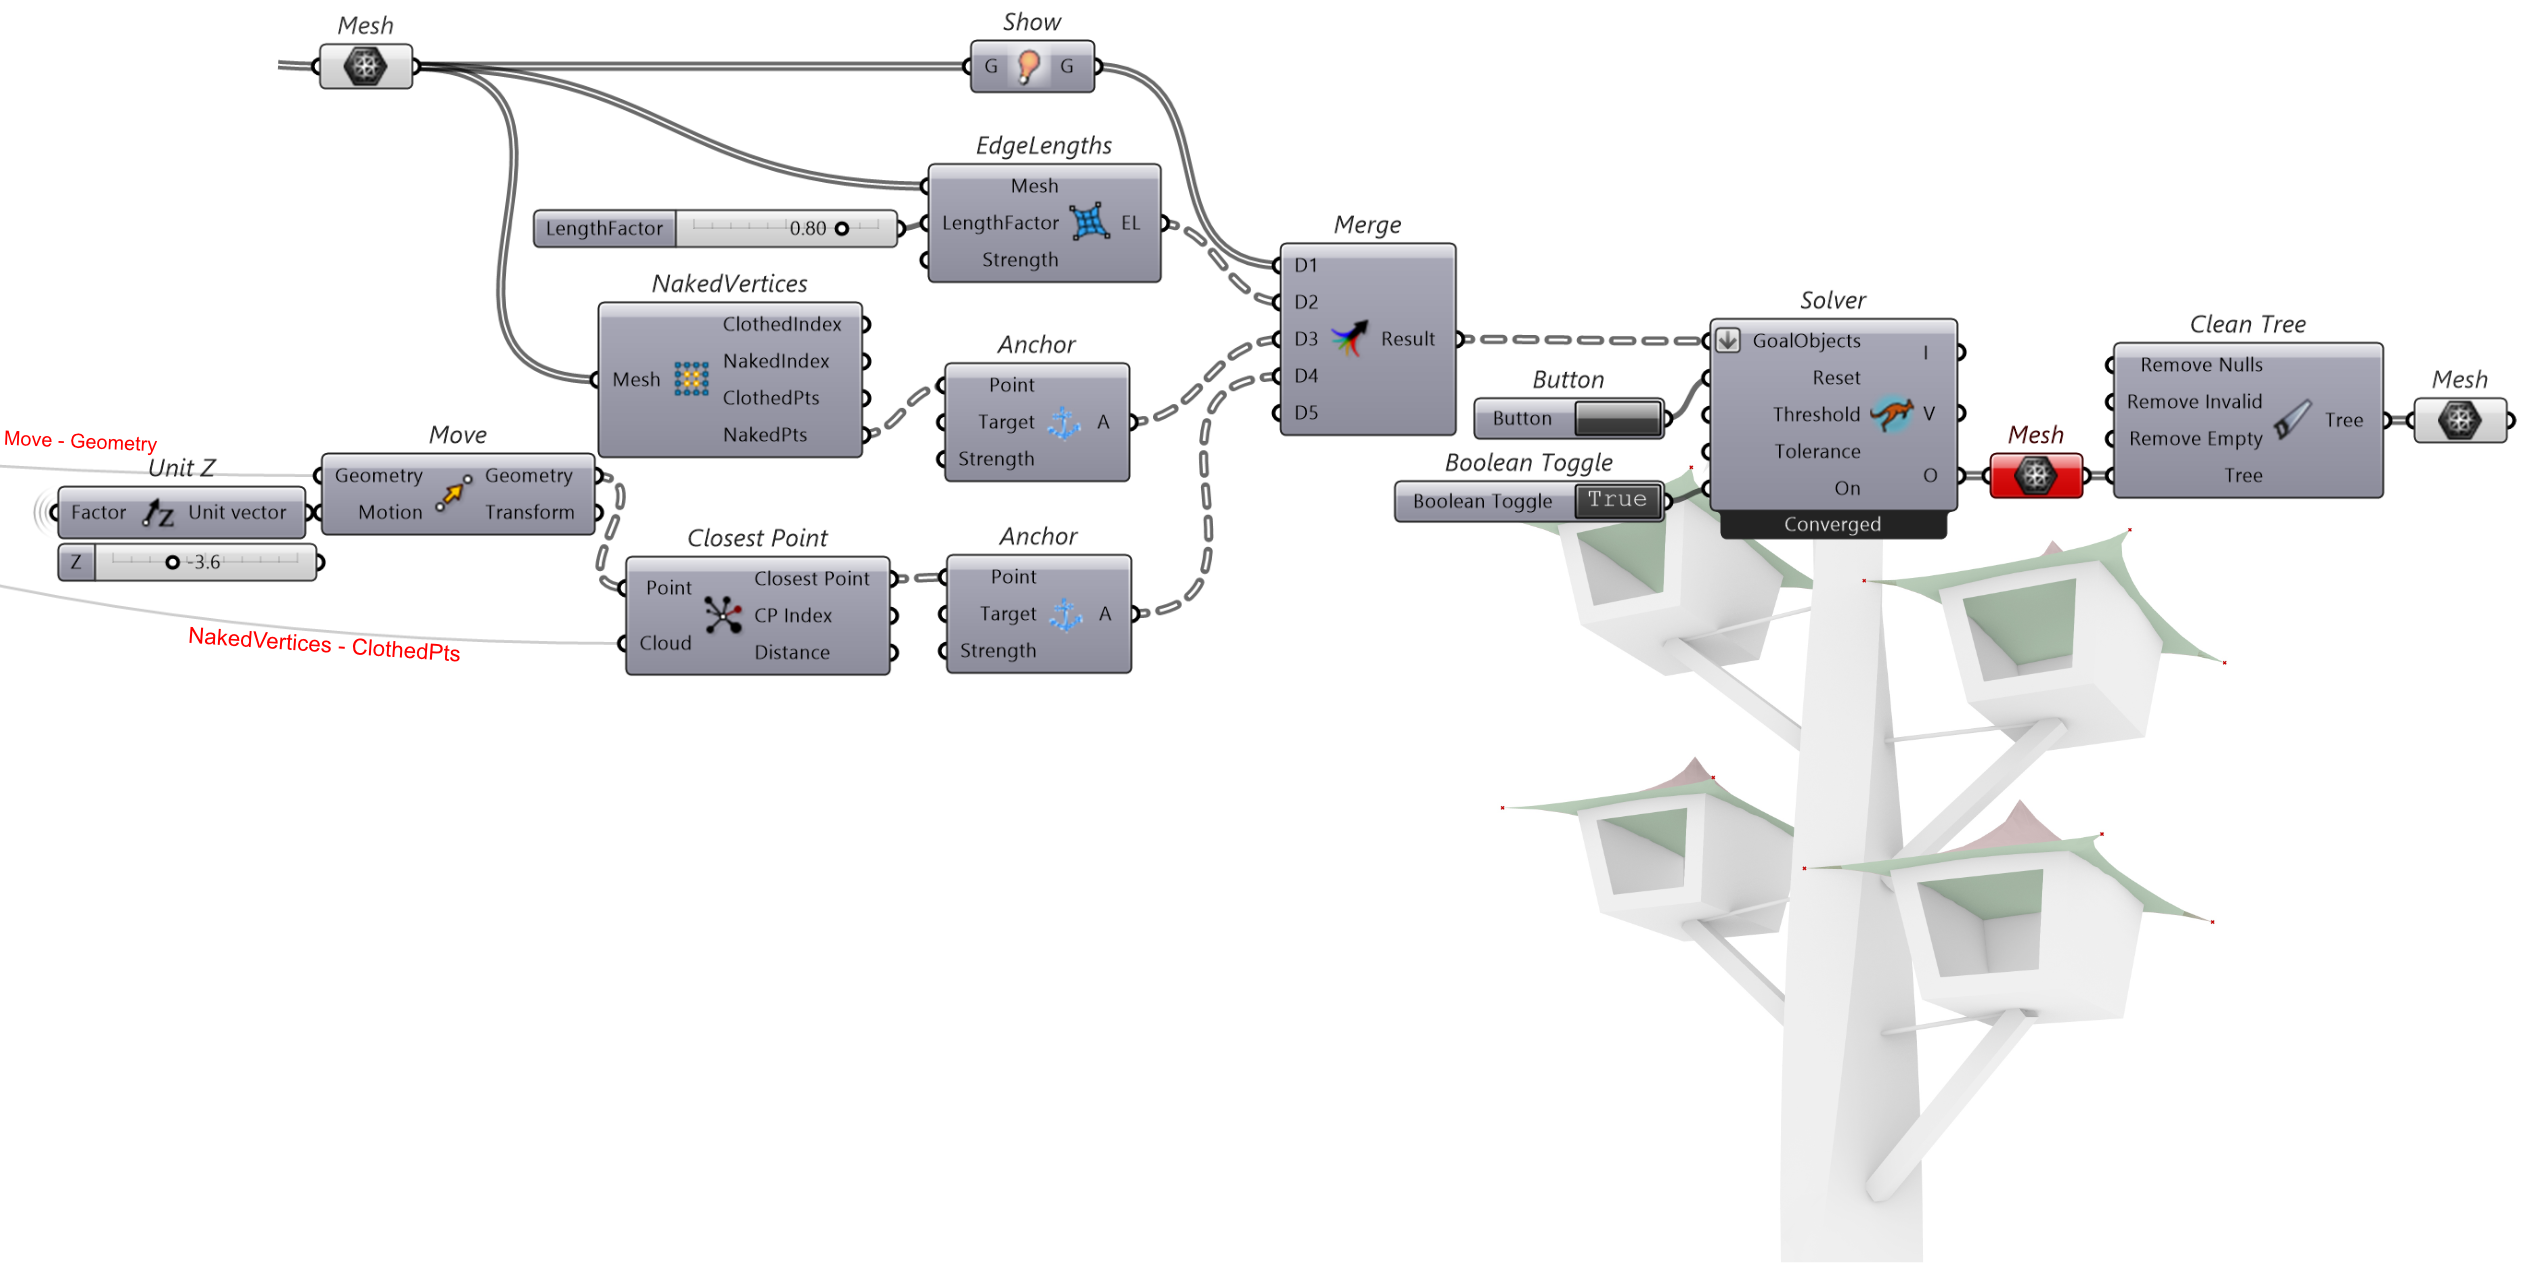
To create closed structure we can use another Kangaroo Solver with Mesh taken from previous visualization (Step. 11)
12. Connect Show, EdgeLengths and Anchor with NakedVertices to previous Mesh
13. Create peak anchor point by using Closest Point where Point is taken from previous Move – Geometry and Cloud is also connected to previous NakedVertices
14. Repeat steps 10 and 11
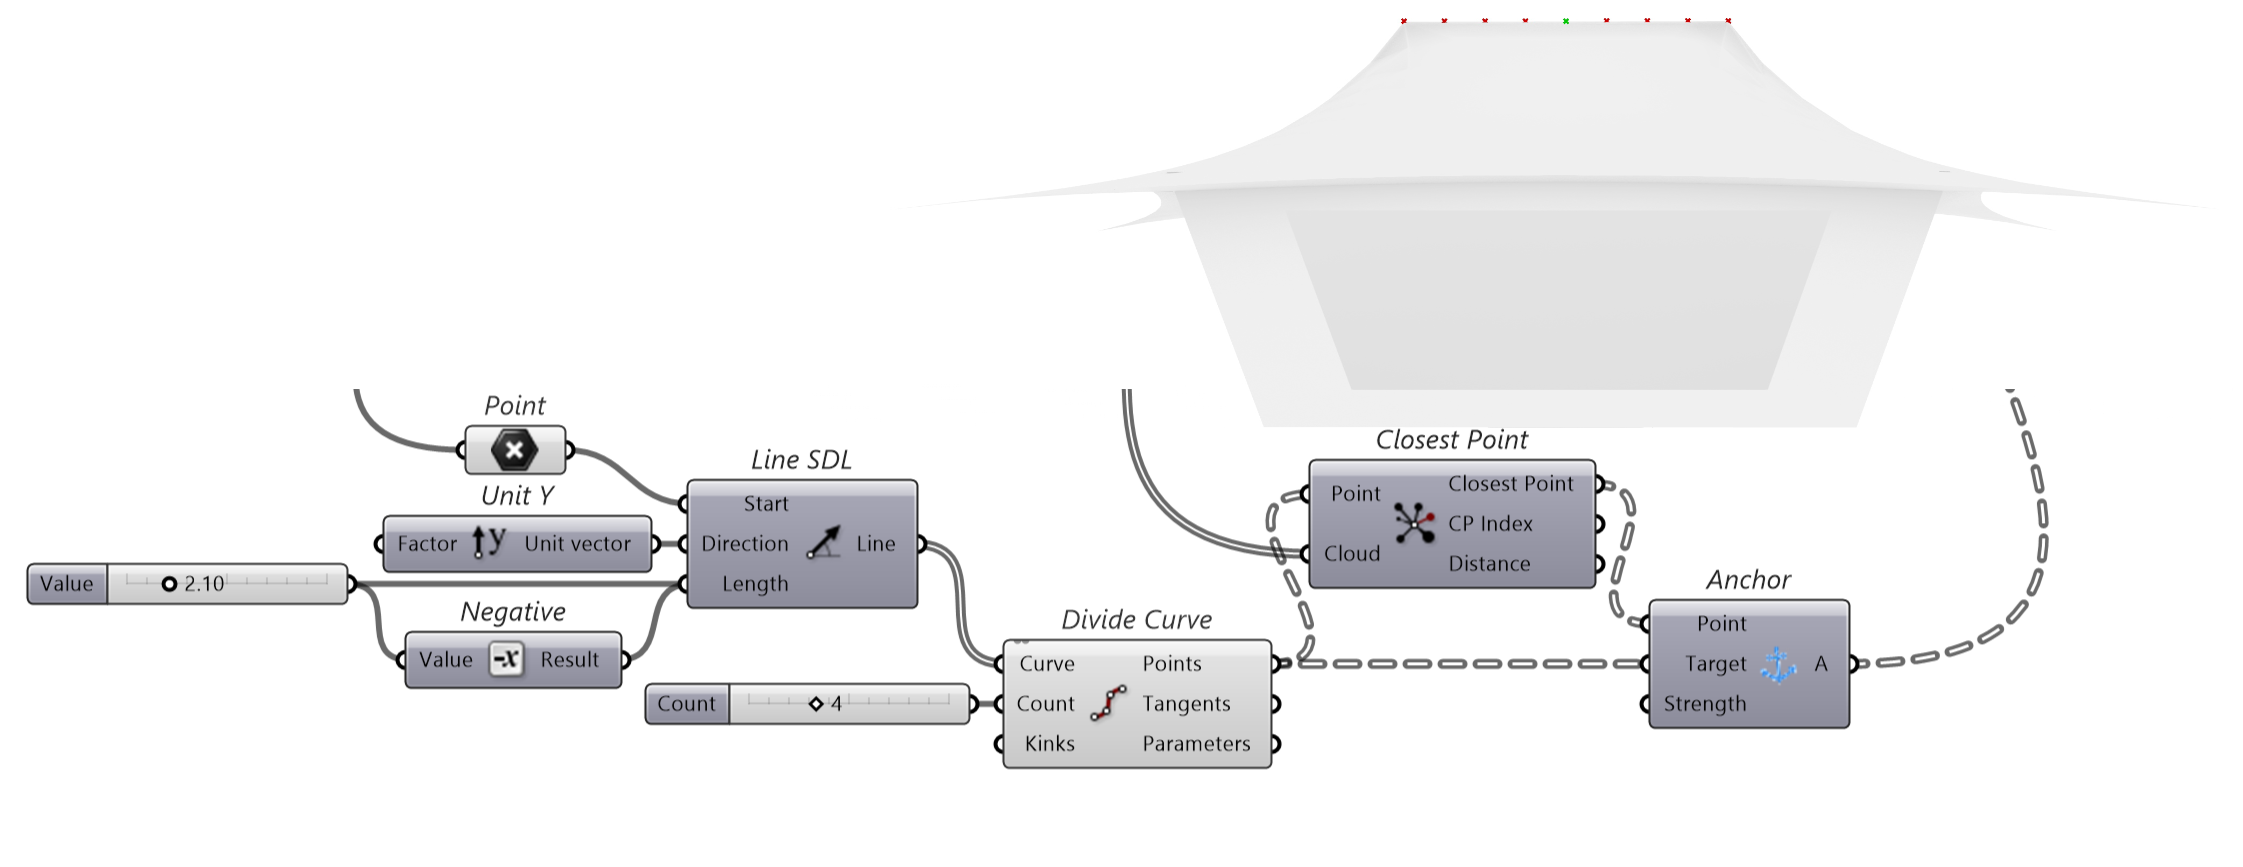
15. To create roof above the main cabin repeat the steps above but instead of one peak anchor point use Line SDL and Divide Curve to achieve this shape
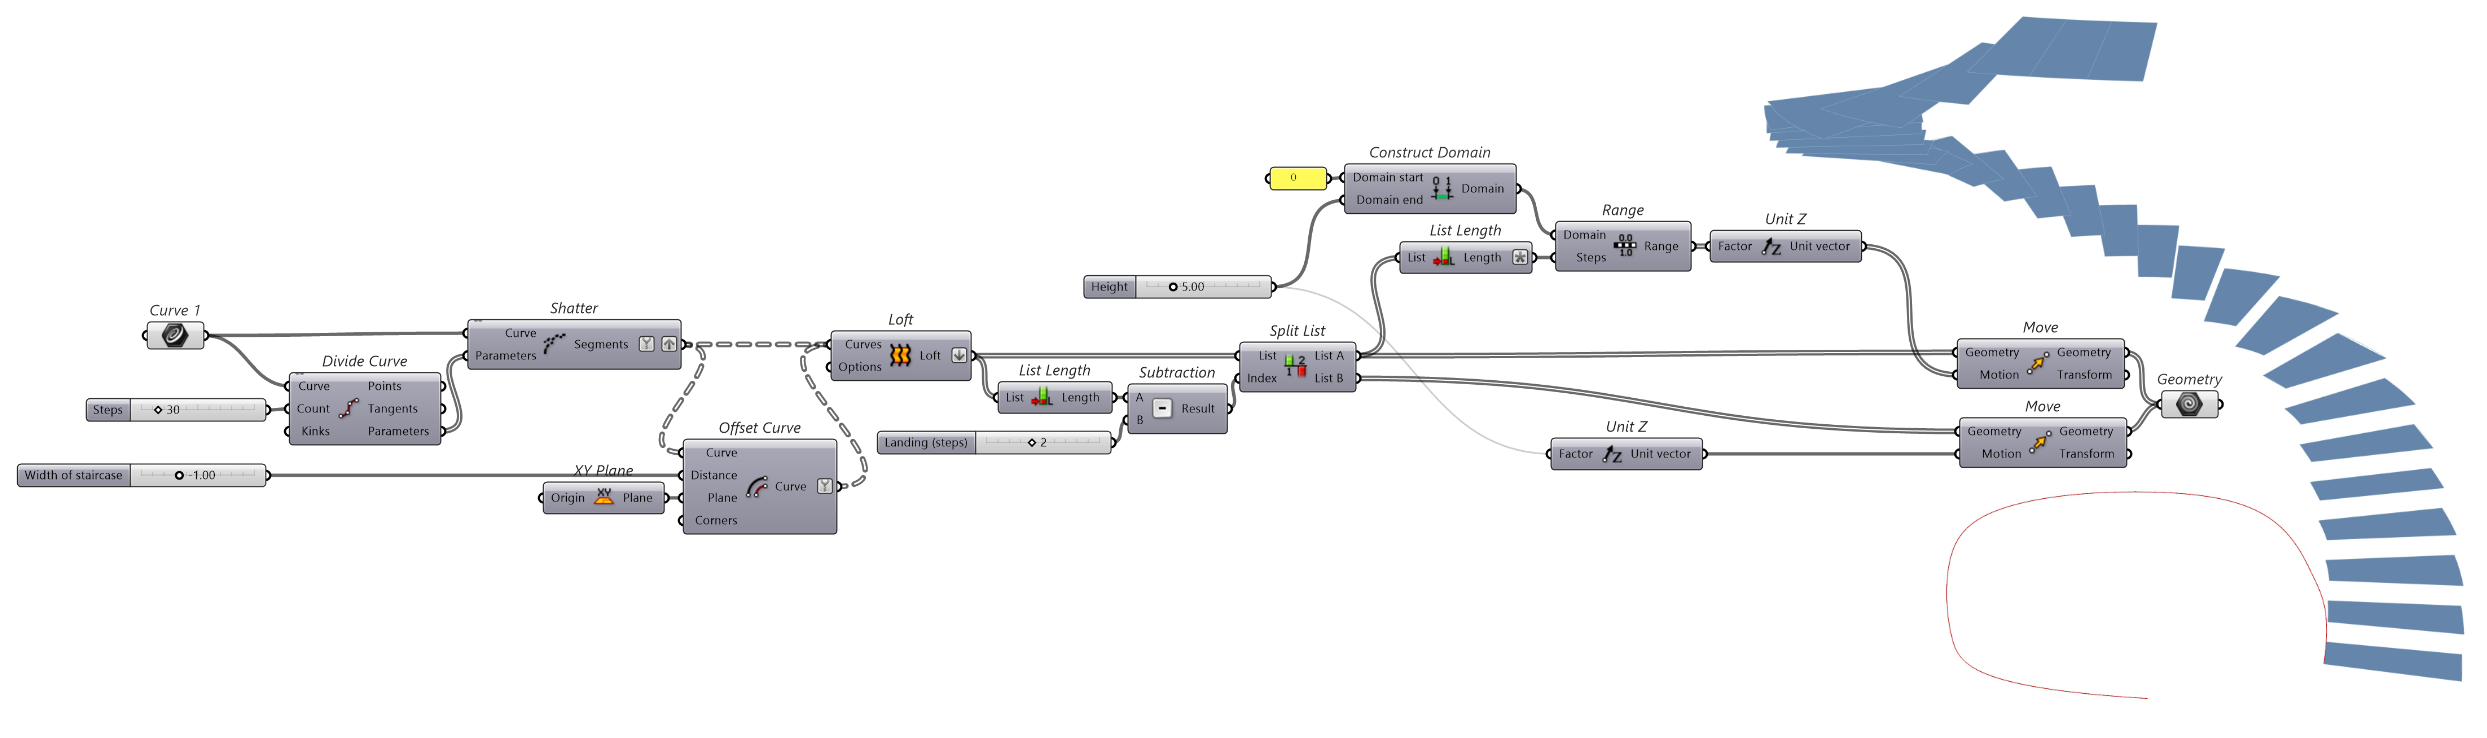
16. To create a parametric staircase start with a Curve drew in Rhino on a XY Plane
17. Divide Curve with required step count and use the parameter to Shatter
18. Offset Curve by width of the staircase and Loft
19. To create a landing, substract number of steps which will be used as landing from List Length, then Split List at that index
20. Raise the stairs (List A) by moving it with Range and Domain with required Height of the staircase
21. Move the stair landing to the same height as the final step, then combine both in one Geometry

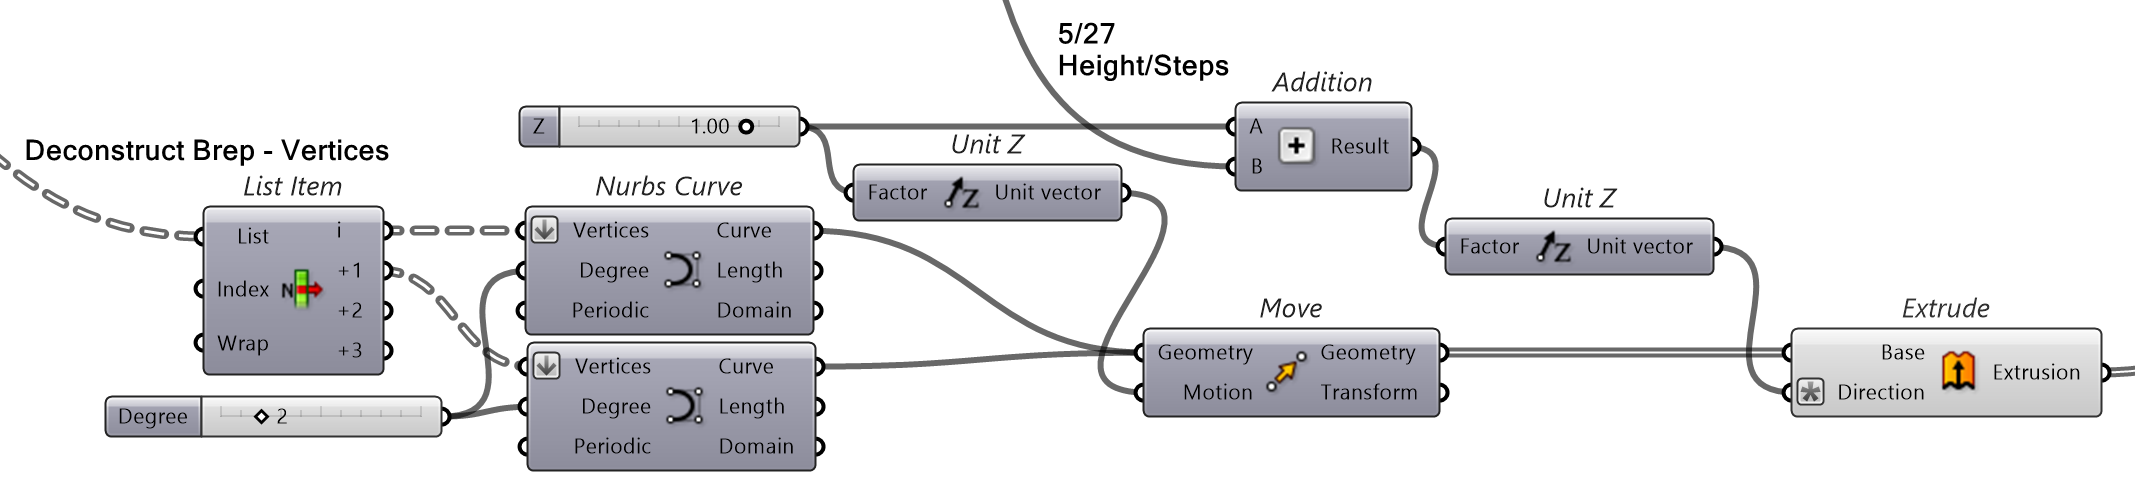
22. To Add stair raisers Deconstruct Brep and find front edge by List Item
23. Shift Tree by using Tree Statistics and Tree Branch
24. Extrude in negative direction by height of the riser (5 meters / 27 steps)
25. To create railing, first select points on the edge of every step by using List Item, first list will be the outer points and second list the inner points
26. Connect the points and fit them to curve using Nurbs Curve
27. Lift the curves using Move by required height of railing
28. Extrude it in the opposite (- z) direction by height of the railing + height of one step
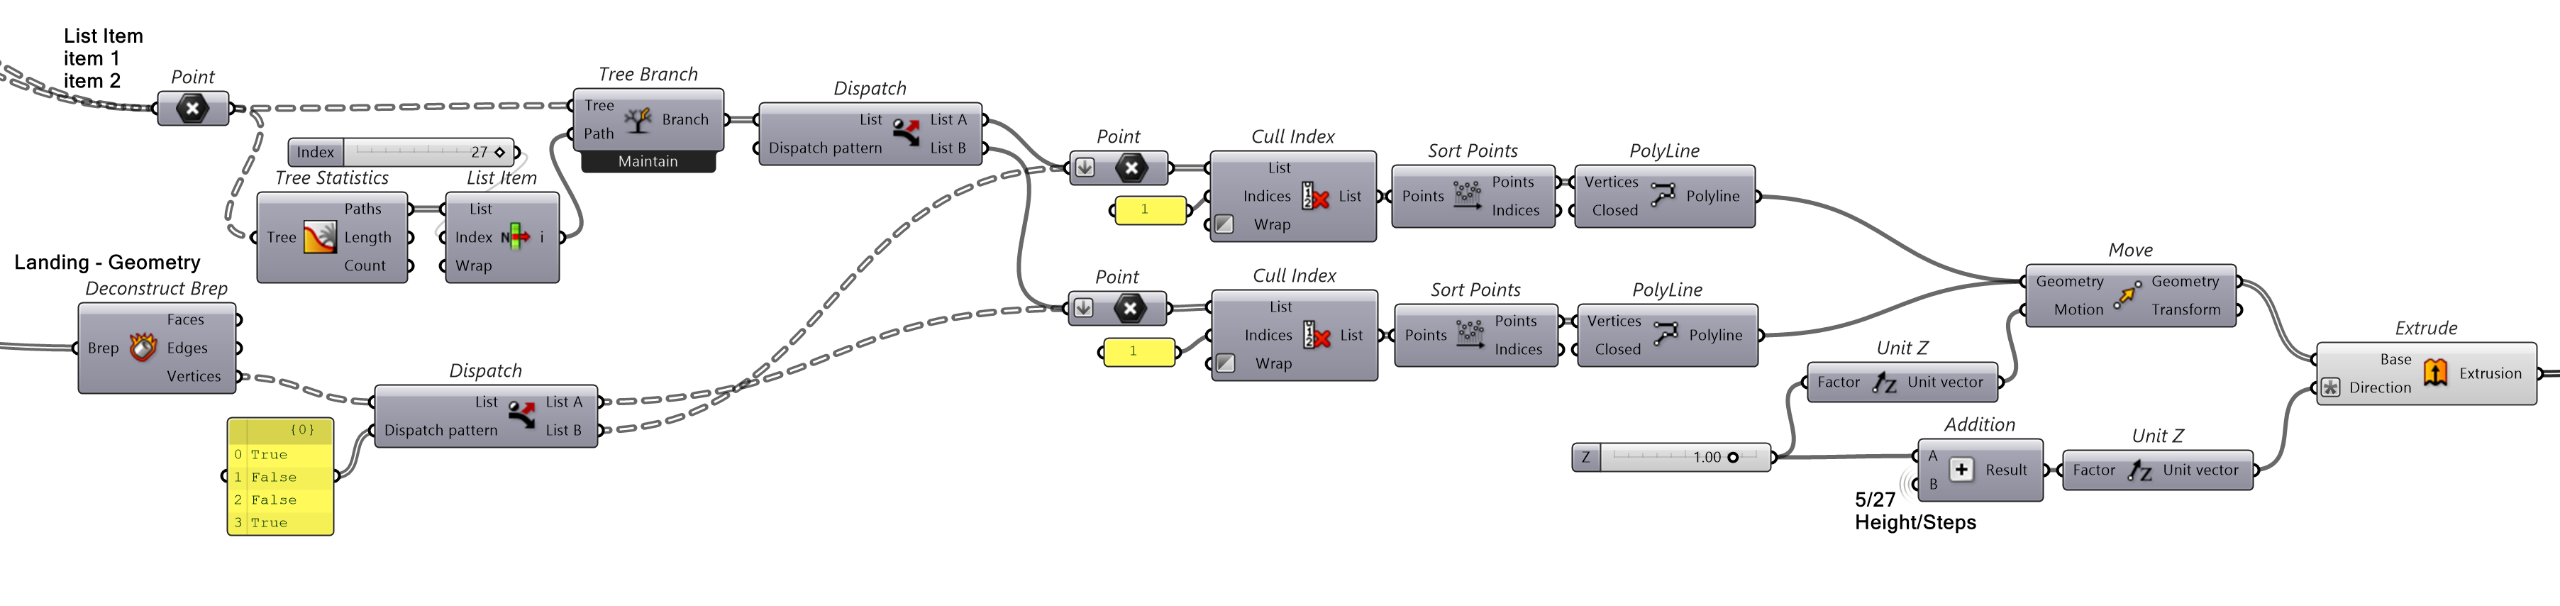
29. To add railing on the stair landing select last points from the step 25. using Tree Statistics and Tree Branch
30. Split them into outer and inner points using Dispatch
31. Select points from landing Geometry using Deconstruct Brep, then apply Dispatch with Dispatch pattern (T/F/F/T)
32. Adjust points by using Cull Index and Sort Points components
33. Connect points with Polyline and Extrude them with same direction and height as railing on the stairs

34. Repeat these steps to create staircase to every cabin with different curvature

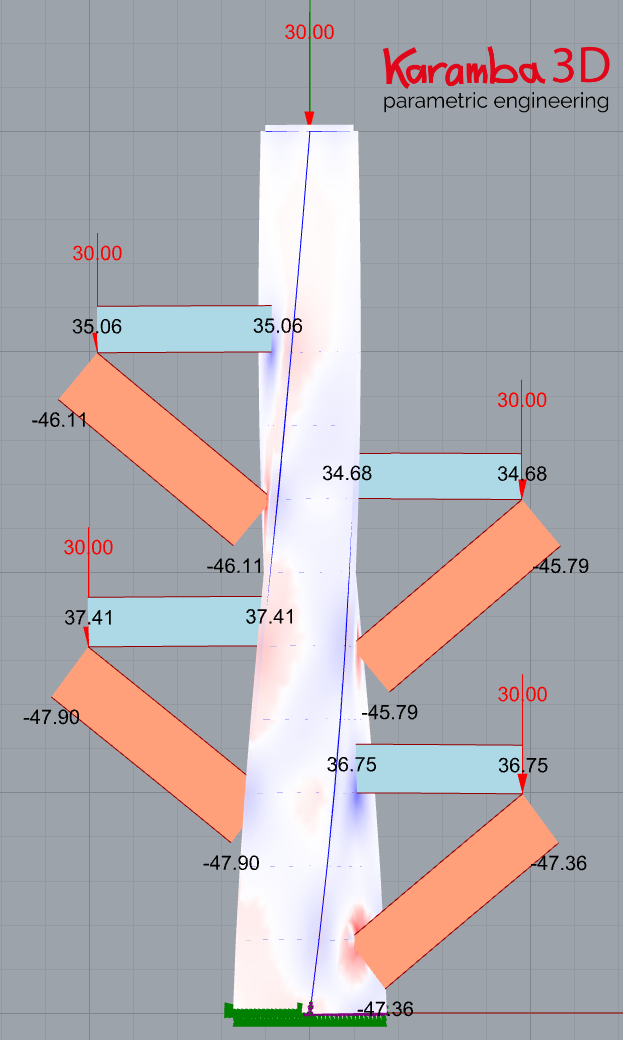
After we are finished with modeling geometry we can perform for example simplified structural analysis of Part 1 and verify dimensions of elements used. For quick and parametric structural analysis I can recommend plugin Karamba3D – https://www.karamba3d.com/ (in the tab Learn you can find Examples and well written Manual).
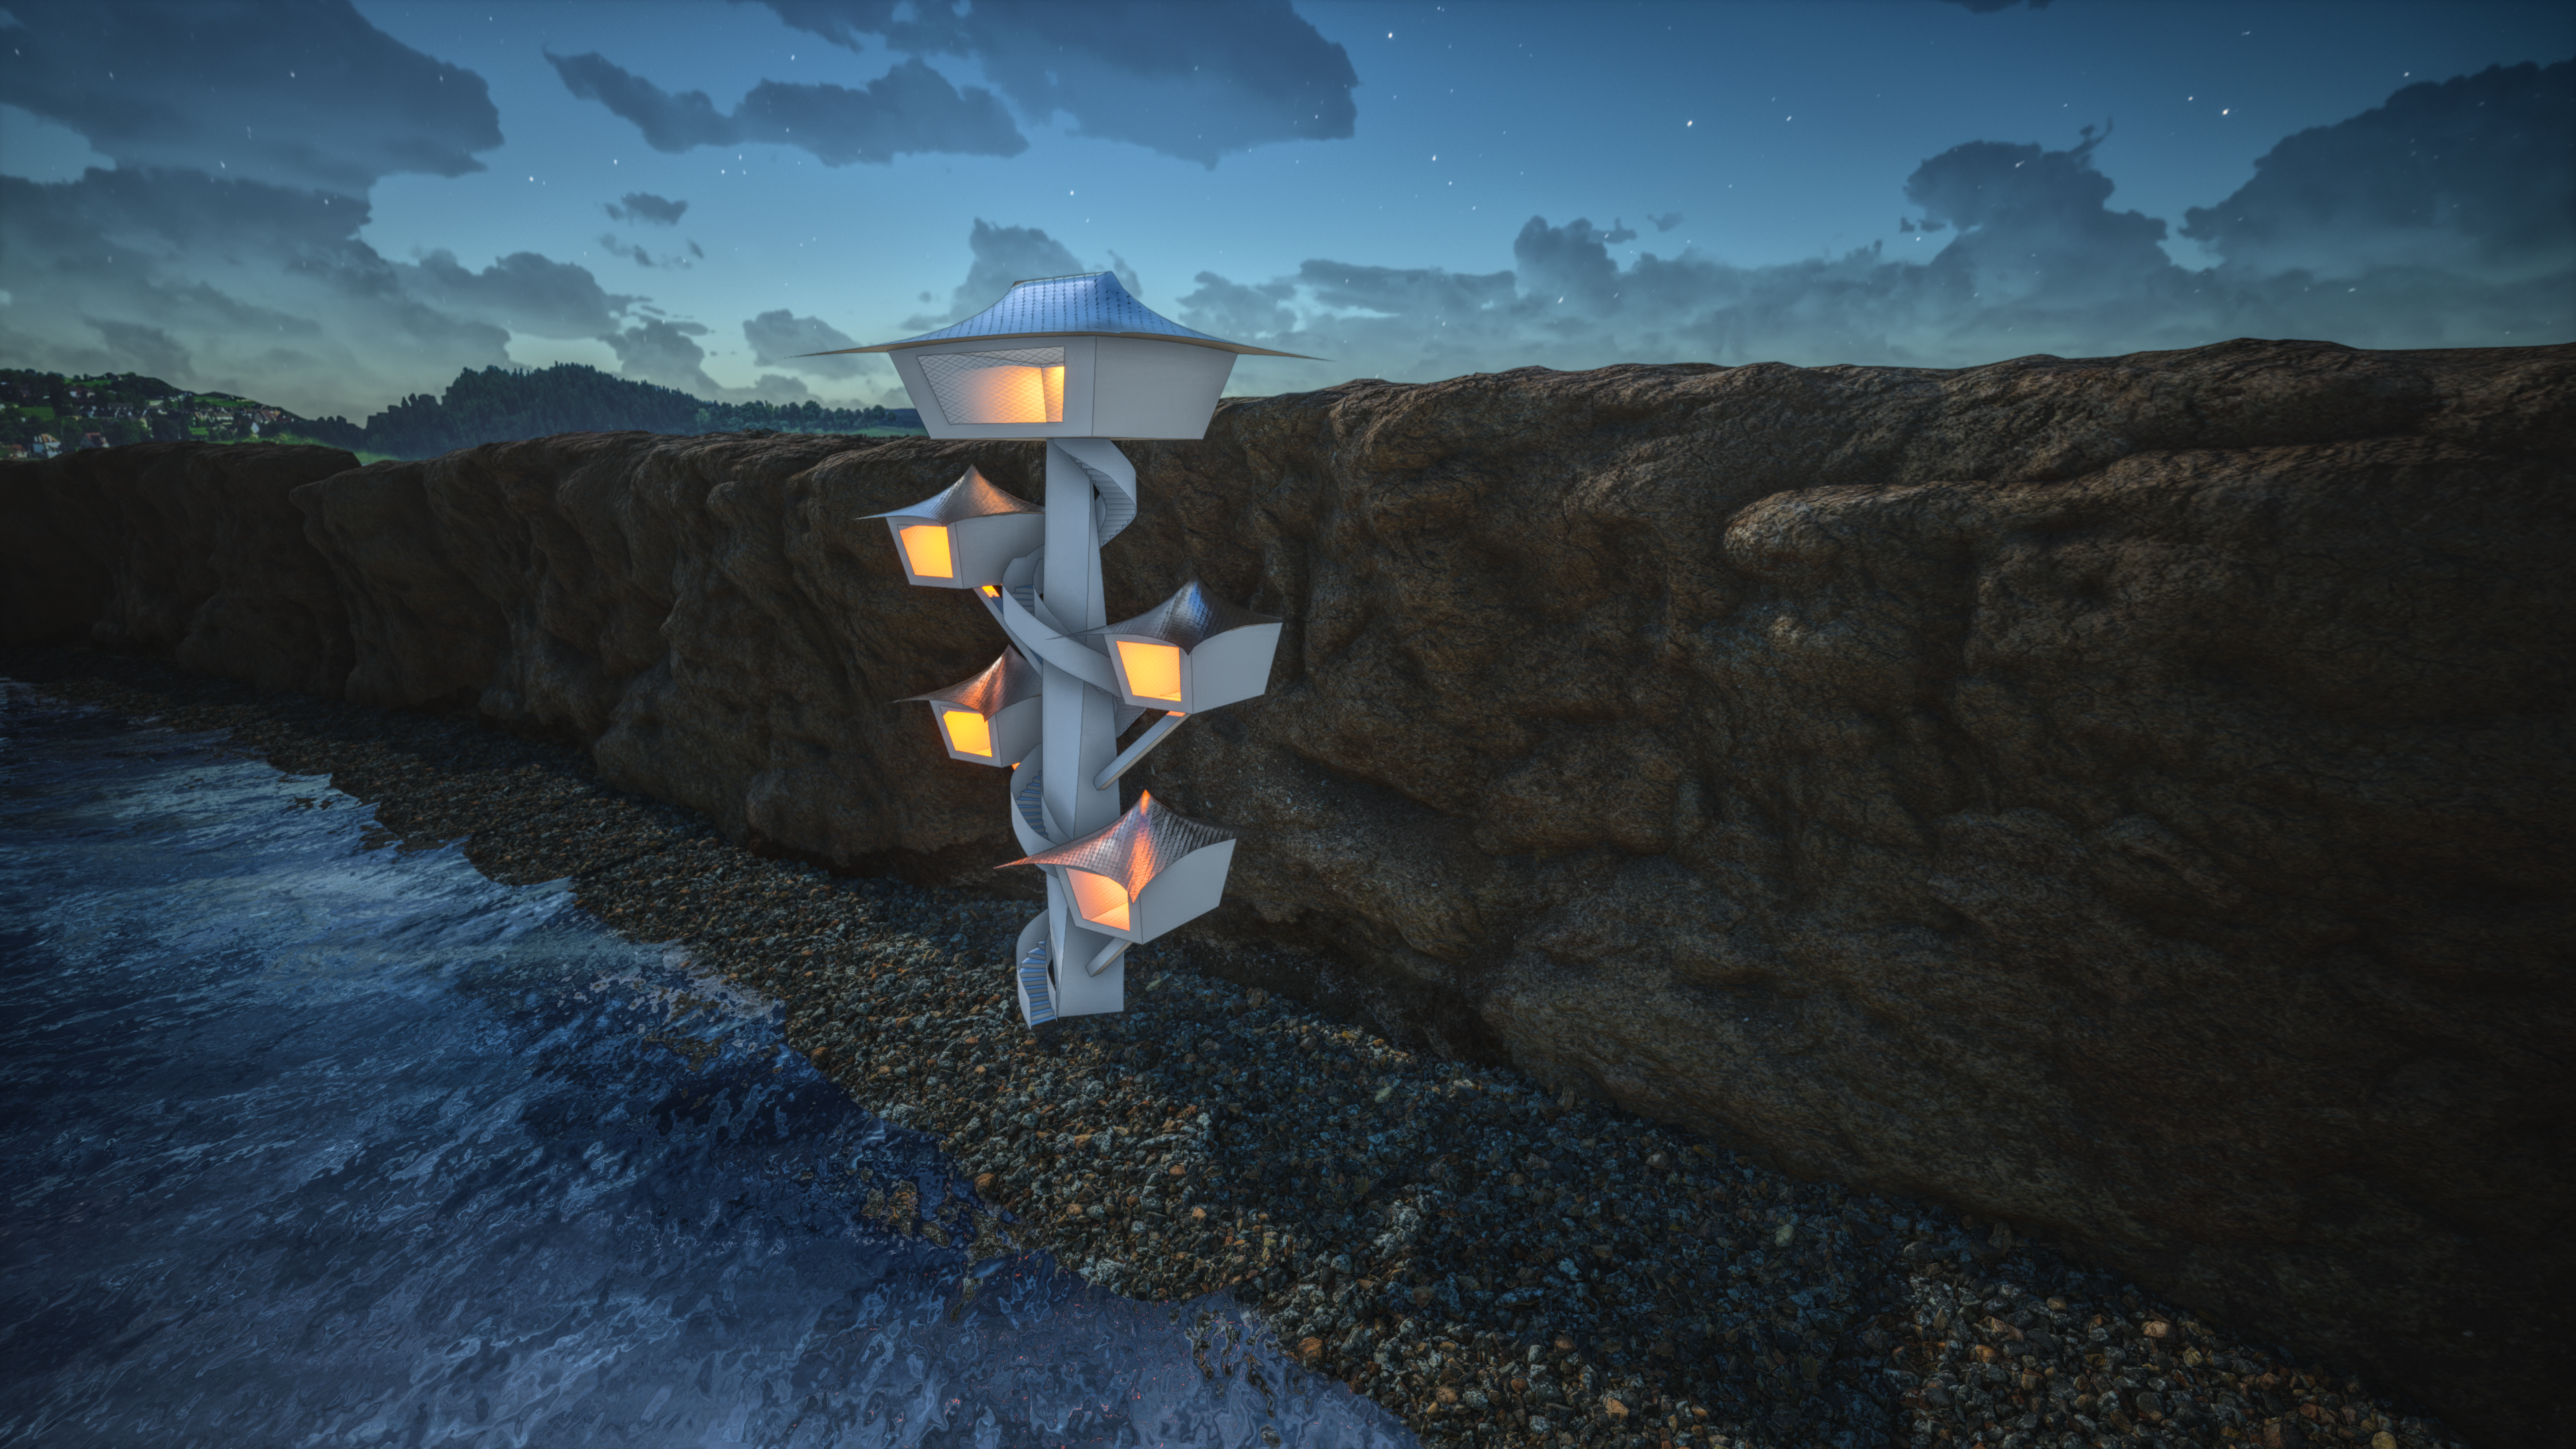
Final Visualization – done in Twinmotion using Datasmith Exporter Plugin from Rhino7 (https://www.unrealengine.com/en-US/datasmith/plugins)
Files:
Grasshopper File – Tutorial – Parametric Cliff Tower
Rhino 7 File – staircase curves