
Introduction
A lot of times, building in Minecraft can be very tedious and it is almost impossible to see ahead and visualise what you are building. Because building in Minecraft is a block by block process, unless you are able to make a projection to visualise the final outcome, a lot of time will be wasted at the trial and error stage to get the visual look that you desire. Sometimes, without the proper visualisations, entire walls, towers, might even have to be demolished and rebuilt to get the desired outcome.
By using Grasshopper, Rhino, we can easily create a preliminary visualisation of our building design and to use it as a visualisation guide, saving time and effort when construction begins in Minecraft.
Basic Box
The basics of the entire Minecraft premise is the cube. Therefore, it is important that we get the cube right first.
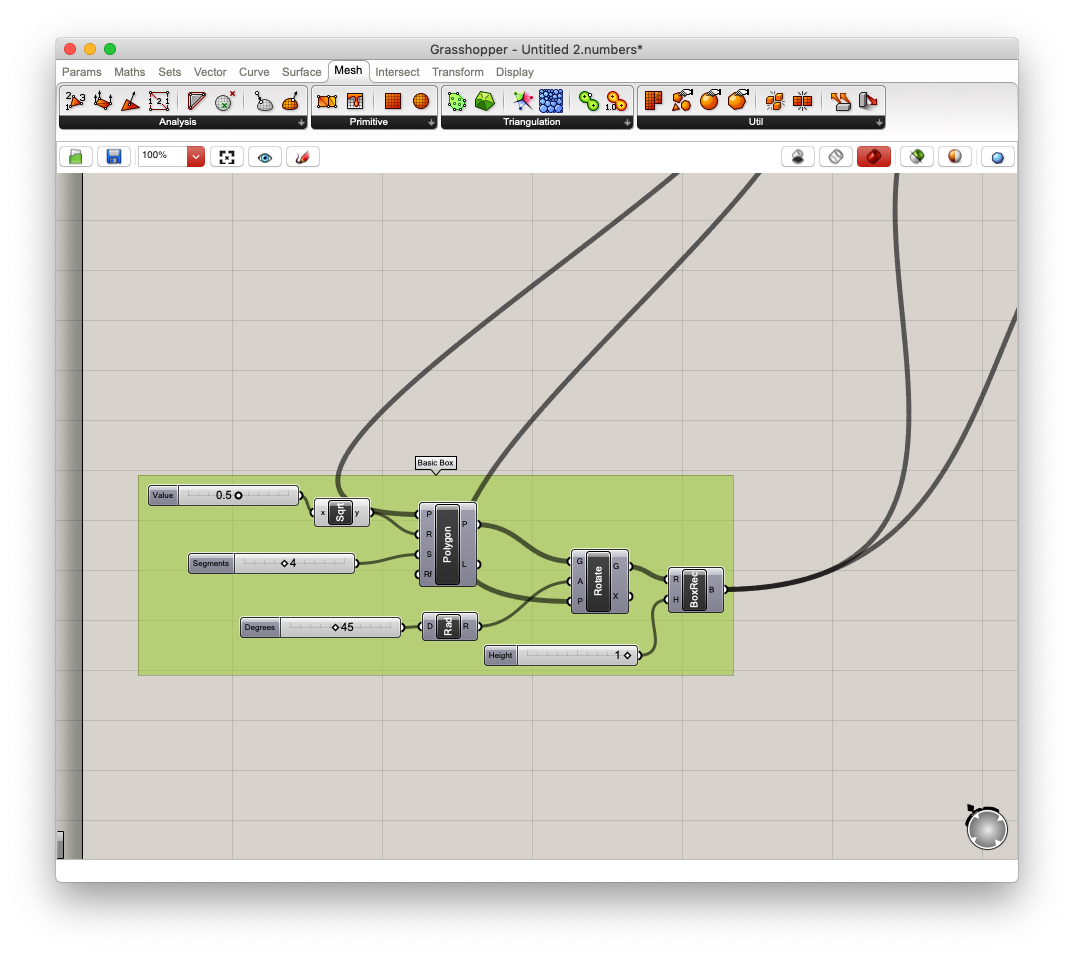
- We start off with a polygon and assign its side to be 4, this is to generate the base square.
- We then assign Square Root 1/2 as its radius. This is because grasshopper measures the radius by taking the distance from the centre of the square to the corner. As we want our square to have length 1, we have to make the radius Root 1/2
- Then we want to rotate the cube by 45º to make it in line with the plane grid.
- We then build the cube up by using the Box Rectangle function and setting its height as 1.
You should be able to see one lone cube being generated. This is the basis for all the cubes to follow.
Setting the Construction Area
Warning: If you are using a potato PC, this part may lag depending on your project scale.
In every Minecraft project, it is normal to set up your construction area. Here are some constraints to take note
- Z-axis (Minecraft Y-Axis) should be kept at a maximum of 255 blocks as the ceiling for each world is only 255 blocks. It is important to note that although Z-axis limit in Minecraft is 255 blocks, most Minecraft surfaces start at block 62, so you will have to do your own math.
- X-axis (Minecraft X-Axis) is self-determined.
- Y-axis (Minecraft Z-Axis) is also self-determined.
The greater the domain/range/height, the more detailed your creation can be. However, that will also mean that your PC will require more time to render the creation in Grasshopper. For tutorial demonstration, we will use a construction area of 15x15x15
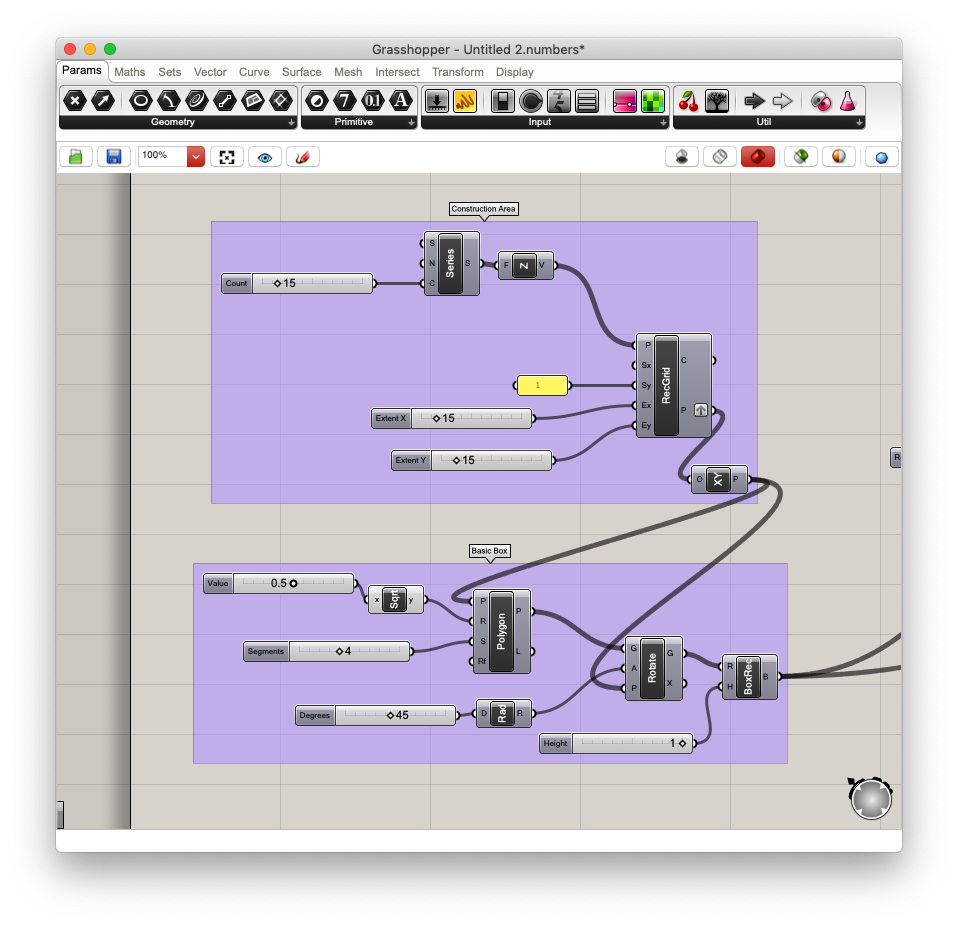
- First, we want to set up the Z-axis planes. We do that by setting up a series with a count size of 15 (15 blocks high).
- We then put this into a Unit-Z function.
- Then we channel these new Z-axis planes to a Rectangular Grid function’s plane.
- We then fill the rectangular grid with these parameters
- We insert 1 for “Sy” because for some reason the default is 2. We want a square grid, not a rectangular one
- We insert 15 for “Ex”, and “Ey” because we want the X-axis and Y-Axis to have 15 blocks each.
- We then graft the “Points” output and put the points generated by the Rectangular Grid function into a Plane function as its centre point
- We then route the Plane function into the Polygon and Rotate function of the Basic Box
You should get something like this:
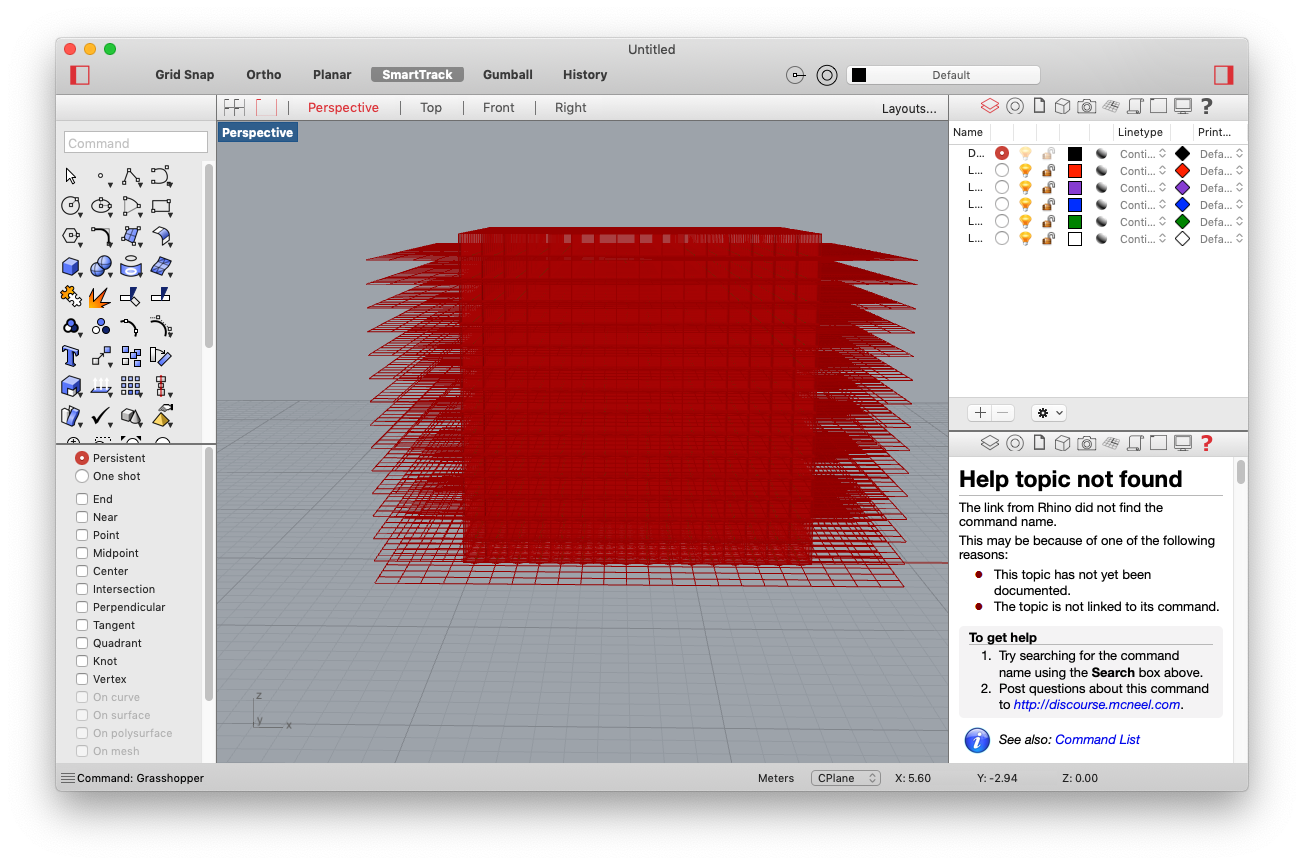
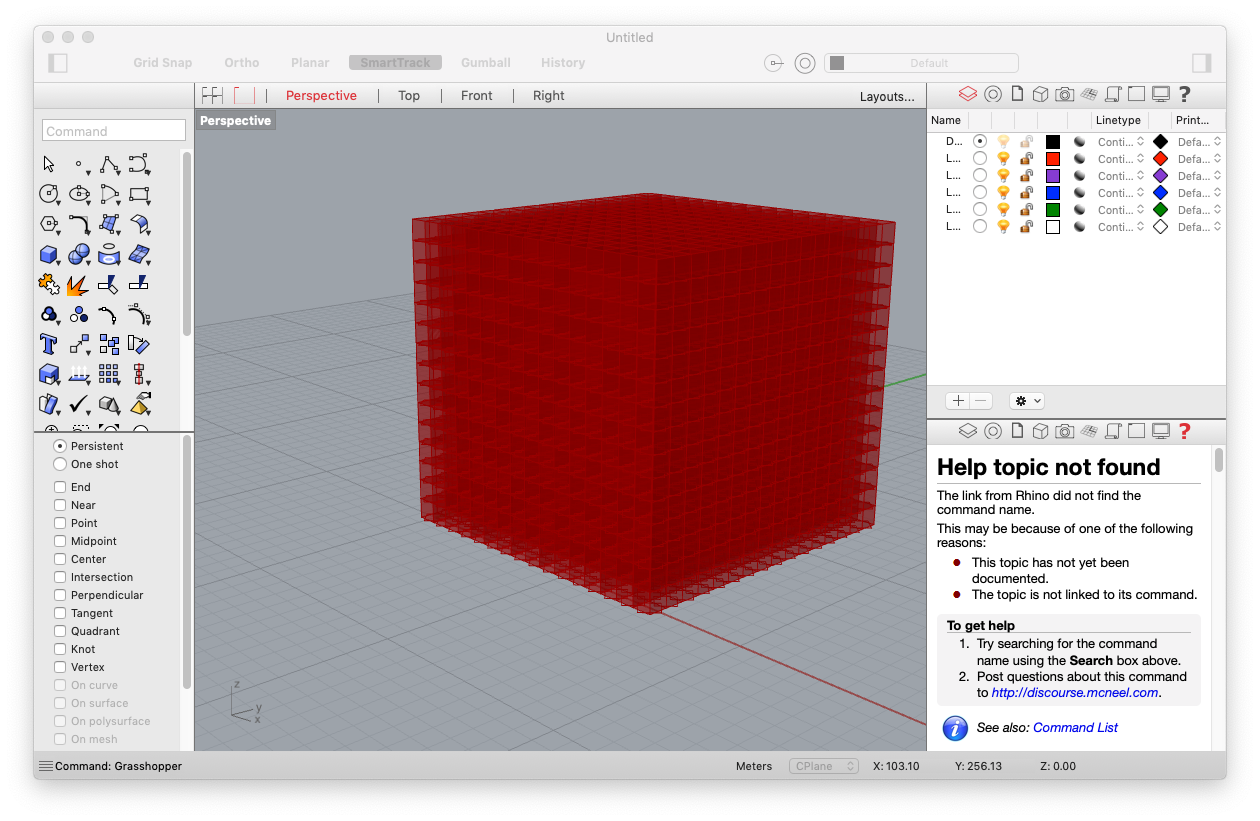
Hide all the non-essential planes and you should get a beautiful cube made up of cubes:
This is all, of course, just the basics of setting up a Construction Area, you can define your own construction area to suit your needs. This tutorial will only go through techniques.
Construction by Removing
So now we got our Construction Area done, it is time to get your building up and running. The method we would be using is called Construction by Removing. It is based on a simple concept of removing the blocks that you do not want to get your final product.
To illustrate the concept, let’s use our previous Construction Area and let it take the shape of a Quarter Sphere.
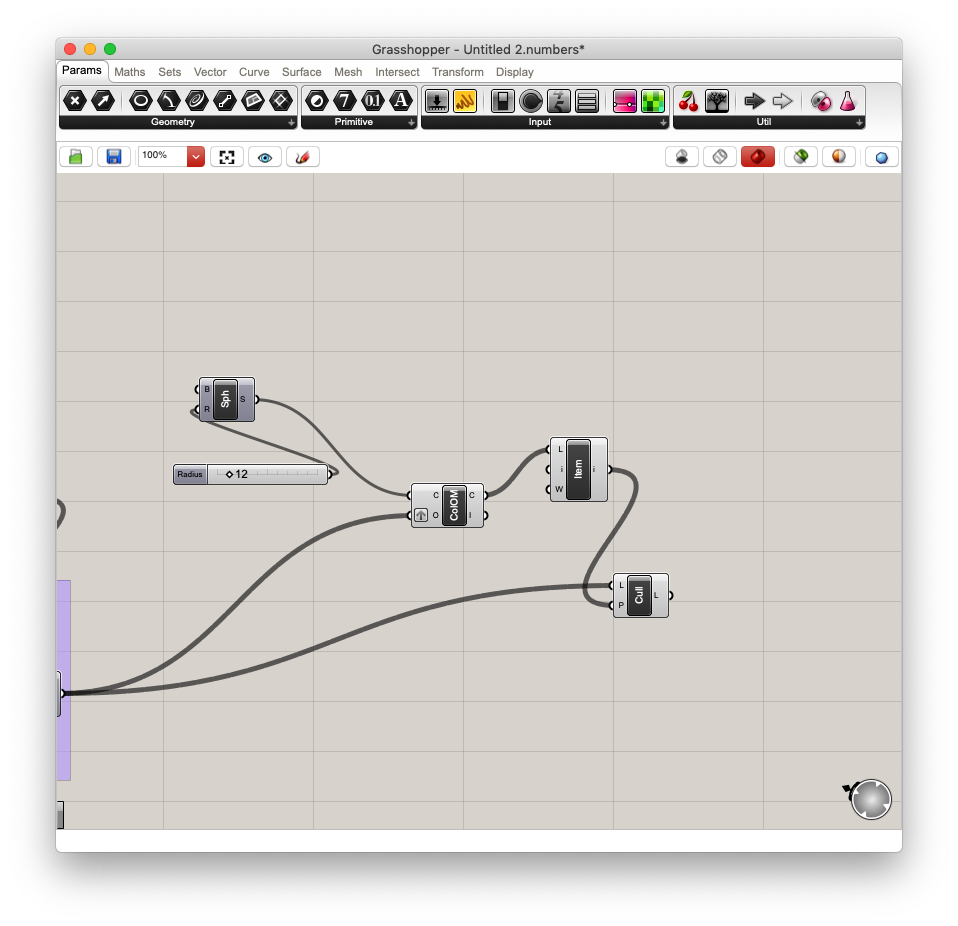
- First, we simply create a Sphere by using the sphere function and set a radius for the sphere. In this illustration, I’m going to use a radius of 12.
- We then create a Collision One|Many function in. We put the Construction Area into the “Obstacle” and the Sphere into the “Collider”. This will return us a list of true or falses on where an overlap has occurred and where it hasn’t.
- We then put them into a list and pull it through the Cull Pattern Function’s “Cull Pattern”. We also connect the Construction Area to the “List” input of the Cull Pattern Function.

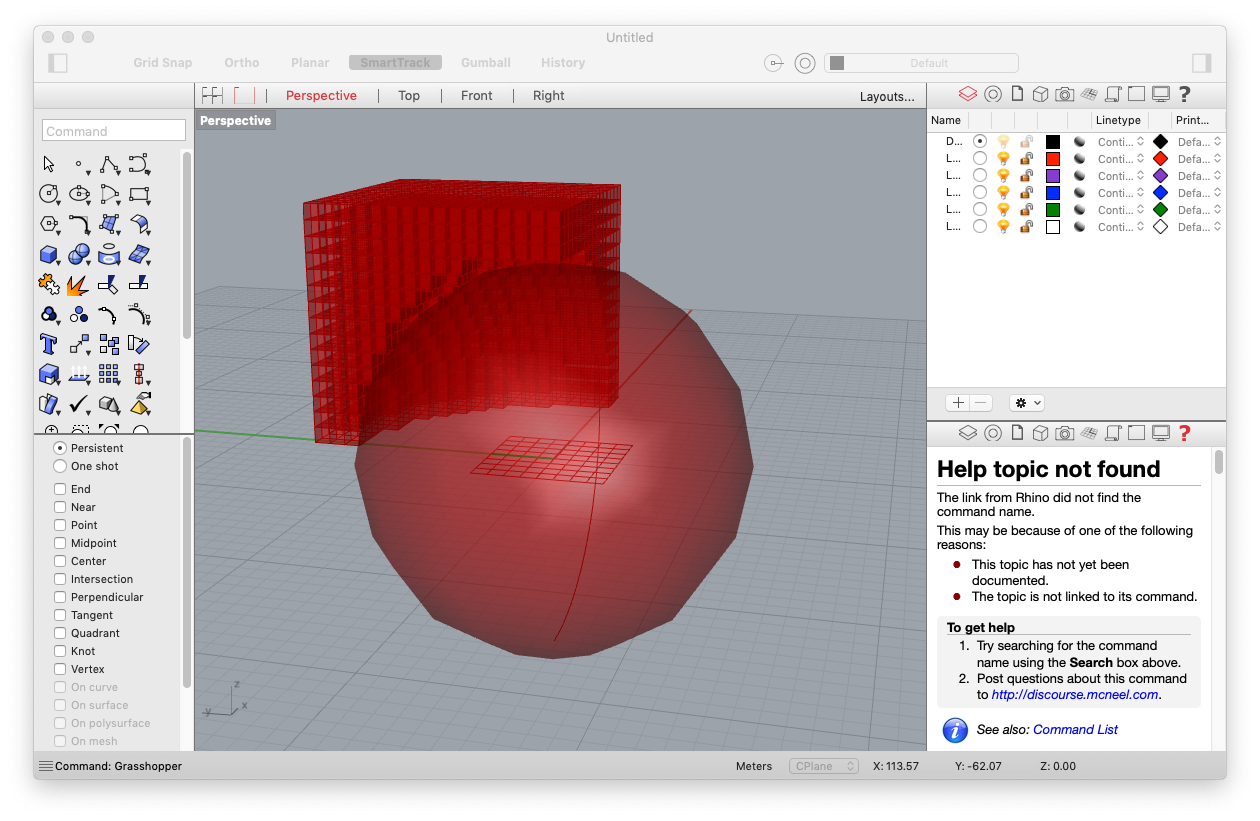
You should then get something like the above. A Sphere created by blocks.
It is also possible to get an inverted cull, should you wish (but I find it weird anyone will use it), by using a Not-Gate function with the true/false list. You can take a look at a situation where the Not-Gate is used to invert the cull:
Further Proof of Concept
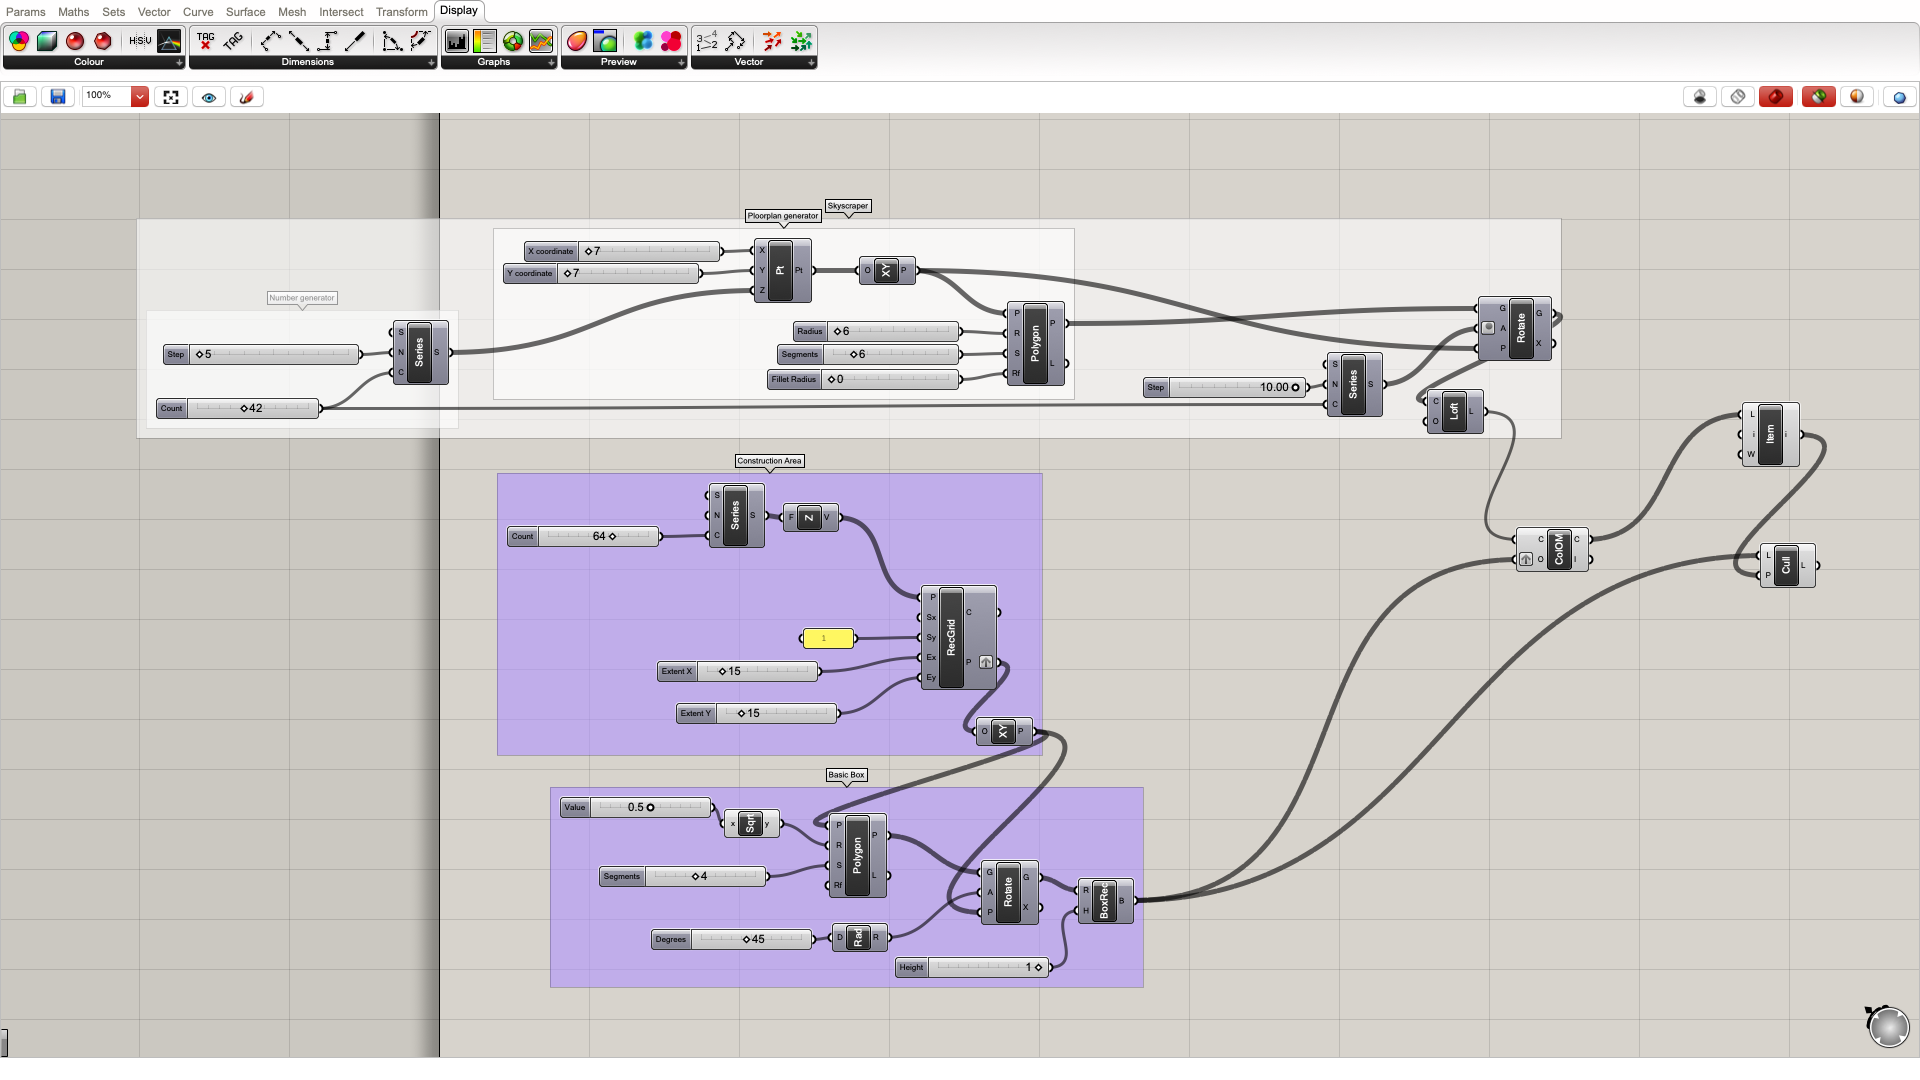
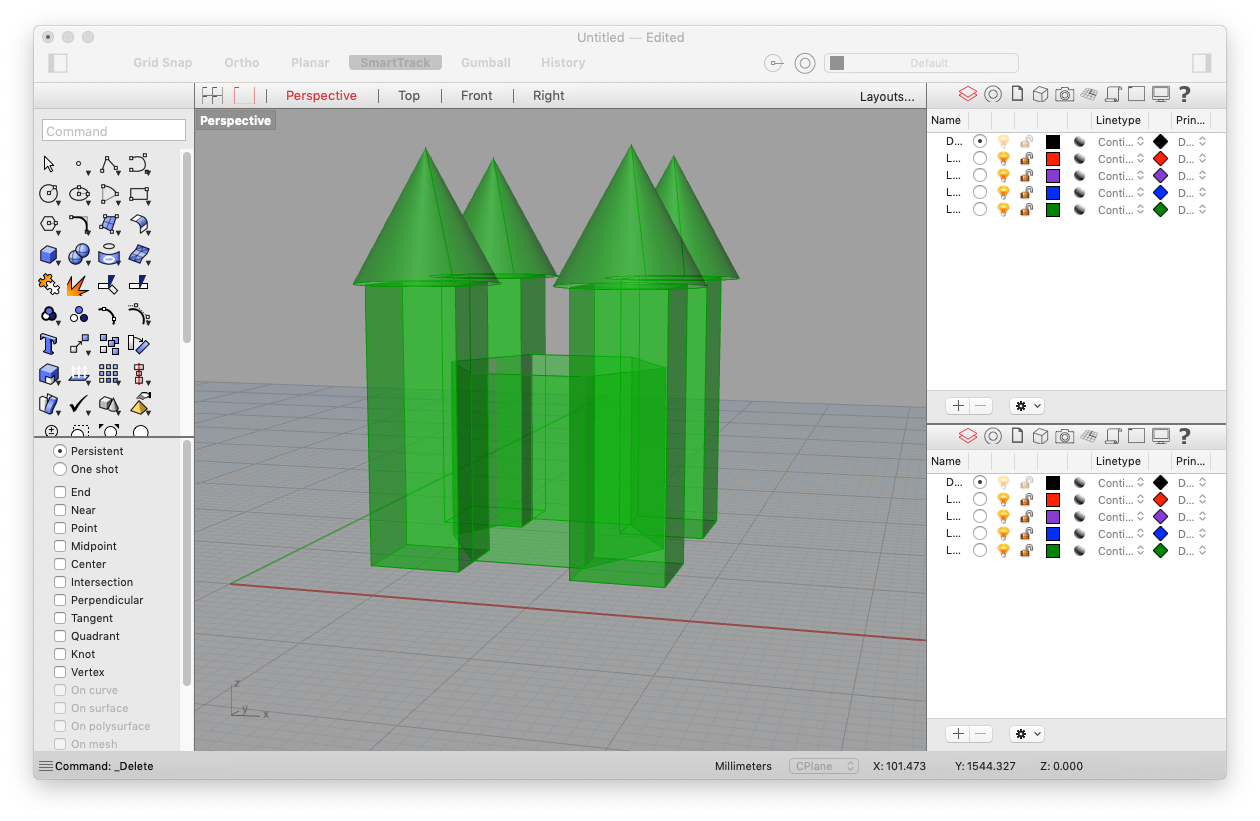
While I have shown the tutorial with a simple sphere, this trick is actually able to generate Minecraft previews of a variety of complex shapes, buildings.
Using asset files from the Skyscraper lecture, I tweaked the parameters to fit it into a 15x15x64 construction area (we could go bigger but my computer is too potato to load it) and moved the skyscraper into the construction area.
Using the same collision and cull functions, I was able to get this:
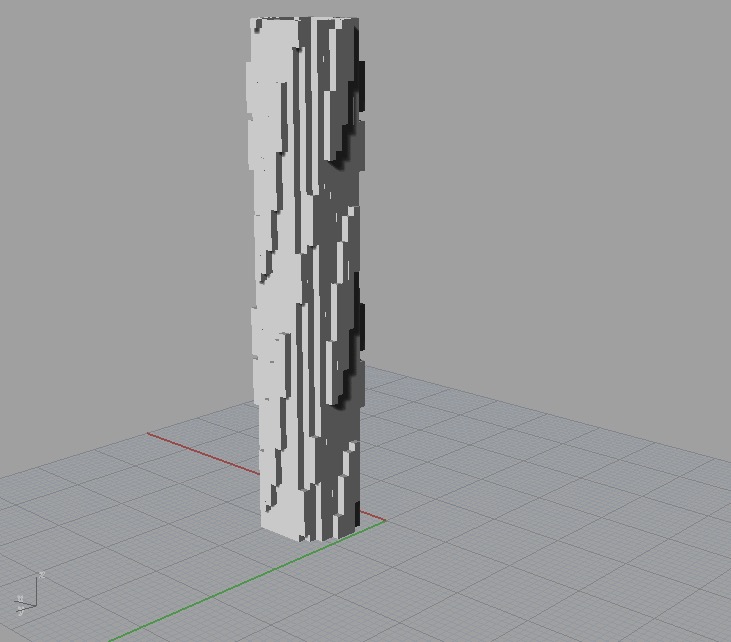
It is a Minecraft render of the twisting Skyscraper that was created during the lesson. All by just shifting the skyscraper asset into the foundational script we made.
In case you really want to see the full code of the twisting skyscraper Minecraft visualisation, it is below:
Complex Objects and Multiple Culls
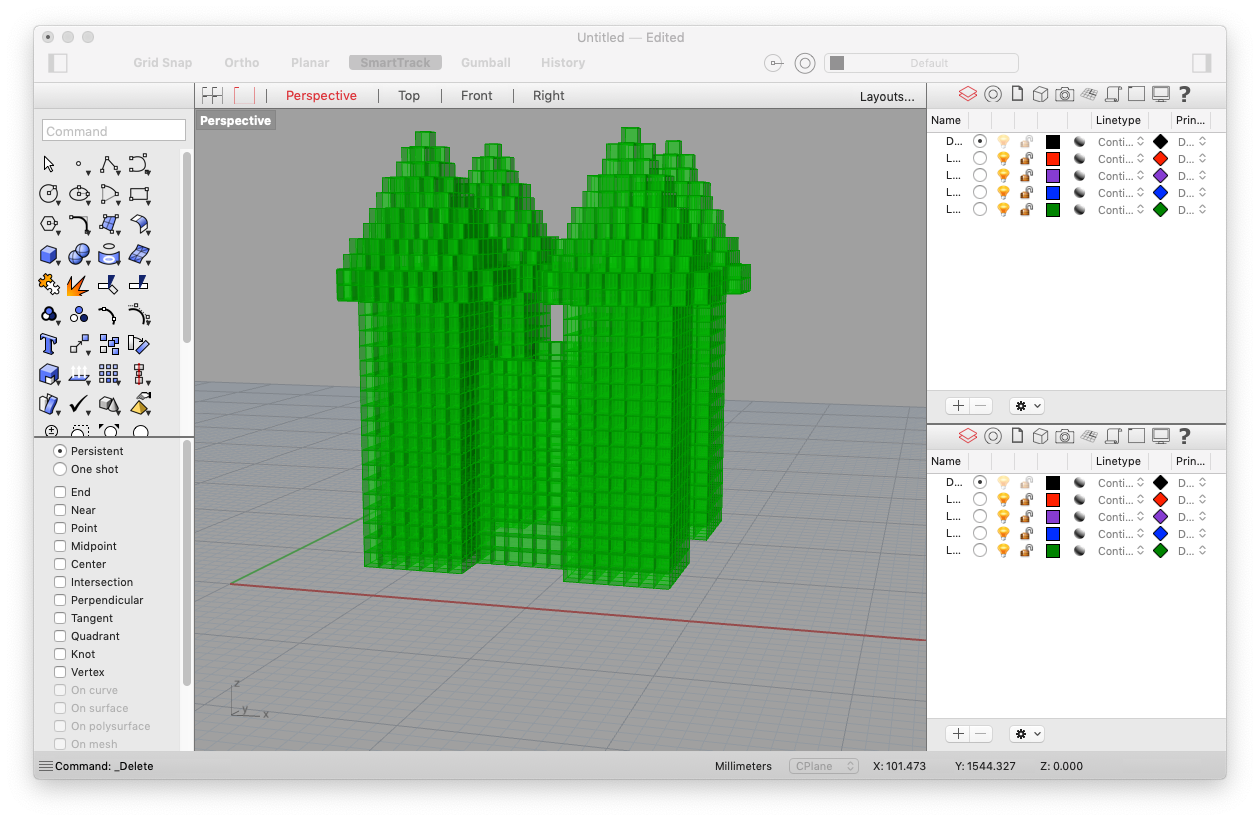
Sometimes you want to get creative, and you might have a castle compound made with different breps and surfaces. Although it is encouraged to create your buildings with as little objects as possible, you can still turn your multi-object building into blocks.
Here’s how you do it:
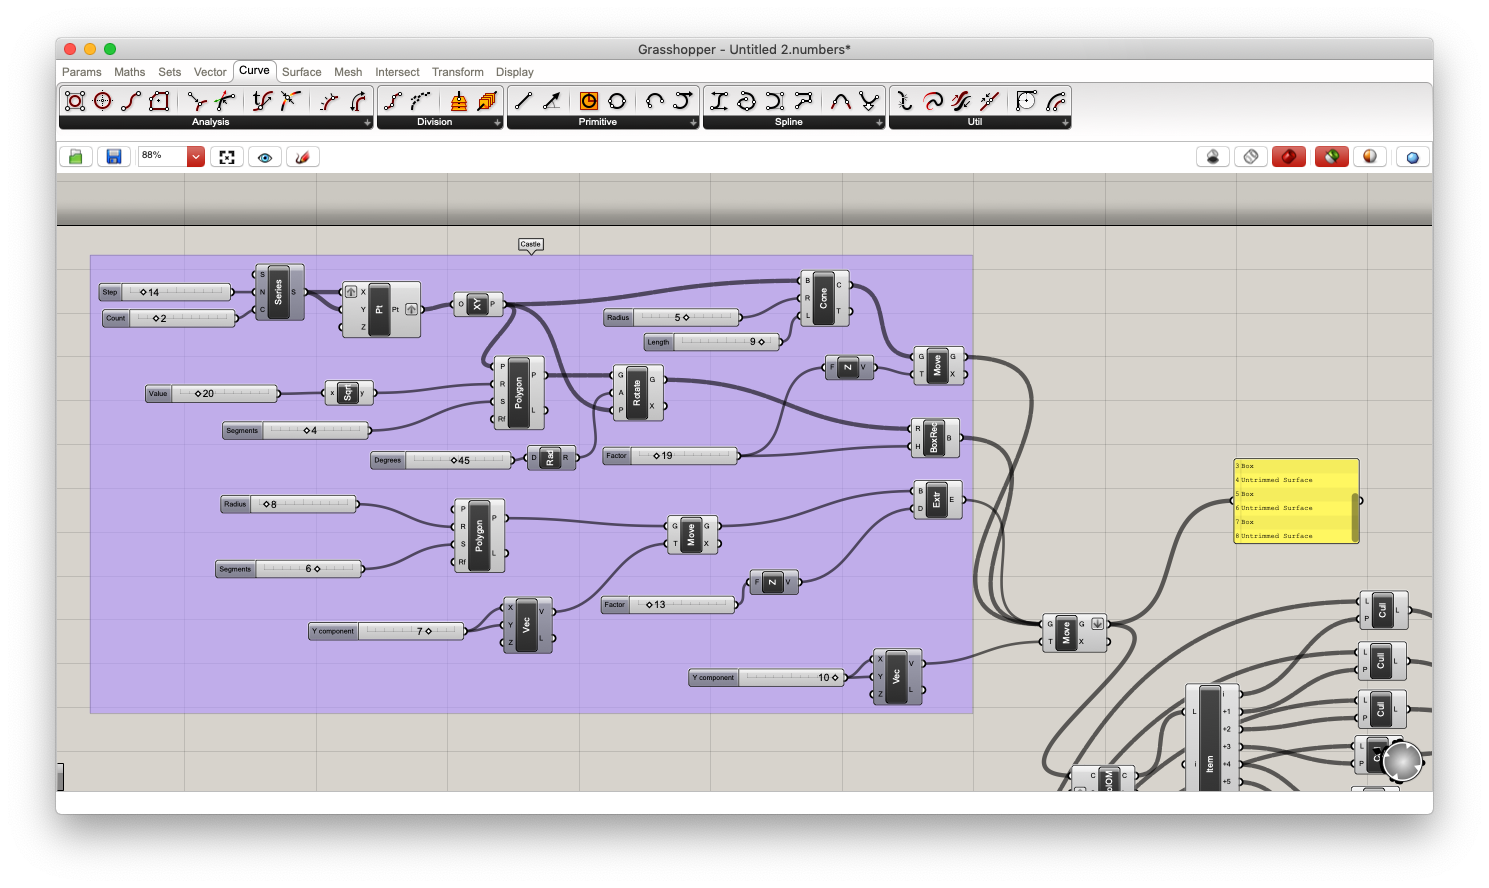
Here I have quickly created a castle to illustrate. As you can see, the castle is made up of 9 objects. 4 Cones, 4 Cuboids, and a Hexagon Extrusion.
If you were to just put the objects into Collider and pass it through the list, as shown above, you would find that the Construction Area and Basic Box functions only generate one of the objects. This can be a problem. In this case, you will have to invoke multiple culls.

All you have to do is to split the list up into its multiple components. If you have 9 objects, pass the 9 different components through the Cull Pattern and then merge them back again. This way you will be able to get the castle you wanted as seen below:
Of course, as mentioned before, the larger the Construction Area, the more detailed your models can go, however, do take note of the rendering requirements and understand that it can take a longer time to render.
An advice I could give is to build up the Construction Area, build up the Basic Box, build up the Collision, List, and Cull functions, before attaching your model to the Collision function. This way the longest process will be done in one shot and you can go have your coffee while you wait.
Curves With Isolines
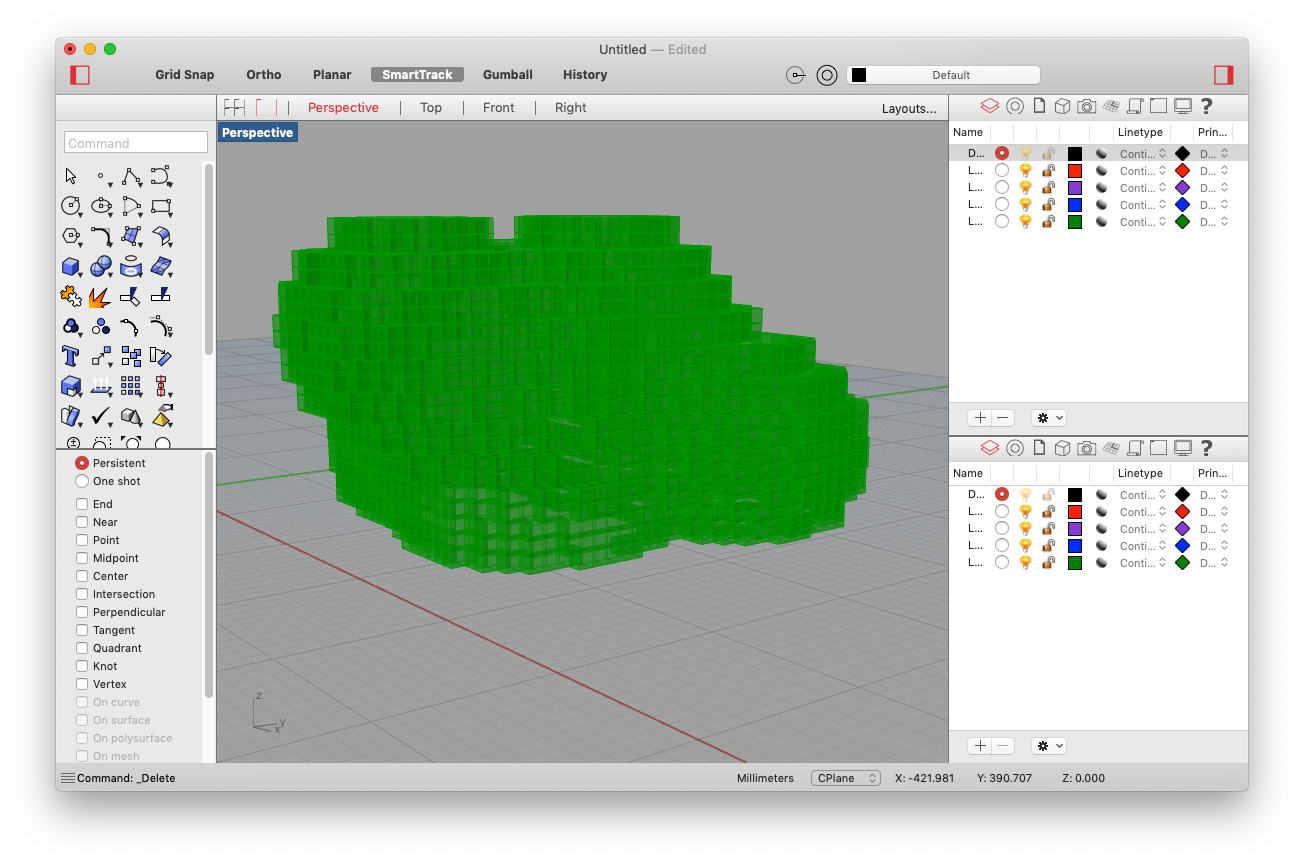
Another fun thing that can be tried out is Metaballs with the Construction Area and Basic Box functions. As visualising curves is one of the hardest parts of building in Minecraft (everything is too blocky), using Metaballs can help build up your curves.
Here is an illustration whereby some isolines are created by metaballs:
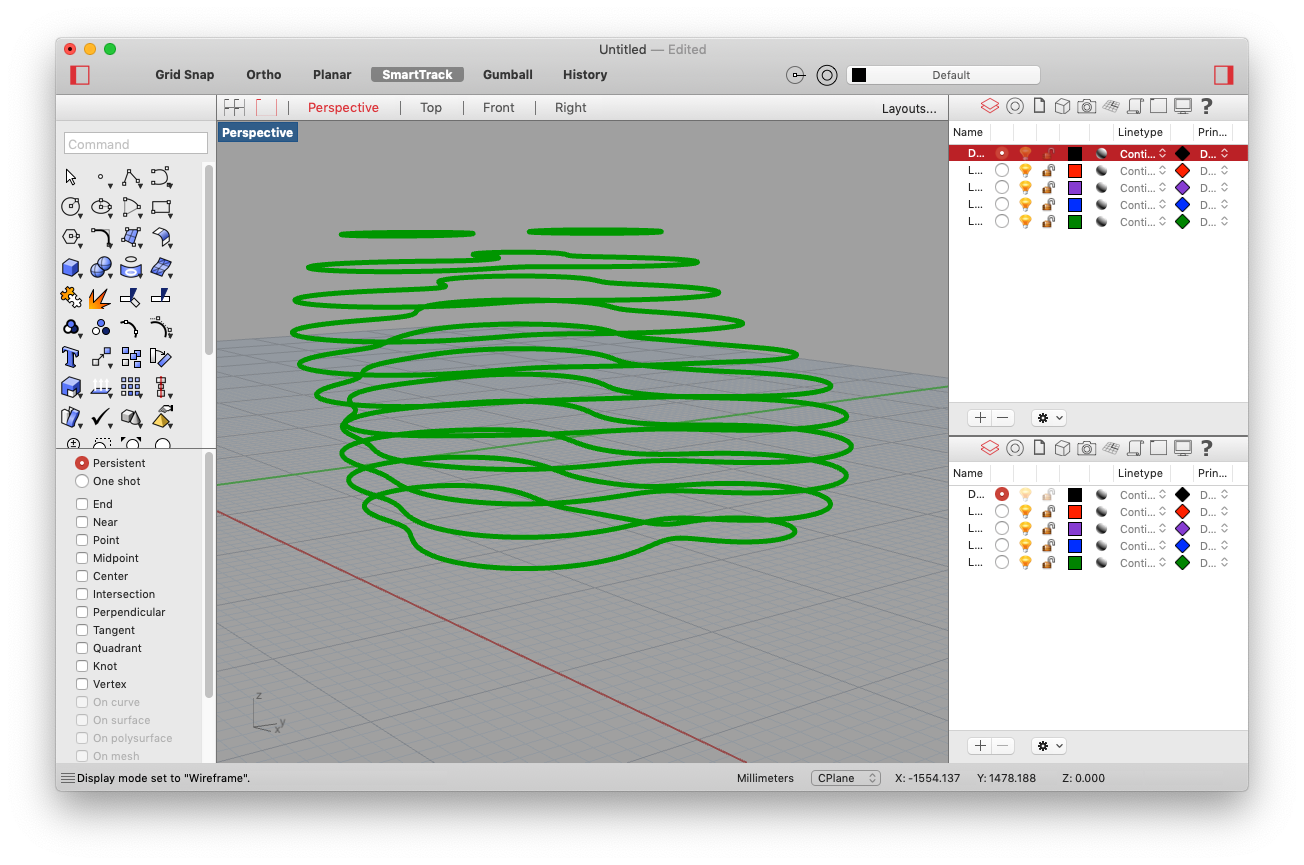
By putting them into the same functions and using the multiple culls, as shown above, you can get beautifully curved Box designs like:
Closing Off
Of course, now comes the hard part of actually building the structure in Minecraft. The good thing is that at least you have the building plans now.
While there are limitations to this visualisation method, for example, the rendering power required. The flexibility of Rhino and Grasshopper allows you to quickly and swiftly visualise any construction you have in mind for you to build it on Minecraft.
I hope this tutorial and the versatility of the functions help your future Minecraft pursuits.

Here are the files created for this tutorial:
Minecraft Tower (Code Files)
Minecraft Castle (Grasshopper file only)
Mincraft Metaballs (Grasshopper file only)
No additional plugin required, thanks Rhino for free evaluation copy.